How to clean up control arms, hubs etc.

Discussion and technical advice the SW20 MR2. 3S-GTE, 3S-GE, 3S-FE etc
Anything and everything to do with maintenance, modifications and electrical is in here for the Mk2.

Moderators: IMOC Moderators, IMOC Committee Members

Post Reply
CalMac
Posts: 1747
Joined: Mon Jan 14, 2013 7:08 pm
Location: Northampton

How to clean up control arms, hubs etc.

Post by CalMac »

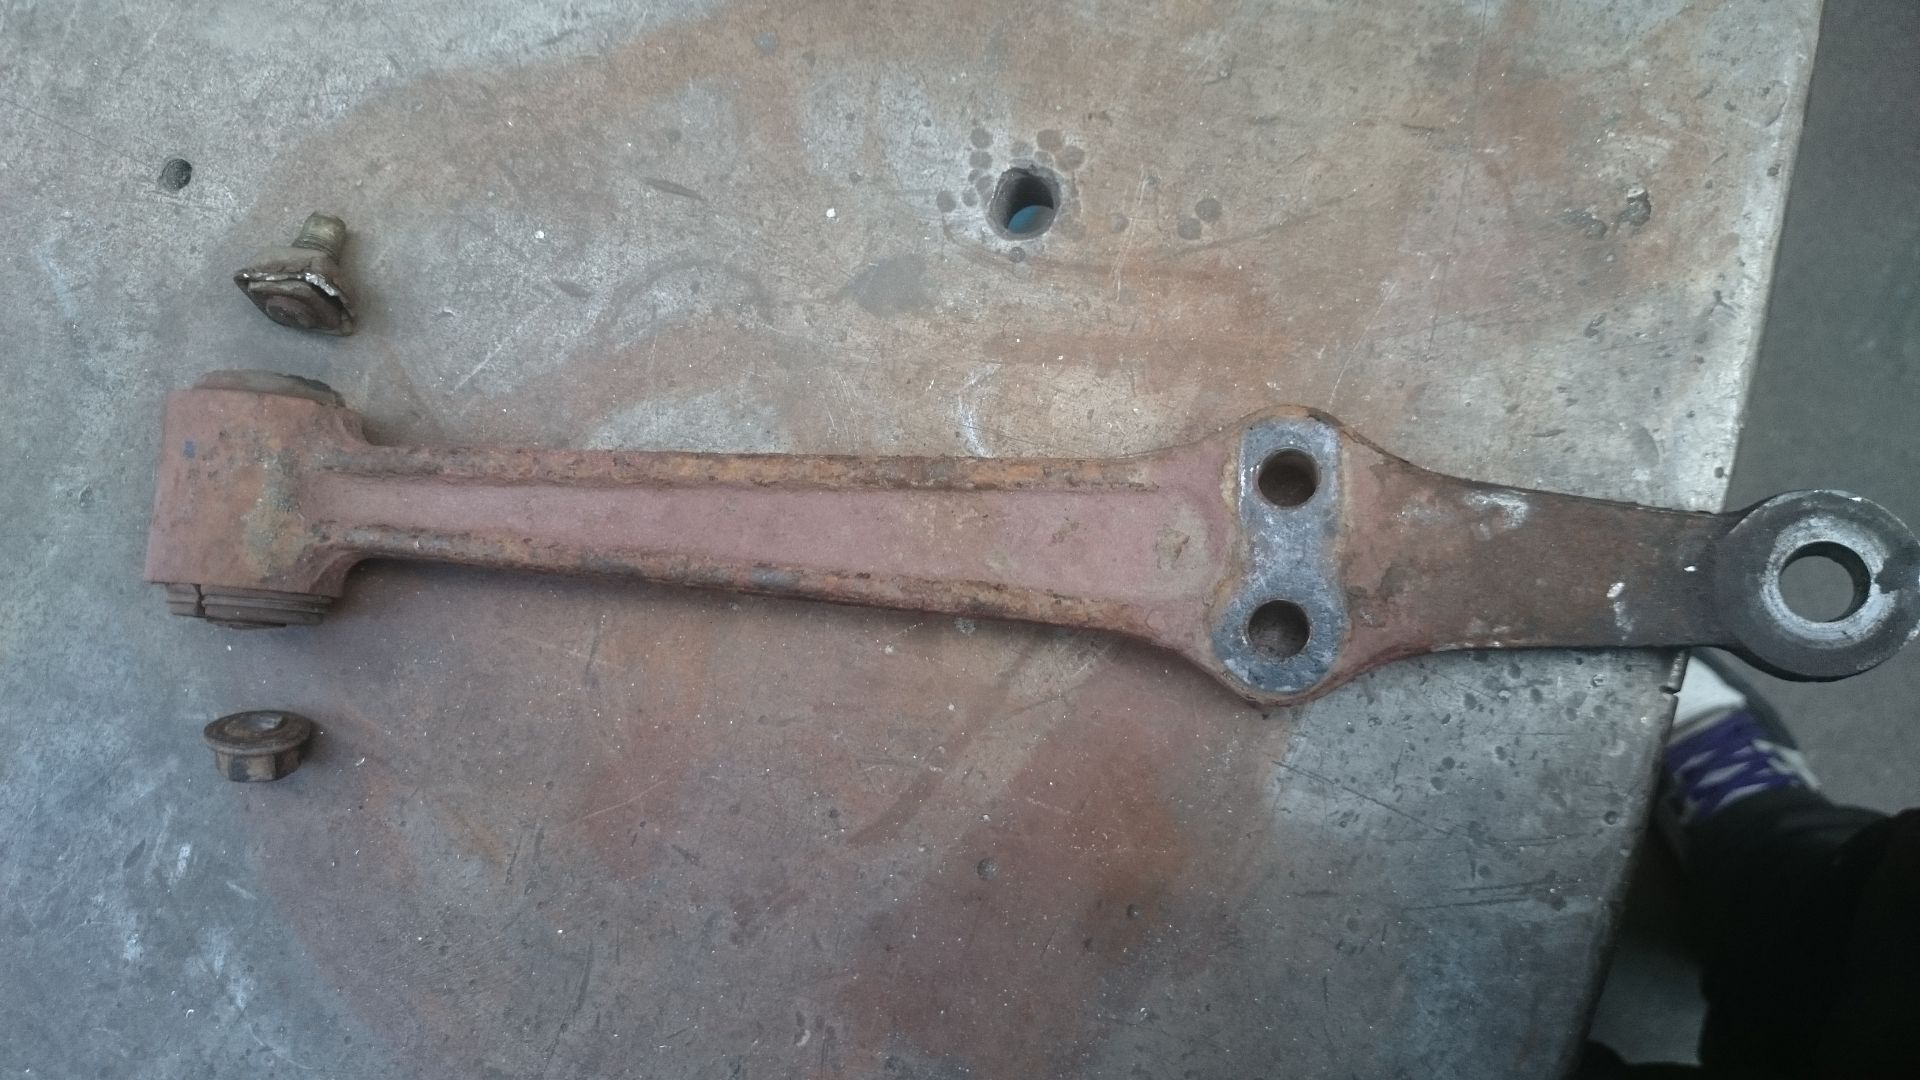
I'm wanting to overhaul all of the rusty control arms, hubs, tensions rods etc. on my project MR2 this weekend. Is it as simple as removing them, washing and degreasing then getting busy with a wire brush?

Then following with something like POR15 (several layer system iirc) and replace bushes?

I think it's probably worth just replacing the steering tie rods and tie rod ends because they look like the threads will strip if they're adjusted now lol

Also I noticed while under the car yesterday that the OS tension rod is threaded about 20mm differently to the NS rod - is this likely to be a mix up of PAS/non-PAS hubs as I've read they're different sizes?

Finally does anybody know is it possible to still buy new control arms, tension rods and trailing arms etc. from Toyota? I couldn't find any part numbers, however it appears there are a few aftermarket performance tension rods available from RHDJapan etc. I'm just not sure how to tell if something is 'too rusty' - obviously OEM arms will cost a fortune though lol
C35Rob
Posts: 2108
Joined: Wed Dec 04, 2013 1:14 am
Location: Gateshead

Re: How to clean up control arms, hubs etc.

Post by C35Rob »

Save yourself the hassle and get them blasted and powdercoated, it's durable, cheap, looks much better than brushed on chassis paint and it'll outlast the car.

You'll get a whole set of arms done in a solid RAL colour for ~£50 which is pennies considering the endless hours you'd spend doing it yourself!

The hubs are a bit more difficult, if you want to do them without replacing the bearings (they would have to come out to powder coat) then they would have to be cleaned up by hand then brushed or wet sprayed.. Obviously if you're happy to pay for new bearings (£50 a corner-ish?) then just get them powdercoated too, then have new bearings pressed in.

There's pics of my 'before and after' arms on my Instagram (@c35rob) if you're interested, and pics of my hubs in my build thread somewhere.
EX MR2 owner, currently on a '00 Honda CBR600 Follow me on Instagram @c35rob
CalMac
Posts: 1747
Joined: Mon Jan 14, 2013 7:08 pm
Location: Northampton

Re: How to clean up control arms, hubs etc.

Post by CalMac »

Thought I'd already followed you tbh! #-o

I suppose I could get the lot powder coated.. I'd better put the car somewhere out of the way first though as it'll take a week or so, maybe longer. They've had two sets of my wheels since before Christmas :lol:

Think I'll just do the hubs and arches, underbody etc. by hand then. I've bought some spray 'tetraschutz' underseal but tempted to go buy some brush on - looks a lot easier and cuts out a lot of masking.
C35Rob
Posts: 2108
Joined: Wed Dec 04, 2013 1:14 am
Location: Gateshead

Re: How to clean up control arms, hubs etc.

Post by C35Rob »

I just got some spare arms, put them in to be coated then swapped them over and sold my original arms to someone on here who was planning to do the same thing..

My powdercoaters are pretty pricey (they are very good though) but I've got a good relationship with them and can usually get things back in a day or two, if I'm not desperate I just drop them off and tell them to fit them in around real jobs and call me whenever they're done - the longest I've ever waited was about 10 days
EX MR2 owner, currently on a '00 Honda CBR600 Follow me on Instagram @c35rob
kennym
Posts: 378
Joined: Sun Aug 22, 2010 11:25 pm
Location: Middlesbrough

Re: How to clean up control arms, hubs etc.

Post by kennym »

As an alternative you can bast them and use an enamel I did this & honestly can tell the finish from powder I brushed a light coat on to really work the paint in then sprayed wet on wet it's a great finish with little less build up than powder my cars off the road & it took me weeks....... Err on second thoughts send them to powder lol
CalMac
Posts: 1747
Joined: Mon Jan 14, 2013 7:08 pm
Location: Northampton

Re: How to clean up control arms, hubs etc.

Post by CalMac »

Well that was hard work :shock: just got home from the workshop and only managed to do the front arches and underside (any bits I can reach without dismantling bodywork).

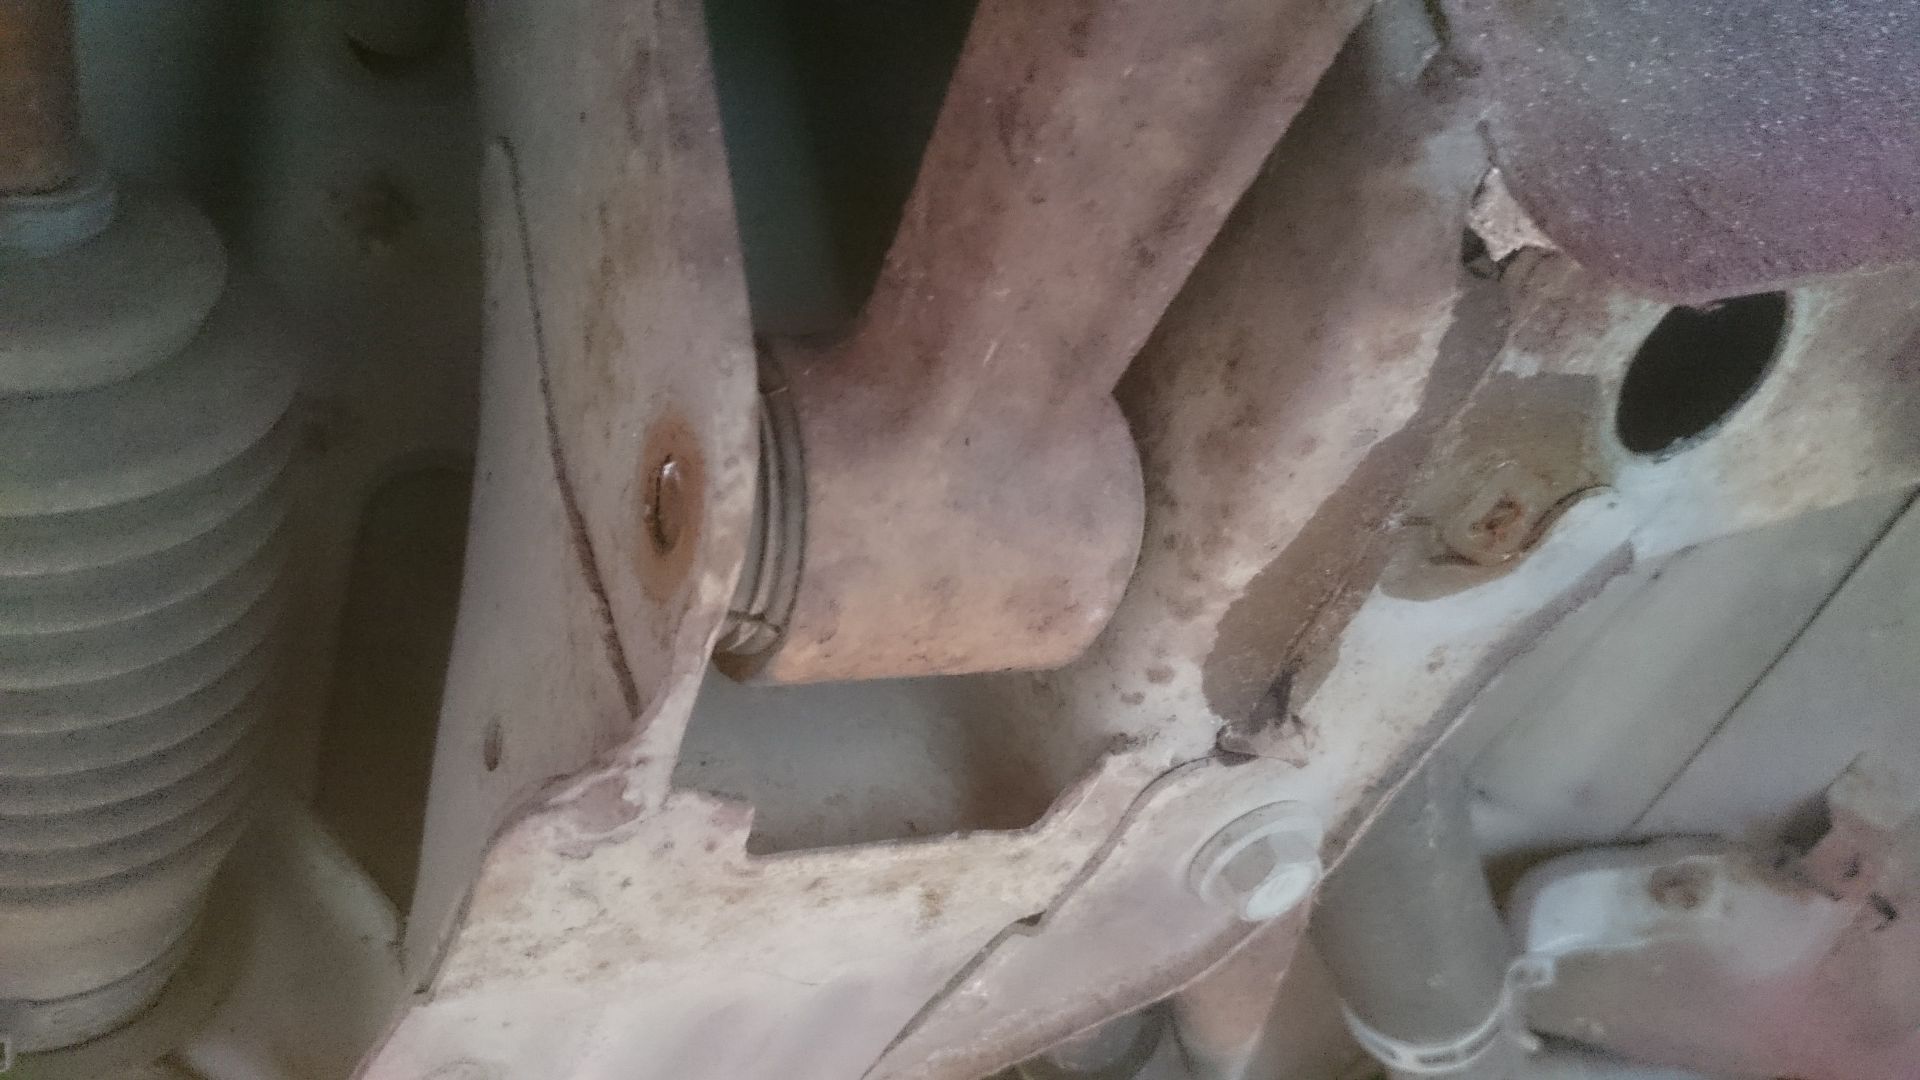
Had some fun with the bolt for the lower control arm - the head sheared off leaving the bolt still threaded into the captive nut on the chassis which you can't access.. Ended up having to smack/drill/angle grind through the bolt and knock the captive nut out through the drainage hole. Fook knows how I'm going to refit the lower arm now :roll: Probably try and feed a bolt and washer through the drainage hole going the opposite way and then fix it with a nyloc and chunky washer :-k Either that or chop the part off the car that the ARB bush bracket bolts into, weld a new captive nut in and then weld the section back in - but chopping and welding a section of the chassis doesn't sound appealing (at least right now :lol:)

Image

Image


Aside from that it's gone quite well, just a dead arm from so much wire brushing and dab-dab-dabbing of the underseal brush :) Tomorrow; the rear.


Before
Image

After
Image
C35Rob
Posts: 2108
Joined: Wed Dec 04, 2013 1:14 am
Location: Gateshead

Re: How to clean up control arms, hubs etc.

Post by C35Rob »

Snapped bolt isn't ideal!

I would weld a new captive nut to a plate then weld the plate in from the front, although you could probably slide a nyloc in then you risk it moving under load and knocking your alignment out
EX MR2 owner, currently on a '00 Honda CBR600 Follow me on Instagram @c35rob
CalMac
Posts: 1747
Joined: Mon Jan 14, 2013 7:08 pm
Location: Northampton

Re: How to clean up control arms, hubs etc.

Post by CalMac »

Which face do you mean by the front Rob, the accessible side?

I'm thinking feed a bolt through the drainage hole (if a 100mm bolt will fit through there and into the mounting hole, fingers crossed), through the bushing, out the other side, torque a flanged nut on and then just tack it into place. Semi-permanent but I can always cut the welds off if I ever need to remove it.
C35Rob
Posts: 2108
Joined: Wed Dec 04, 2013 1:14 am
Location: Gateshead

Re: How to clean up control arms, hubs etc.

Post by C35Rob »

Yeah through the accessible side, square nut welded to a square of 2mm plate slightly larger than the hole where the captive nut was torn off, massage the face back with a hammer and a drift through the front hole so when the new plate is in place the face to face distance is correct (so the bush still fits in!) then weld it in, you should be able to fully weld at least 3 of the 4 sides, probably all 4 - permanent solution and you won't have to cut into the body.
EX MR2 owner, currently on a '00 Honda CBR600 Follow me on Instagram @c35rob
CalMac
Posts: 1747
Joined: Mon Jan 14, 2013 7:08 pm
Location: Northampton

Re: How to clean up control arms, hubs etc.

Post by CalMac »

Only problem is that I won't be able to turn the head of the bolt to tighten it, as it's pretty much inaccessible if I feed it through backwards. Could work if I manage to just hold the head still with a socket wrench through the drain hole and do the nut/plate up tight on the accessible side then just tack them in place once torqued up. :-k

A steel riv-nut probably would've worked ok to replace the captive nut (not sure how much torque it'll take before spinning though) however it would mean drilling the bolt holes out to a larger diameter ](*,)
C35Rob
Posts: 2108
Joined: Wed Dec 04, 2013 1:14 am
Location: Gateshead

Re: How to clean up control arms, hubs etc.

Post by C35Rob »

This is what I mean (excuse the drawing!)

Image

New nut welded to small square of plate,

Feed a drift through the Oem bolt hole and beat back the mounting face by the thickness of your new plate

Weld plate in place (probably want to thread the bolt onto it to align it at this point.

Clean up welds and ensues face to face distance is the same as the other side
EX MR2 owner, currently on a '00 Honda CBR600 Follow me on Instagram @c35rob
CalMac
Posts: 1747
Joined: Mon Jan 14, 2013 7:08 pm
Location: Northampton

Re: How to clean up control arms, hubs etc.

Post by CalMac »

It could work but not sure if I'll be able to get access to beat back the mounting face so that the plate sits flush, I'll have a go in the morning. Also I'll have to drill the bolt hole out to about 17mm to fit the nut through from the outside, but that means I'll have to drill the other bolt hole out to get to it as there's no space and then the bolt will be really loose #-o At a guess the gap between the two faces for the bush to sit in is only about 50mm ](*,)
C35Rob
Posts: 2108
Joined: Wed Dec 04, 2013 1:14 am
Location: Gateshead

Re: How to clean up control arms, hubs etc.

Post by C35Rob »

CalMac wrote:It could work but not sure if I'll be able to get access to beat back the mounting face so that the plate sits flush, I'll have a go in the morning. Also I'll have to drill the bolt hole out to about 17mm to fit the nut through from the outside, but that means I'll have to drill the other bolt hole out to get to it as there's no space and then the bolt will be really loose #-o At a guess the gap between the two faces for the bush to sit in is only about 50mm ](*,)


yeah it's not ideal, if you've got a long carbide burr on a die grinder you'll be able to open the hole up without drilling out the oem bolt hole
EX MR2 owner, currently on a '00 Honda CBR600 Follow me on Instagram @c35rob
CalMac
Posts: 1747
Joined: Mon Jan 14, 2013 7:08 pm
Location: Northampton

Re: How to clean up control arms, hubs etc.

Post by CalMac »

Also never realised a drift pin existed until you just mentioned it (thought it was a typo of 'drill'!). Can a drift be used to open a hole up as well as align?

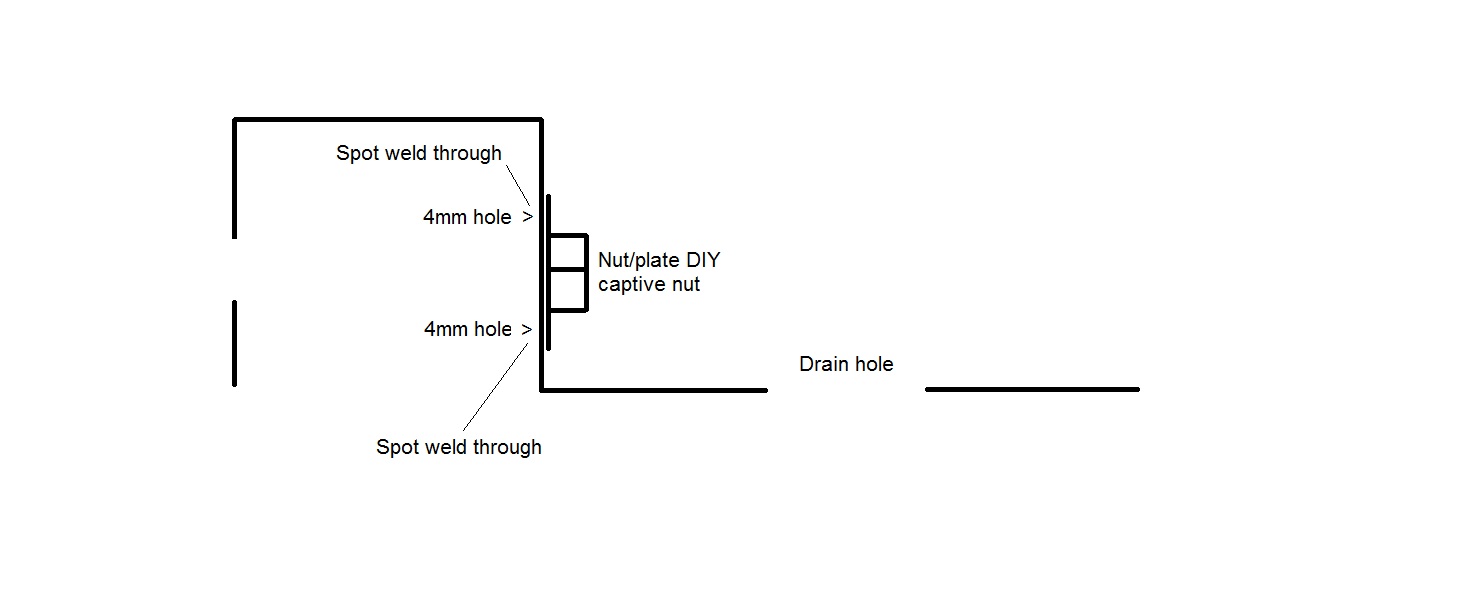
This might work:

Image

Image


Using a long 4mm drill bit going through the first (accessible) bolt hole I could drill at a slight angle on four sides of the second (captive nut) hole, open them up to 6mm and then spot weld through onto my new captive nut backing plate having bolted it up to hold everything in place. Maybe. It'll be tricky though.

I may have completely misunderstood your idea though, sorry if I have. Can be a bit dense like that sometimes :lol: And cheers for taking the time to help me out :thumleft:
C35Rob
Posts: 2108
Joined: Wed Dec 04, 2013 1:14 am
Location: Gateshead

Re: How to clean up control arms, hubs etc.

Post by C35Rob »

CalMac wrote:Also never realised a drift pin existed until you just mentioned it (thought it was a typo of 'drill'!). Can a drift be used to open a hole up as well as align?

This might work:

Image Replaced With URL For Quote [url]http://i193.photobucket.com/albums/z53/mulac19/MR2%20problem_zpsyvhneoaf.png[/URL]

Image Replaced With URL For Quote [url]http://i193.photobucket.com/albums/z53/mulac19/MR2%20problem%202_zpspixxglm5.png[/URL]


Using a long 4mm drill bit going through the first (accessible) bolt hole I could drill at a slight angle on four sides of the second (captive nut) hole, open them up to 6mm and then spot weld through onto my new captive nut backing plate having bolted it up to hold everything in place. Maybe. It'll be tricky though.

I may have completely misunderstood your idea though, sorry if I have. Can be a bit dense like that sometimes :lol: And cheers for taking the time to help me out :thumleft:


that's a perfect solution if you can get the plate in through the drain hole (I wouldn't be scared to enlarge it tbh...) just make sure your plug welds are nice and hot :thumleft:
EX MR2 owner, currently on a '00 Honda CBR600 Follow me on Instagram @c35rob
Post Reply

Return to “MR2 MK2 1990 - 1999 NA & Turbo”