MR2 SW20 RHD Power Steering Quick Steer Pinion.
Moderators: IMOC Moderators, IMOC Committee Members
Re: MR2 SW20 RHD Power Steering Quick Steer Pinion.
dwyer125 from Australia has joined the group buy. Thank you dwyer125, deposit received.
-
ziggyzigatron
- Posts: 29
- Joined: Sat Apr 02, 2011 7:58 am
- Location: cambridge
Re: MR2 SW20 RHD Power Steering Quick Steer Pinion.
just to clarify before i put down deposit tommorrow.
This will fit a 93 rev 2 power steering right hand drive turbo
£120 deposit ?
This will fit a 93 rev 2 power steering right hand drive turbo
Re: MR2 SW20 RHD Power Steering Quick Steer Pinion.
ziggyzigatron wrote:just to clarify before i put down deposit tommorrow.
This will fit a 93 rev 2 power steering right hand drive turbo
Yes this will fit the above spec, in fact you have the same revision and spec MR2 as myself.
A deposit of
Please let me know if you want parts only or assembled pinion which will cost you slightly more.
-
ziggyzigatron
- Posts: 29
- Joined: Sat Apr 02, 2011 7:58 am
- Location: cambridge
Re: MR2 SW20 RHD Power Steering Quick Steer Pinion.
assembled please
i have just pay palled you£78 for deposit
If you can let me know the remaining balance and any further details you need from me that would be cool
Cheers
i have just pay palled you
If you can let me know the remaining balance
Cheers
Re: MR2 SW20 RHD Power Steering Quick Steer Pinion.
Thanks for joining in on the group buy ziggyzigatron.
The remaining balance is£155.00.
Shipping costs will be calculated at a later date.
The remaining balance is
Shipping costs will be calculated at a later date.
Re: MR2 SW20 RHD Power Steering Quick Steer Pinion.
5SGTE is the latest person to join the group buy. Deposit received, thank you.
Re: MR2 SW20 RHD Power Steering Quick Steer Pinion.
You should have another deposit now...
I'll have the parts only please and will assemble it myself.

Thanks,
Wingers
I'll have the parts only please and will assemble it myself.
Thanks,
Wingers
Re: MR2 SW20 RHD Power Steering Quick Steer Pinion.
Wingers wrote:You should have another deposit now.
I'll have the parts only please and will assemble it myself.
Thanks,
Wingers
Deposit received, thanks.
Re: MR2 SW20 RHD Power Steering Quick Steer Pinion.
OK I have been thinking about when to end the group buy and start production. It's been great to see that we have reached 12 customers so far. That little rush in December has helped.
I will be in contact with the manufacturer in the New Year to arrange a final date for production. Providing they can fit us in, I am going to wait until 31 of January 2012 to end the group buy. The first customer has been waiting five months now, so it's only fair to end it soon.
If we get lucky and 20 or more have paid a deposit by that time, all of you will get the benefit of the lower cost.
GROUP BUY ENDS 31/01/2012 !
I will be in contact with the manufacturer in the New Year to arrange a final date for production.
If we get lucky and 20 or more have paid a deposit by that time, all of you will get the benefit of the lower cost.
Re: MR2 SW20 RHD Power Steering Quick Steer Pinion.
Haha and there was me thinking they'd be produced before i came back from summer holiday. Glad the end is in sight, cant wait to fit it!
-
ziggyzigatron
- Posts: 29
- Joined: Sat Apr 02, 2011 7:58 am
- Location: cambridge
Pinion removal
For some reason i cant get the link to mr2oc.com to work to show me how to remove the pinion. I am a member but for some reason i dont have privilages to see this. Can anyone copy the contents or some thing for me.
Many thanks
Many thanks
Re: MR2 SW20 RHD Power Steering Quick Steer Pinion.
Leave it with me. I'll get it done soon.
Re: MR2 SW20 RHD Power Steering Quick Steer Pinion.
They following information was written by Judgeman a member of mr2oc.com.
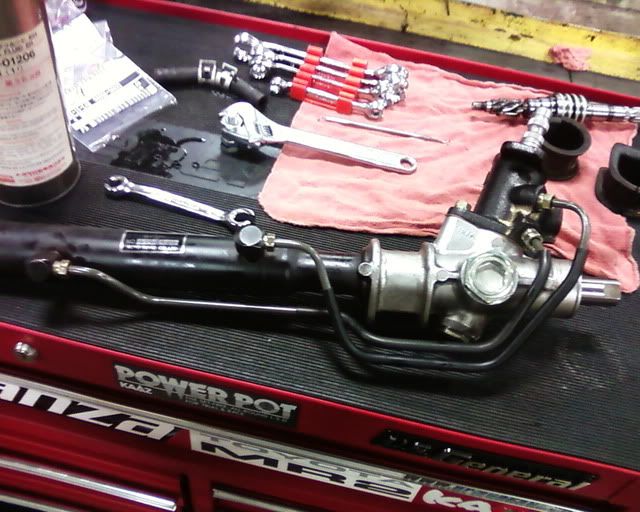
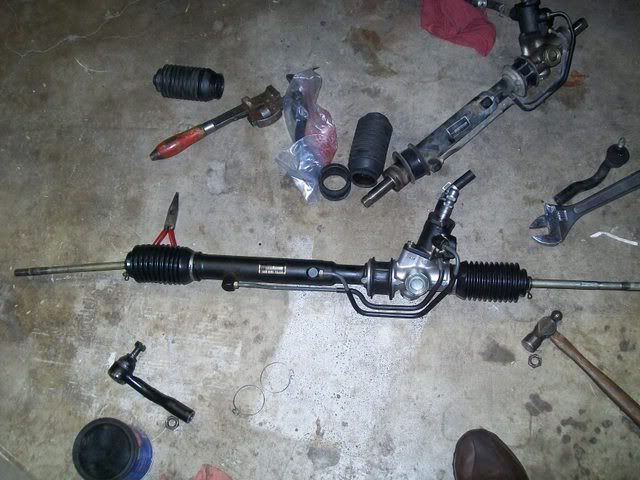
i didnt get any pictures wile i was tering it apart but this is what i got.
the tare down is pritty strait forward but you will need som pritty big wrenches/sockits and dont forget your super special service tool.
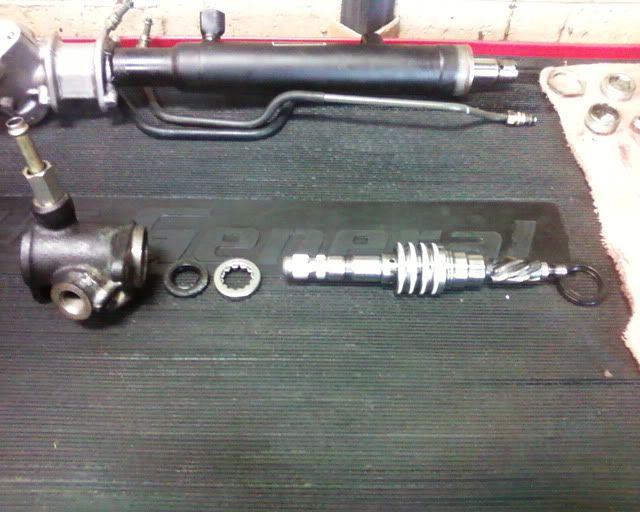
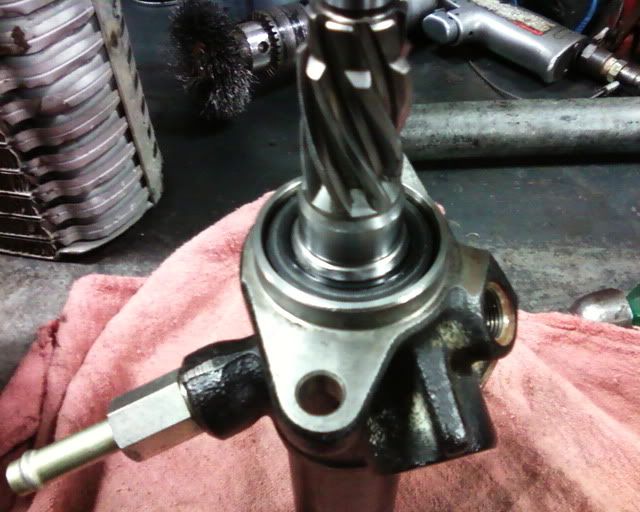
in order to replace the oil seal in the valve housing il have to remove the bearing too and i may have to get a new one but i havnt got that far yet.
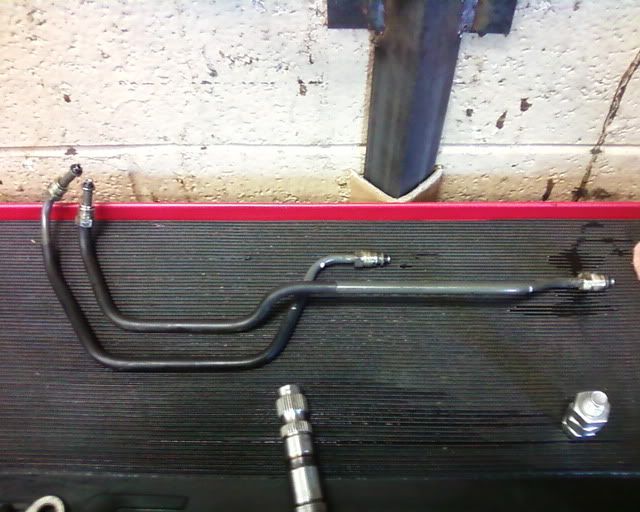
the hard lines have O-rings on the ends witch should be replaced.
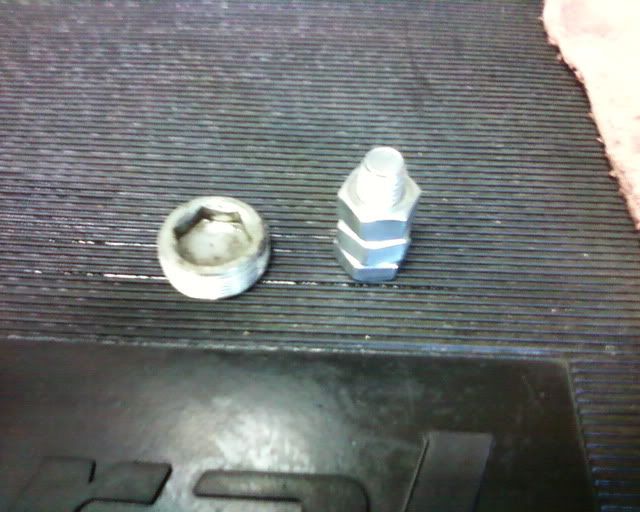
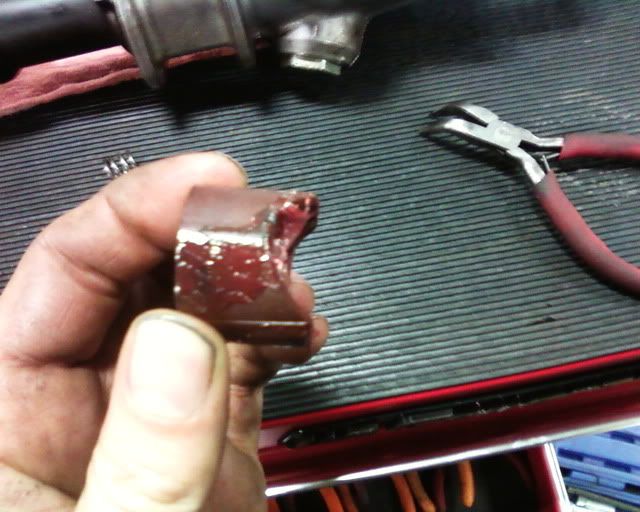
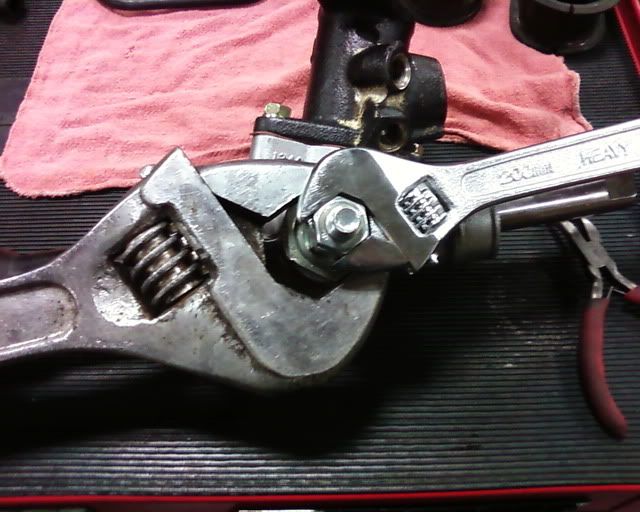
the special service tool AKA big bolt and 2 nuts is used to remove an allen bolt that would normaly require a 19mm(i think) allen wrench, i didnt have one that big.
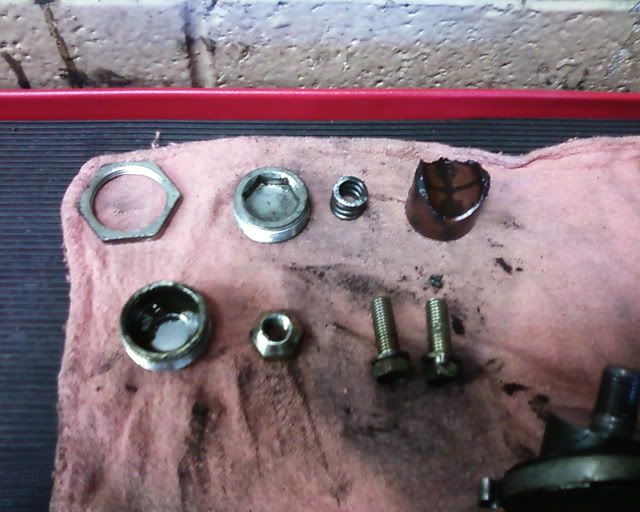
i was able to press out the seal without damaging the bearing so i just need to order the 2 new seals, gasket, the 4 O-rings for the hard lines and 2 claw washers for the inner tie rods.
i orderd my new seals and stuff today from Lithia Toyota.
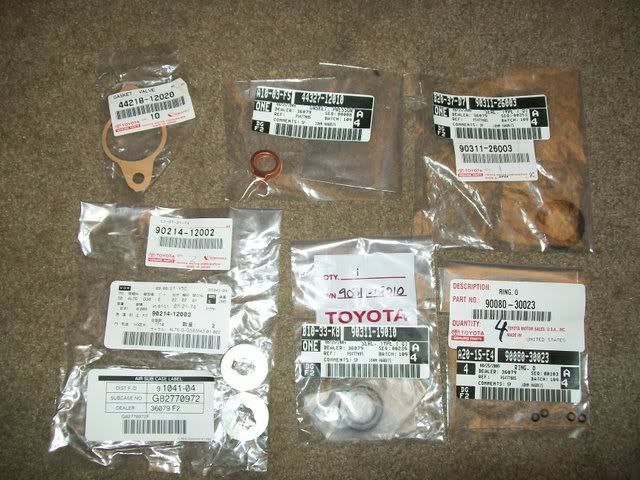
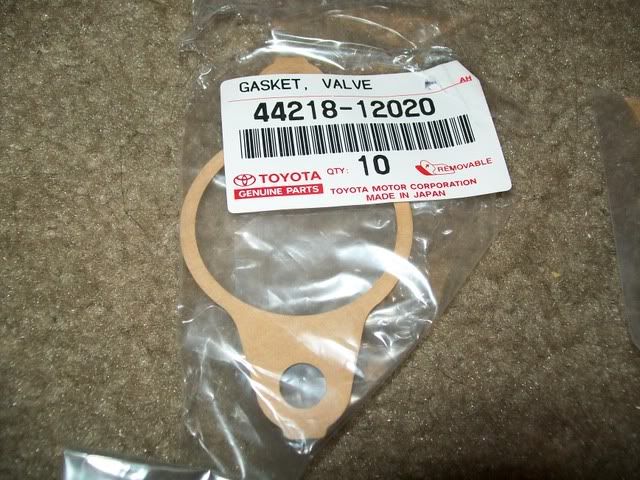
44218-12020 gasket, valve housing
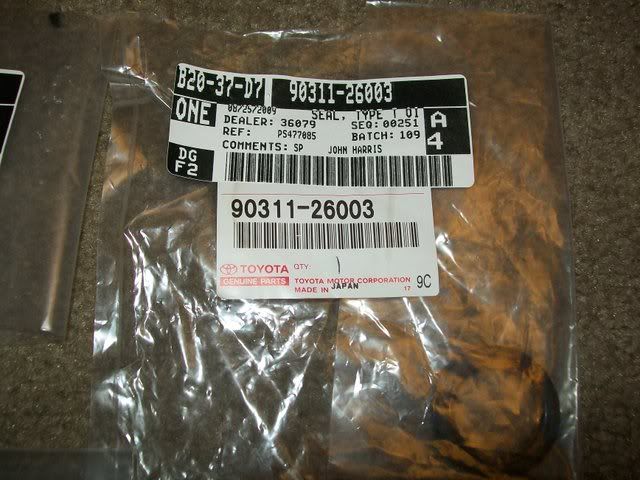
90311-26003 seal, oil
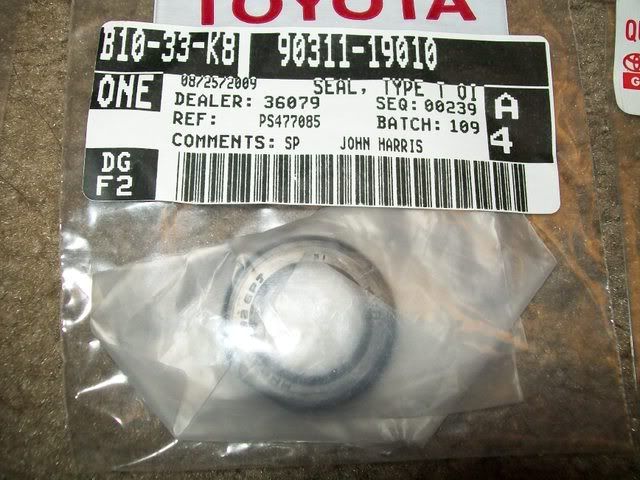
90311-19010 seal, oil
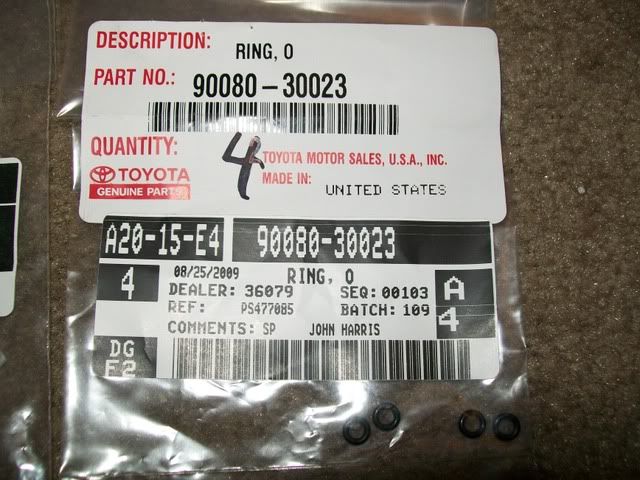
90301-03001 ring, O X4
90214-12002 washer, claw X2
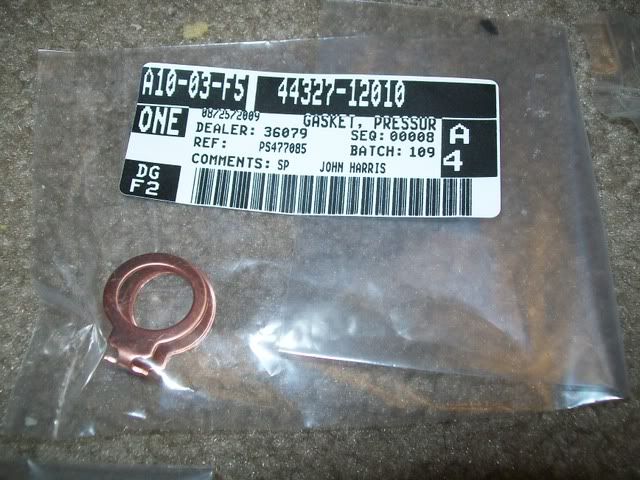
44327-12010 gasket, pressure port#1
the total came to$31.32
im also going to order new tie rod ends from twos r us, il be using the inner tie rods and boots that are in my 2 now becaus they are only about 2 years old.
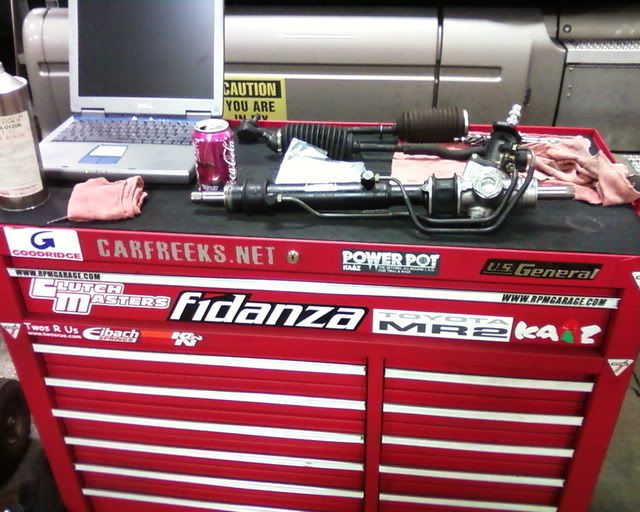
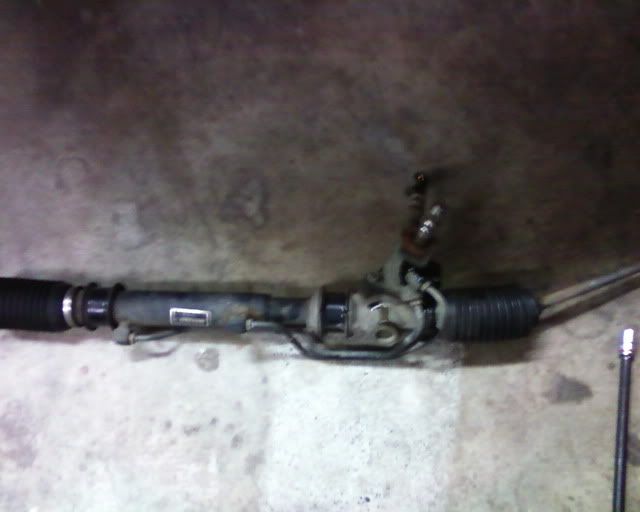
got my parts from Lithia Toyota today, im still waiting for the pinion gear though.

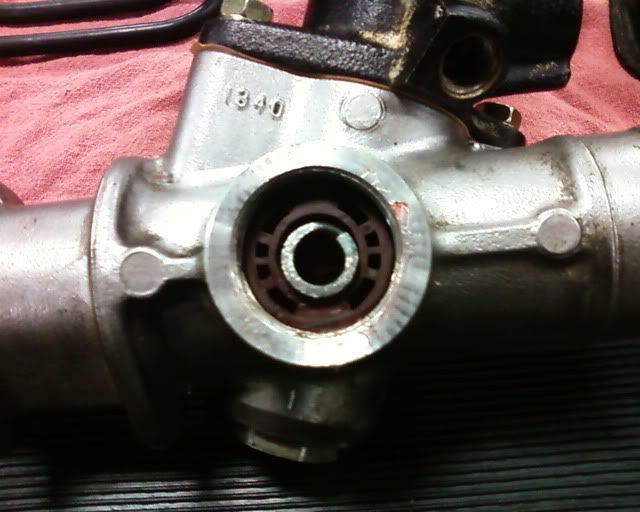
i picked up my new pinion gear from Seth on Sunday and put it in tonight.
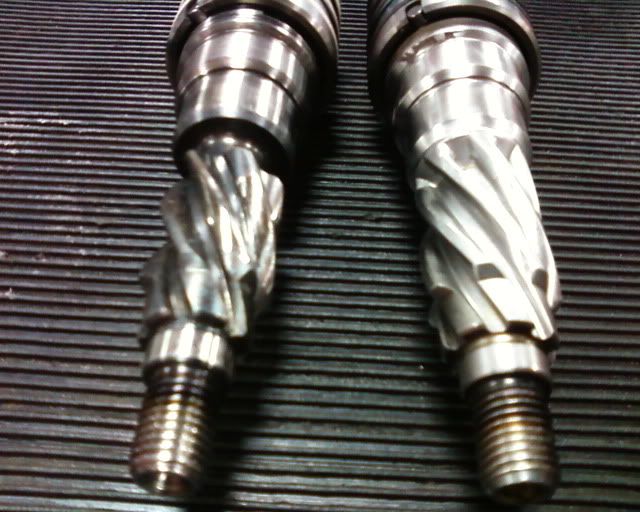
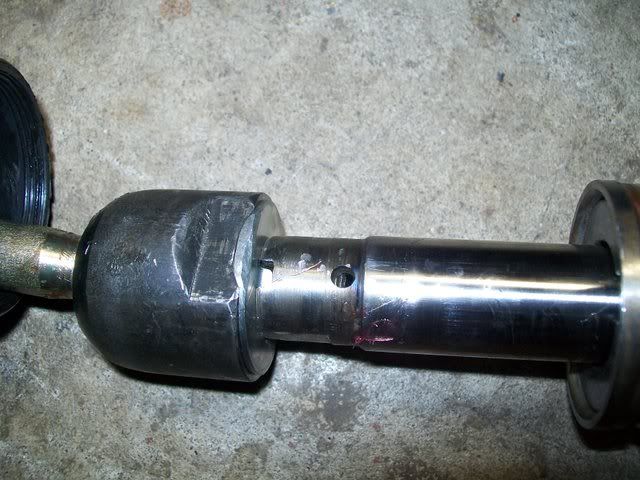
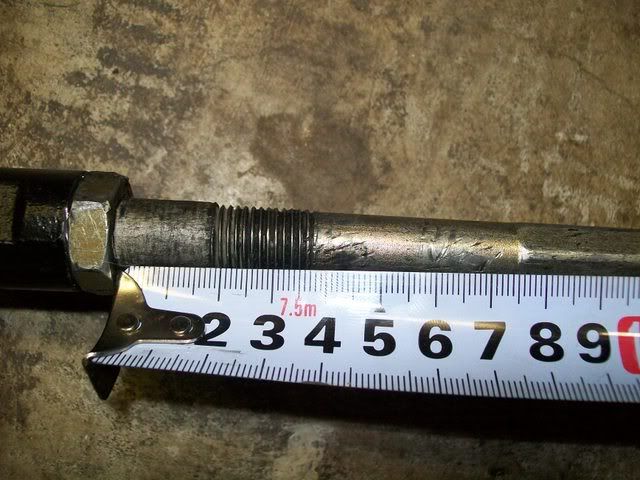
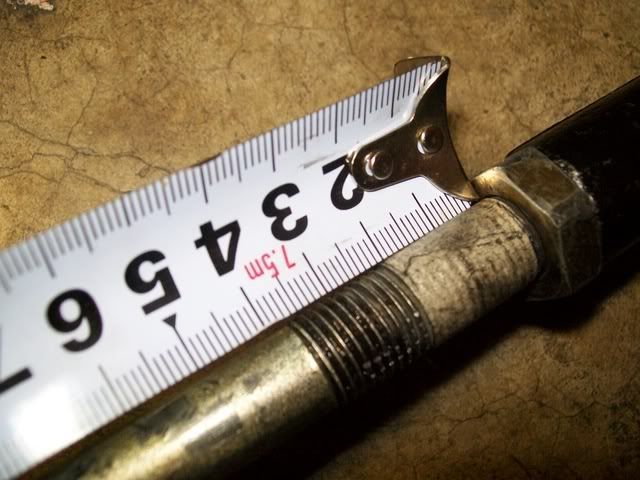
the diferance between the two is the old one on the left has 6 teath and the new one on the right has 7.
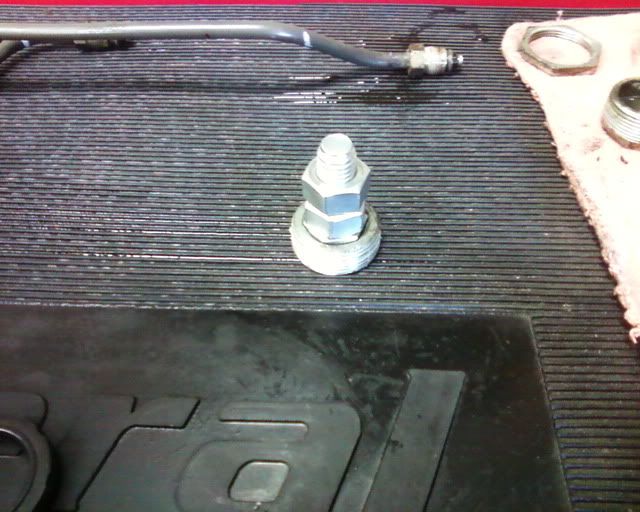
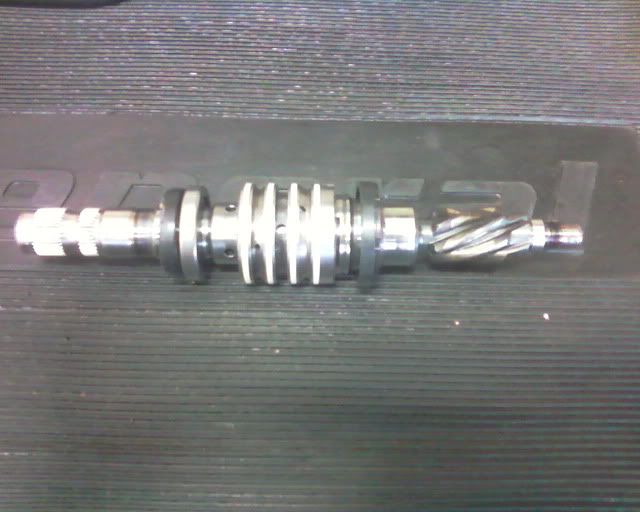
the install is very strait forword, i used a big deep sockit to press in the new seal then the old bearing.
the next step is to coat the teflon seals on the pinion gear with power steering fluid then it just pushes in with a little wigling.
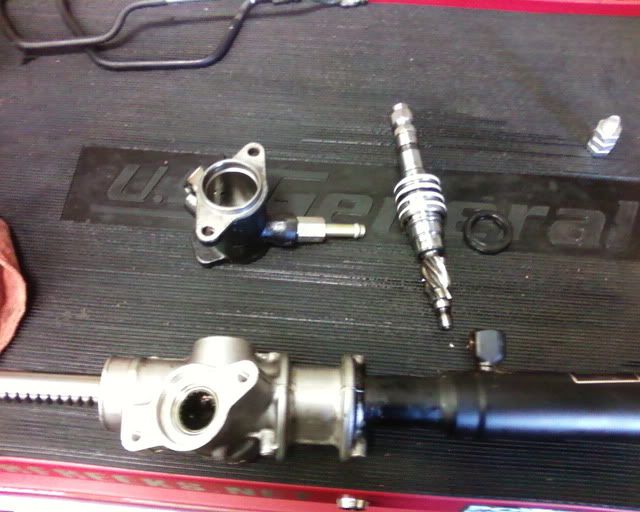
the next seal was a bit trickier, i had to use two larg sockits witch made it to big for the vice so i had to tap this one in with a hammer.
the seal in place.
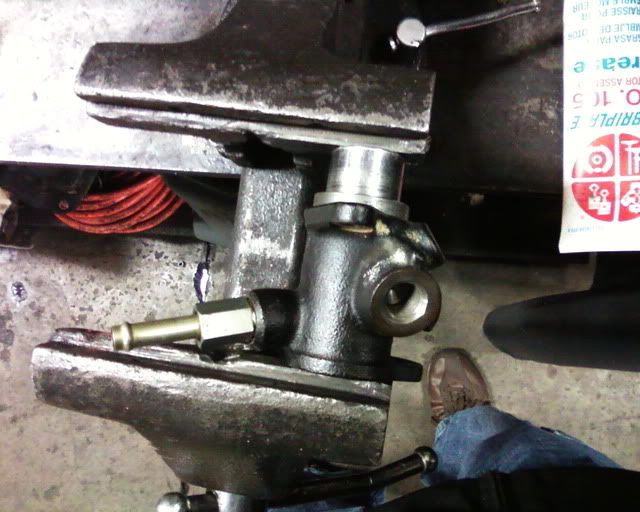
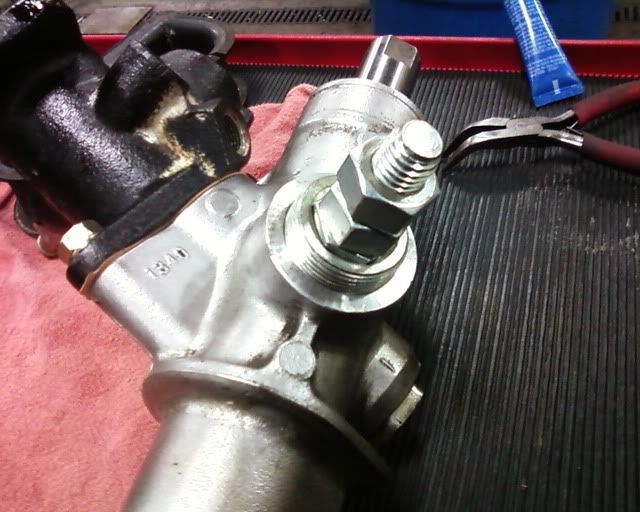
next is bolting the valve housing to the gear housing, theres nothing to it realing just dont pinch the gasket.
sence i reused the old lock nut i put som locktite on it for good mesure

i used two blocks of wood to hold it in a vice wile i torqued the lock nut
put som locktite on the cap threats then torque it and stake it.
next is the rack guide, i greased it up befor puting it in.
put the guide spring in the guide.
but som locktite on the threads and use your super special service tool to torque the guide, then back it off 12 degrees and check the preload.
if all is well put some locktite on the lock nut and but it on.
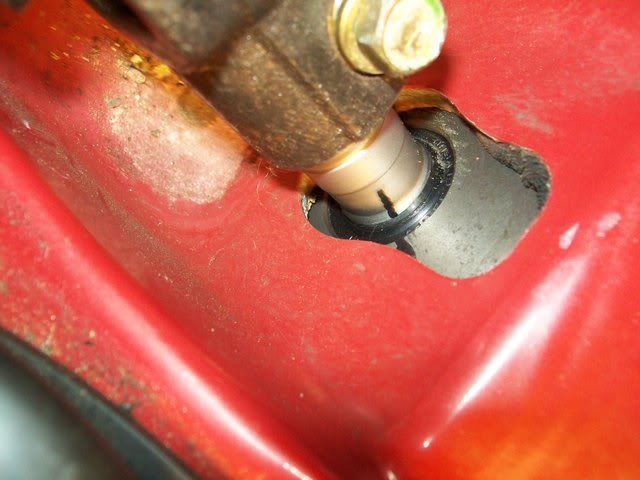
put some powre steering fluid on your new O rings put the O rings on the hard lines and put the hard lines on the rack. they only go on one way.
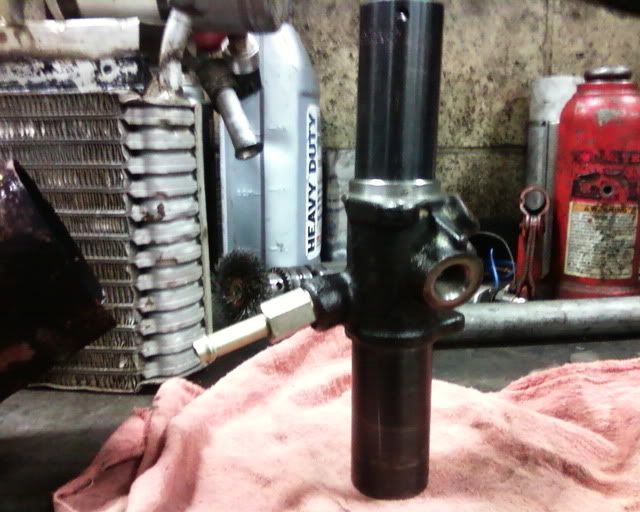
all done, stand back an admire your work.
i started the rack install today but didnt finish becaus i need some new bellows.
sorry for the bad pictures i forgot my digi cam.
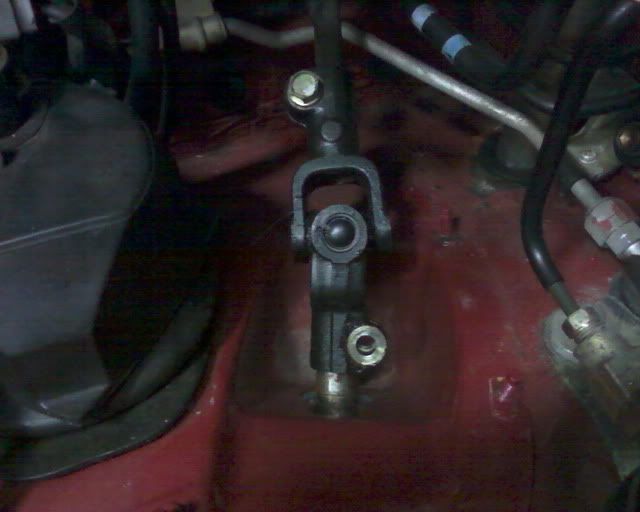
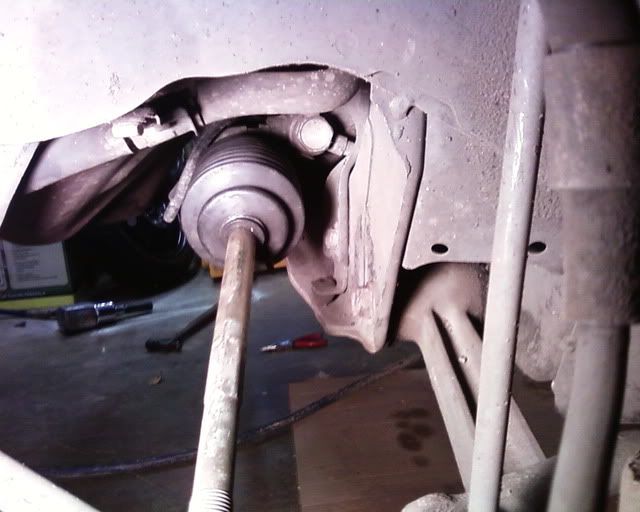
start by jacking the car up and securing it on jack stands.
then secure the steering wheel with the seet belt.
now get the junk out of your frunk and remove this plastic cover, its held on with a few plastec nuts witch should unscrew by hand.
remove the lower U joint bolt and loosn the upper one, the U joint should just slide off the rack and up the steering colum with a little wigling.
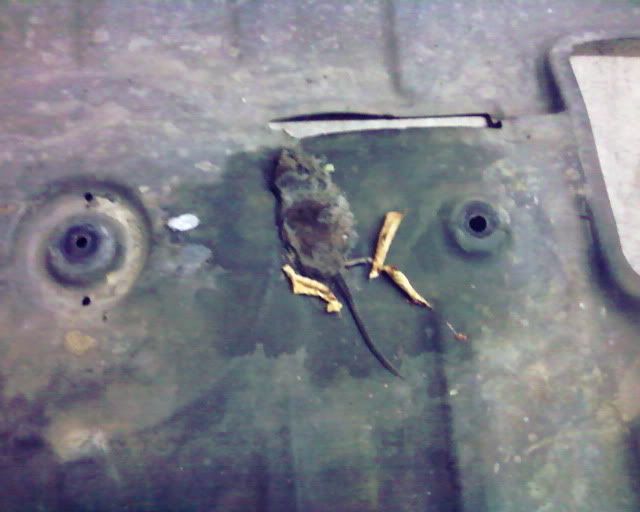
now go underneath and remove the under boddy cover. the dead mouse on the under boddy cover can be thrown away, you wont need it any more.
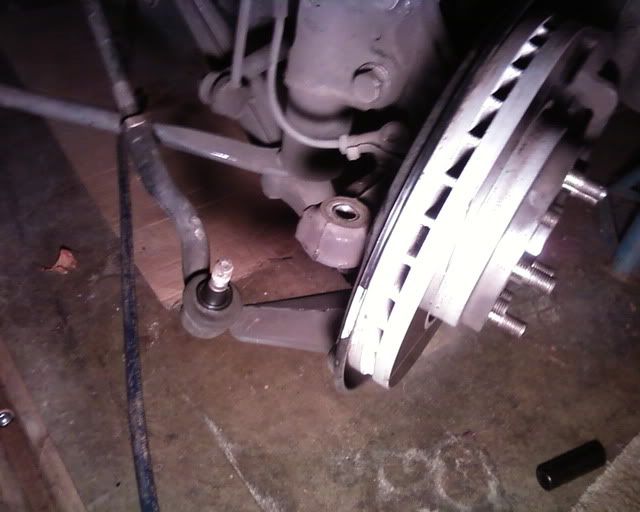
if you havnt done so already, remove the front wheels.
to remove the end links you need to remove the cotter pin and castle nut.
a few wacks with a ball peen hammer should nock the end link out of the hub.
note: if your are afraid of damaging the tierod ends leav the castle nut on flush with the top of the bolt when you beat it out. thanks to David Hawkins.
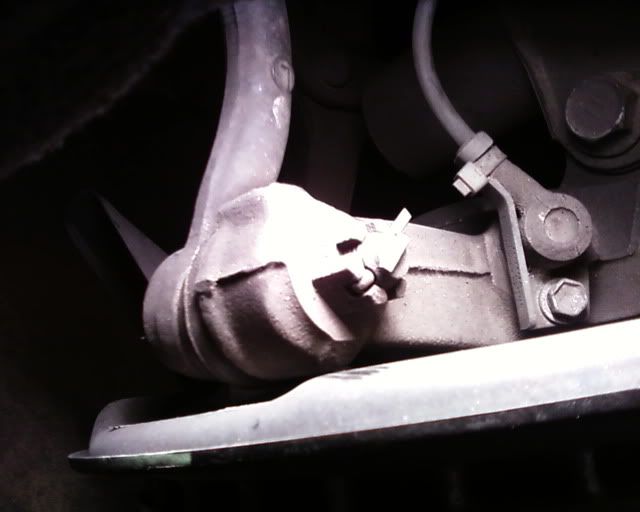
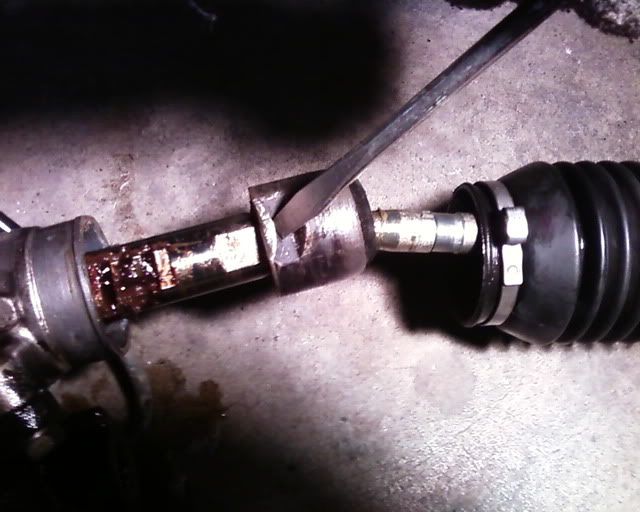
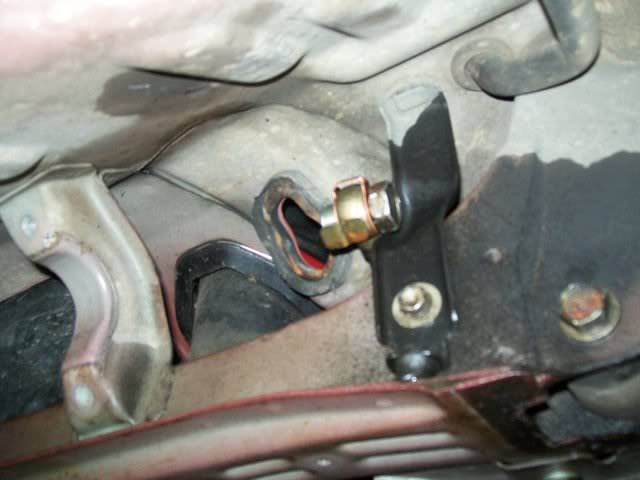
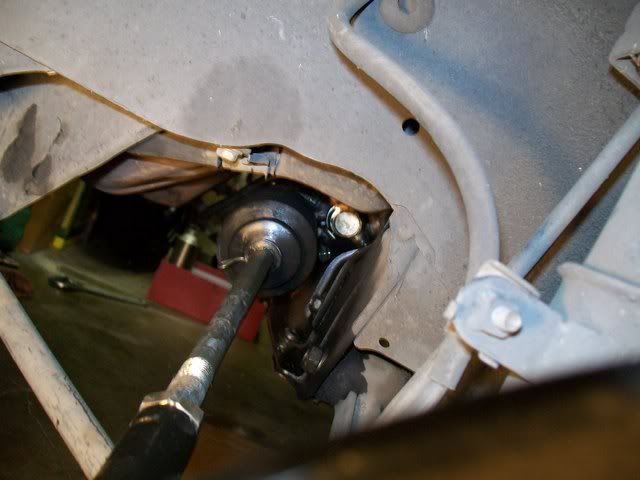
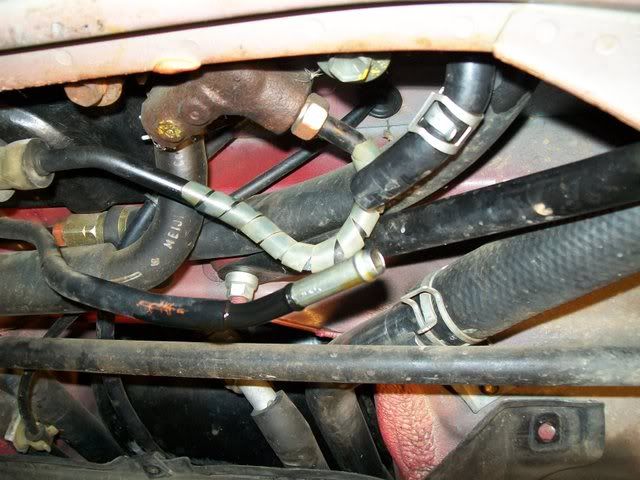
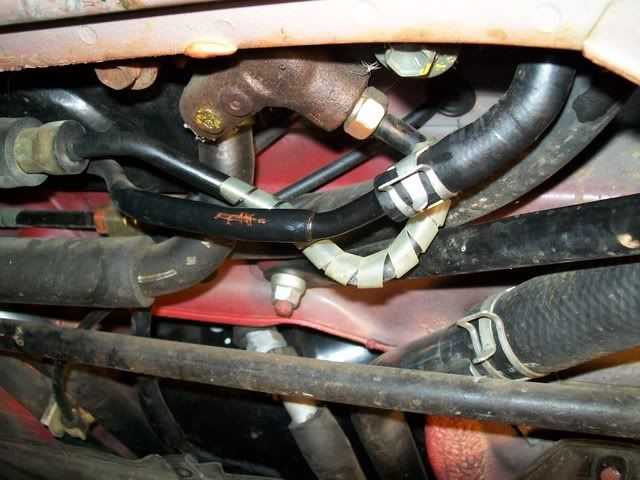
now things get messy there is a 22mm banjo bolt that needs to come out. i used about 1.5 feet of extensions and a braker bar to get at it. its not on there very hard its just hard to get at.
now you need to move this hose clamp and undo this hose.
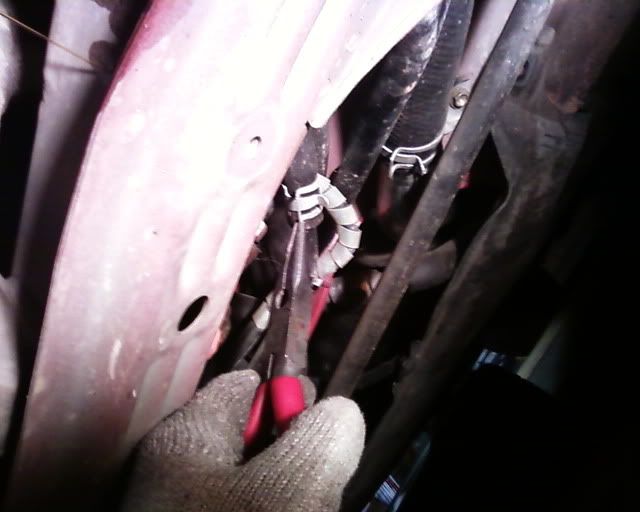
undo the 4 bolts and remove the 2 brackets that hold the rack in.
then start cussing and wigling and you will have it out in no time.
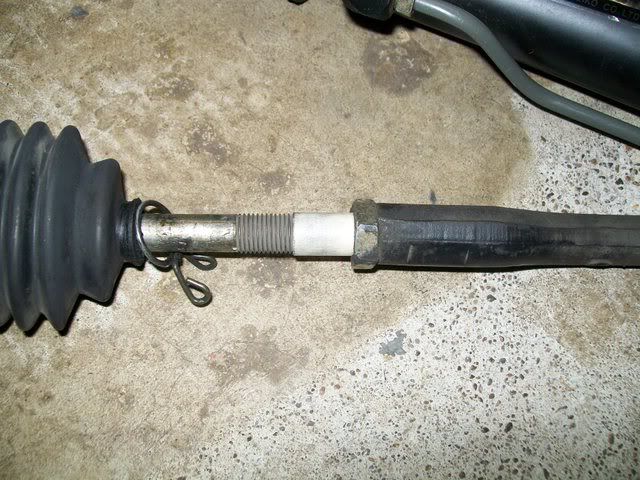
now becaus im reuseing my inner tie rods i need to take them off my old rack.
the claw washers are soft, a flat head screw driver and a hammer makes short work of them. after that use a couple of wrenches to unscrew them from the rack.
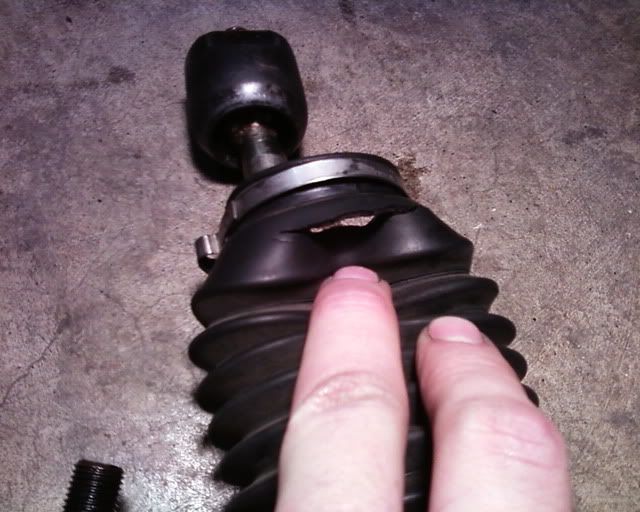
and this is ware im stuck, i was going to reuse my bellows but one is cracking so i ordered a pare from twos-r-us.
You can also remove the outers without damage by putting the castle nut flush with the top of the threads when you whack it with the hammer. The nut keeps the threads from getting bu88ered up.
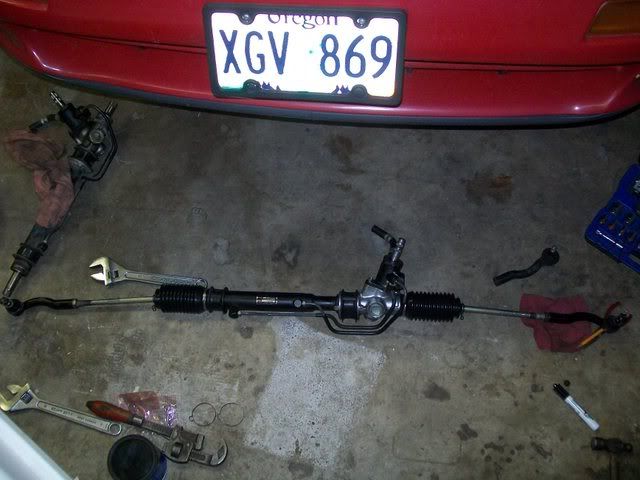
ok i finnished it up last night.
befor you take the tie rod ends off but some tape on the tie rods as a marker.
the next step is putting the new claw washers and inner tie rods on my new rack.
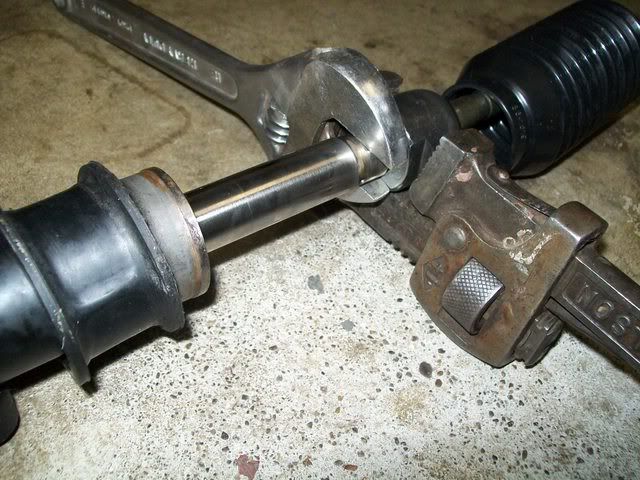
the flat spots on the inner tie rods are very narrow so rather then using a normal wrench i used a bug pipe wrench insted.
a combination of OEM claw washers and after market inner tie rods left me with very little to pound over but it should be enough.
now we can put the new bellows on, theres nothing to it realy but if you reuse the OEM mettle inner clamps get them good and streched out befor you try to put them on.
NOTE: make sure that hole in the rack is clear^ it alows are to flow from one bellows to the other.
put the tie rod ends on loosly for now.
we are almost ready to put the rack in now so before you forget, but this gasket in place.

ok now things get a little fuzy, the BGB will give you measurements for centering the rack and tie rod ends, but becaus iv got after market tie rods it dosnt do me a hole lot of good.
i tryed many things and most of it didnt realy get me any ware and in the end it pritty much came down to eye balling it.
one thing i did was i measured ware my tie rod ends were and mooved one one way and one the other so they wer both the same and so thet i keep my original toe setting(or at least somthing close to it).
i also measured the rack at all the way left and all the way right and found the racks center of travel but this turnd out to be a wast of time in the end.
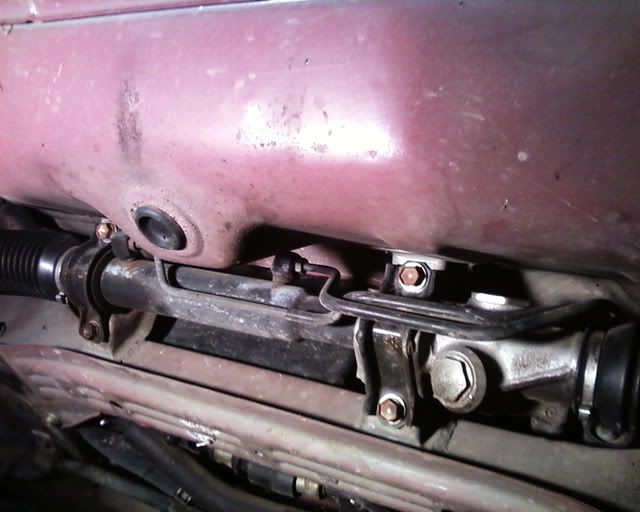
now we can put the rack in place, if it isnt going in try rotating the hose clamp so that the little wings are pointing to the side instead of down(sorry no pictures of this).
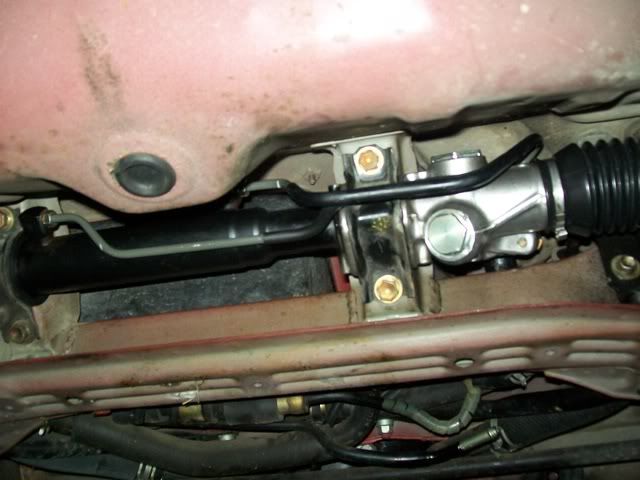
you should be able start the banjo bolt by hand, then use a 22mm socket to tighten it down.
then hook up the return hose.
now i tryed hooking up the U-joint with the rack at the center line.
but after i had the tie rod ends in the hubs and steped back it was obvious things wernt strait.
i dont have any more pictures but what i did is i looked at my front brake roters, try to imagin a line running along the face of the toter towards the back of the car, then i bumped the hubs over till both sides looked the same.
i hooked the steering back up and turned the wheel from lock to lock and i couldnt see any difference at the angle of the wheel at eather lock so i bolted it all down like that.
it turns out i was pritty close.
the steering wheel was only off by about a half an inch, if that.
the steering is way more responsiv now, i cant wait for the next autocross.
i didnt get any pictures wile i was tering it apart but this is what i got.
the tare down is pritty strait forward but you will need som pritty big wrenches/sockits and dont forget your super special service tool.
in order to replace the oil seal in the valve housing il have to remove the bearing too and i may have to get a new one but i havnt got that far yet.
the hard lines have O-rings on the ends witch should be replaced.
the special service tool AKA big bolt and 2 nuts is used to remove an allen bolt that would normaly require a 19mm
i was able to press out the seal without damaging the bearing so i just need to order the 2 new seals, gasket, the 4 O-rings for the hard lines and 2 claw washers for the inner tie rods.
i orderd my new seals and stuff today from Lithia Toyota.
44218-12020 gasket, valve housing
90311-26003 seal, oil
90311-19010 seal, oil
90301-03001 ring, O X4
90214-12002 washer, claw X2
44327-12010 gasket, pressure port
the total came to
im also going to order new tie rod ends from twos r us, il be using the inner tie rods and boots that are in my 2 now becaus they are only about 2 years old.
got my parts from Lithia Toyota today, im still waiting for the pinion gear though.
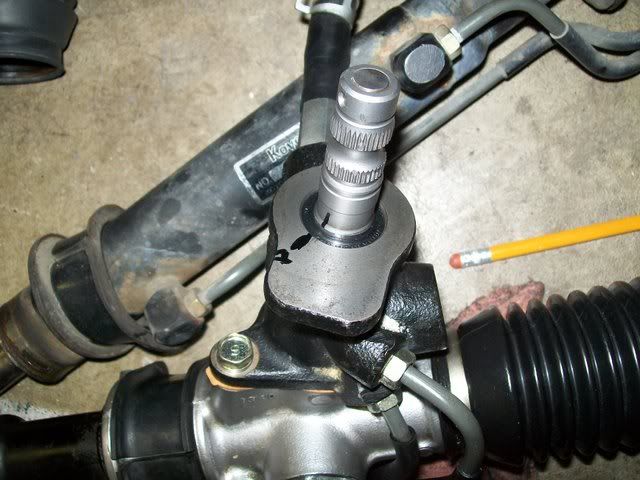
i picked up my new pinion gear from Seth on Sunday and put it in tonight.
the diferance between the two is the old one on the left has 6 teath and the new one on the right has 7.
the install is very strait forword, i used a big deep sockit to press in the new seal then the old bearing.
the next step is to coat the teflon seals on the pinion gear with power steering fluid then it just pushes in with a little wigling.
the next seal was a bit trickier, i had to use two larg sockits witch made it to big for the vice so i had to tap this one in with a hammer.
the seal in place.
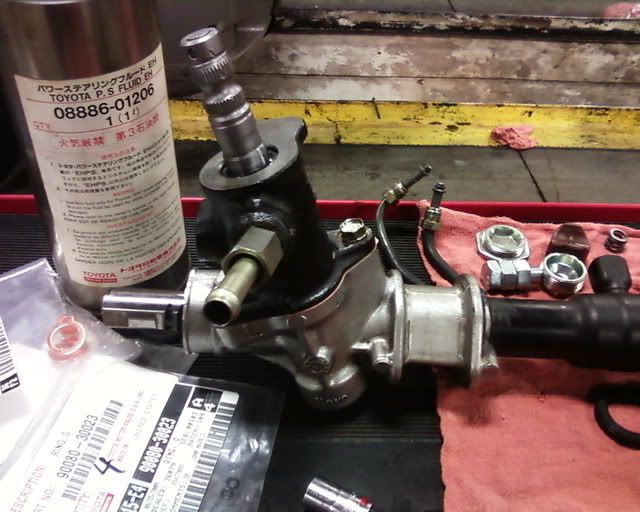
next is bolting the valve housing to the gear housing, theres nothing to it realing just dont pinch the gasket.
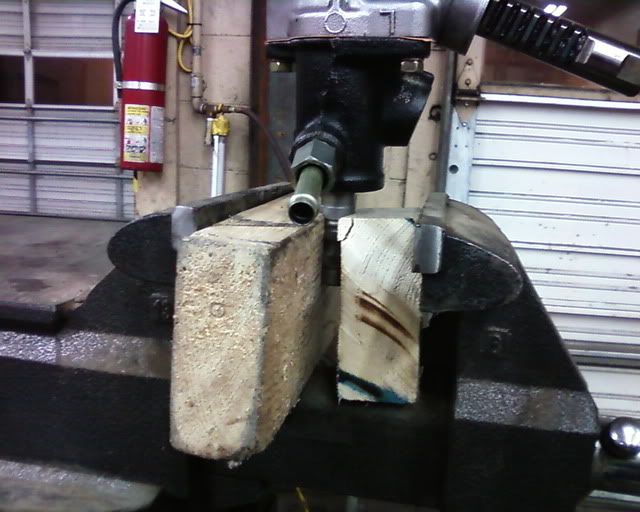
sence i reused the old lock nut i put som locktite on it for good mesure
i used two blocks of wood to hold it in a vice wile i torqued the lock nut
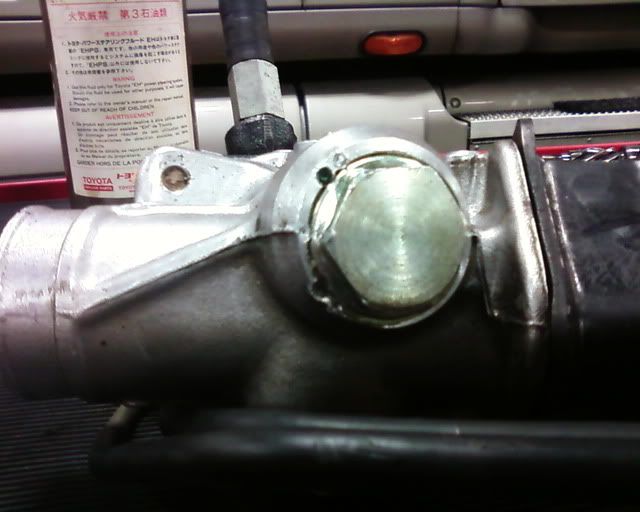
put som locktite on the cap threats then torque it and stake it.
next is the rack guide, i greased it up befor puting it in.
put the guide spring in the guide.
but som locktite on the threads and use your super special service tool to torque the guide, then back it off 12 degrees and check the preload.
if all is well put some locktite on the lock nut and but it on.
put some powre steering fluid on your new O rings put the O rings on the hard lines and put the hard lines on the rack.
all done, stand back an admire your work.
i started the rack install today but didnt finish becaus i need some new bellows.
sorry for the bad pictures i forgot my digi cam.
start by jacking the car up and securing it on jack stands.
then secure the steering wheel with the seet belt.
now get the junk out of your frunk and remove this plastic cover, its held on with a few plastec nuts witch should unscrew by hand.
remove the lower U joint bolt and loosn the upper one, the U joint should just slide off the rack and up the steering colum with a little wigling.
now go underneath and remove the under boddy cover.
if you havnt done so already, remove the front wheels.
to remove the end links you need to remove the cotter pin and castle nut.
a few wacks with a ball peen hammer should nock the end link out of the hub.
note: if your are afraid of damaging the tierod ends leav the castle nut on flush with the top of the bolt when you beat it out.
now things get messy there is a 22mm banjo bolt that needs to come out.
now you need to move this hose clamp and undo this hose.
undo the 4 bolts and remove the 2 brackets that hold the rack in.
then start cussing and wigling and you will have it out in no time.
now becaus im reuseing my inner tie rods i need to take them off my old rack.
the claw washers are soft, a flat head screw driver and a hammer makes short work of them.
and this is ware im stuck, i was going to reuse my bellows but one is cracking so i ordered a pare from twos-r-us.
You can also remove the outers without damage by putting the castle nut flush with the top of the threads when you whack it with the hammer.
ok i finnished it up last night.
befor you take the tie rod ends off but some tape on the tie rods as a marker.
the next step is putting the new claw washers and inner tie rods on my new rack.
the flat spots on the inner tie rods are very narrow so rather then using a normal wrench i used a bug pipe wrench insted.
a combination of OEM claw washers and after market inner tie rods left me with very little to pound over but it should be enough.
now we can put the new bellows on, theres nothing to it realy but if you reuse the OEM mettle inner clamps get them good and streched out befor you try to put them on.
NOTE: make sure that hole in the rack is clear
put the tie rod ends on loosly for now.
we are almost ready to put the rack in now so before you forget, but this gasket in place.
ok now things get a little fuzy, the BGB will give you measurements for centering the rack and tie rod ends, but becaus iv got after market tie rods it dosnt do me a hole lot of good.
i tryed many things and most of it didnt realy get me any ware and in the end it pritty much came down to eye balling it.
one thing i did was i measured ware my tie rod ends were and mooved one one way and one the other so they wer both the same and so thet i keep my original toe setting
i also measured the rack at all the way left and all the way right and found the racks center of travel but this turnd out to be a wast of time in the end.
now we can put the rack in place, if it isnt going in try rotating the hose clamp so that the little wings are pointing to the side instead of down
you should be able start the banjo bolt by hand, then use a 22mm socket to tighten it down.
then hook up the return hose.
now i tryed hooking up the U-joint with the rack at the center line.
but after i had the tie rod ends in the hubs and steped back it was obvious things wernt strait.
i dont have any more pictures but what i did is i looked at my front brake roters, try to imagin a line running along the face of the toter towards the back of the car, then i bumped the hubs over till both sides looked the same.
i hooked the steering back up and turned the wheel from lock to lock and i couldnt see any difference at the angle of the wheel at eather lock so i bolted it all down like that.
it turns out i was pritty close.
the steering wheel was only off by about a half an inch, if that.
the steering is way more responsiv now, i cant wait for the next autocross.
Re: MR2 SW20 RHD Power Steering Quick Steer Pinion.
Deposit received with thanks, from -Totenkopf- .
Re: MR2 SW20 RHD Power Steering Quick Steer Pinion.
Deposit received from WIDEMR, thanks.
Re: MR2 SW20 RHD Power Steering Quick Steer Pinion.
Here is a reminder.
Thegroup buy closes in two weeks. Please have your deposit paid before the end of January if you would like a quick steer pinion.
The
-
Steve-O 2007
- Posts: 6233
- Joined: Sun Nov 12, 2006 1:54 pm
Re: MR2 SW20 RHD Power Steering Quick Steer Pinion.
I have a steering rack from a Rev3 if anyone is looking for one to help with this conversion (means you can still use the car while the other gets converted then its just a swap when ready  )
)
Re: MR2 SW20 RHD Power Steering Quick Steer Pinion.
Twincams from Singapore has joined the group buy. Thank you Twincams.
Re: MR2 SW20 RHD Power Steering Quick Steer Pinion.
Ashtwo has paid his remainder, which means he is fully paid up excluding shipping. Thank you ashtwo.
Re: MR2 SW20 RHD Power Steering Quick Steer Pinion.
Thank you Marty for acknowledging my payment. Please let me know the shipping when the time comes.
Marty J wrote:Twincams from Singapore has joined the group buy.