| Fitting a stereo to a Mk3 |
Description Details on how to fit a single DIN radio to an Imported MR2 Roadster. Could also be used as guide to replacing the stock issue stereo
Author
Date Sat Aug 06, 2005 12:16 am
Type Picture How-To
Category Electrical
Views 9067
|
Fitting a stereo to a Mk3
Details on how to fit a single DIN radio to an Imported MR2 Roadster. Could also be used as guide to replacing the stock issue stereo |
 |
Fitting a stereo to a Mk3
by Tony Murphy
The original inspiration for this site was that when my lovely new Roadster arrived, it had no stereo fitted. After a bit of investigation I have found out that the stereo unit is a "Point of Entry" part. i.e. All Roadsters are made the same and when they arrive at their final destination, various parts are added. These include for the UK MR2, Stereo unit, Thatcham 1 alarm, Roadster badge on rear and lots of extra little bits to boot.
Had Toyota had their standard stereo available as a part, I would have bought it, but it is not on any of the part lists. (Don't know what you would do then if it broke or was stolen) ![[Smile]](images/smiles/icon_smile.gif "Smile")
ou will need to order the following parts from a Toyota dealer.</p>
55521 -16030 : Tray / Storage slot
55423 - 17040 : Surrounding trim
86221 -52050 : Left hand spacer
86221 - 52060 : Right hand spacer
86211 - 17050 : Left hand mounting bracket
86212 - 17050 : Right hand mounting bracket
When you pick them up, be cheeky and ask the parts department for 10 or 12 self tapping screws, as you will need a few extra.
NB: If you a replacing the existing stereo you will not need the last two parts (L & R Mounting brackets) as they are already attached to the installed strereo.
This is how my central console looked after taking delivery of my Roadster. Very bare and not much happening in the entertainment zones, but I must admit a nice finishing on the two upright pillars.
First you must remove the plastic surrounds to the steel columns.
<a href="http://www.imoc.co.uk/technical/howto/images/Dsc00151.jpg"> </a> </a>
The two inner covers are the easiest to remove, with your index finger run your finger up the back of the inner cover until you find the recess. Pull the cover forward and it will clip off.
<a href="http://www.imoc.co.uk/technical/howto/images/Dsc00154.jpg"> </a> </a>
The larger outer covers need slightly more effort to remove. The lower, light grey, cover needs to be pulled away from the central console, to expose two screws and a single bolt. Undo the two screws bur NOT the bolt.
Pull down on the outer cover and it should come away easily.
<a href="http://www.imoc.co.uk/technical/howto/images/Dsc00153.jpg">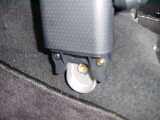 </a> </a>
The next job is to remove the heating / Air Con control facia.
Remove the slider handle and the three control knobs. Behind the left and right controllers are two screws, remove these.
The panel should now be free to be removed. Pulling from the bottom, ease the panel away from the dash, you may find it necessary to give extra leverage at the top edge with a small screw diver inserted above the control facia and the main dash.
<a href="http://www.imoc.co.uk/technical/howto/images/DSC00165.jpg">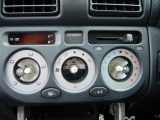 </a> </a>
Be careful when removing facia as there are still wires connected to the rear of the unit, to power the clock.
<a href="http://www.imoc.co.uk/technical/howto/images/DSC00166.jpg">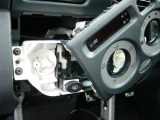 </a> </a>
Fix the left and right mounting brackets to the head unit. Modern stereos have a standard set of locating dimples and screw points, so (nearly) all units should mount easily. It may take two, three or four screws per side to suitably fix the unit to the brackets
<a href="http://www.imoc.co.uk/technical/howto/images/DSC00167.jpg">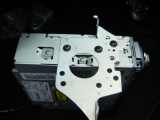 </a> </a>
The craftiest part of all, the Celica storage tray. Yes this part is intended for a new Celica.
There a numerous mounting points on the unit, but it needs to be slotted in-between the newly attached brackets on the head unit. The mounting hole on the top of the unit just behind the first hole is the one we need to get aligned with one of the holes on the brackets. Only 1 self tapping screw is needed per side, as the brackets have locating points which match up with some of the other holes on the tray.
<a href="http://www.imoc.co.uk/technical/howto/images/DSC00168.jpg">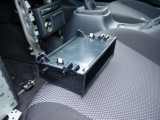 </a> </a>
Hook up the stereo and test to see if everything works. There are various places to get the wiring looms to connect the stereo to the vehicle, but I got mine from www.basesystems.com
The hard part to find is the antenna.....
<a href="http://www.imoc.co.uk/technical/howto/images/DSC00169.jpg">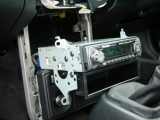 </a> </a>
The hardest part was locating the antenna connector, it was eventually found tucked down beneath the carpeting on the drivers side. The coverings behind the central console pull back very easily and after a bit of investigation you should spot a cable running over the side and away under the carpet. There is about 15 to 20cm of cable terminated in a standard aerial connector. Fold the carpeting back round behind the console and fasten the Velcro tabs.
<a href="http://www.imoc.co.uk/technical/howto/images/DSC00158.jpg">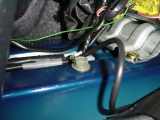 </a> </a>
Now for the clever bits. As the standard head units available are a predefined size, these is going to be a gap at the edges of the stereo, since the Toyota unit is about 15mm wider on each side.
<a href="http://www.imoc.co.uk/technical/howto/images/DSC00170.jpg">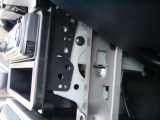 </a> </a>
Fear not, Mr. Toyota has already though of that, the two plastic spacers are fitted to the front edge of each bracket to fill the gap. They just clip on over a small meta tab in the bracket.
I had to undo two of the stereo / tray mounting screws, fix on the spacer then refit the screws.
<a href="http://www.imoc.co.uk/technical/howto/images/DSC00171.jpg">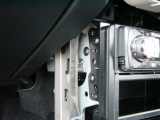 </a> </a>
Screw the hole assembly into the central console with four self tapping screws.
Clip over the surround trip (not shown on this image for some bizarre reason), before refitting the heating / Air Con facia, as the surround clips behind it on its top edge.
<a href="http://www.imoc.co.uk/technical/howto/images/Dsc00172.jpg">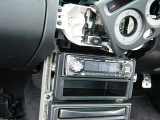 </a> </a>
This is how, it should look when it's all finished.
To fit the stereo from scratch took about 30 minutes. Click here for another installed view.
For those who are interested, the unit is a Pioneer DEH-P6100R CD Tuner see here for more details.
<a href="http://www.imoc.co.uk/technical/howto/images/Dsc00176.jpg">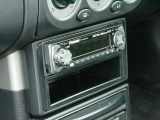 </a> </a>
I hope this information will be of some help to people out there, I can't be the only Roadster (or Spyder!) owner in the world who wants to install a standard size stereo unit..can I'
Please contact me for any reason on the following address [url=mailto:[email protected]]Tony Murphy[/url]
**UPDATE**
I have found a US only supplier of a plastic vacuum formed adapter to hold standard DIN size stereo in the MR2 roadster, Part number TA2047 from www.scosche.com Unfortunately they can only ship to the US, so if you live there or have friends who can send it on, it may be an easier option, but from what I can see, you still have to do most of the hard work of removing the facia and column covers anyway.
Edit: BenF: in the UK Halfords now supply an adapater suitable for a RAV4 which also fits MR2s - cost is '25 |
| |
| User comments |
| BenF: Sat Aug 06, 2005 12:16 am [ KB ] Fitting a stereo to a Mk3 |
|
[ Article updated...BenF ]
Category: Electrical
Type: Picture How-To
Article Name: Fitting a stereo to a Mk3
Author: poyntesm
Description: Details on how to fit a single DIN radio to an Imported MR2 Roadster. Could also be used as guide to replacing the stock issue stereo
>>Read Full Article |
|
|
| Page 1 of 0 |
All times are GMT
Goto page |
Powered by Knowledge Base, wGEric © 2002 PHPBB.com MOD
This script (Knowledge Base - MX Addon v. 1.03e) is modified by Haplo
|