The journey of one man and his Mule(s)
Moderators: IMOC Moderators, IMOC Committee Members
Re: The journey of one man and his Mule(s)
Bottle of Kraken and a straw. Got it.
2001 BMW M5 (Bahnstormer) | 2004 RX8 231 (the Racecat) | 2001 Volvo V70 (Swedish eBay barge)
Previous:
1989 MR2 Mk1b T-bar| 1988 MR2 SC Super Edition
Previous:
1989 MR2 Mk1b T-bar
-
Magic Beans
- Posts: 4789
- Joined: Thu Nov 24, 2011 1:01 pm
- Contact:
-
Magic Beans
- Posts: 4789
- Joined: Thu Nov 24, 2011 1:01 pm
- Contact:
Re: The journey of one man and his Mule(s)
No real developments over the last few days, we've not really been at home. I have started working on a little something, which while it isn't for the car physically, it is car related. I'll show it once it's done...
One pretty significant event is the change in Photobucket's Ts& Cs, especially the impact that's had on this thread. Up until Mule V I was using PB to host the images, like most other people. Now they've made the changes I'm left with 118 pages that currently have, or are about to have (I have two accounts, one is still dodging the bullet) broken links. I'm not relishing the thought of having to upload/edit/update all of that, but it's a shame to leave it thousands of posts without context  I appreciate it's a free service so we have no real grounds to complain, it's still a dick move though.... Thankfully Mule VI onwards are all hosted on Flickr, mainly because PB was so unbelievably slow to use at the time.
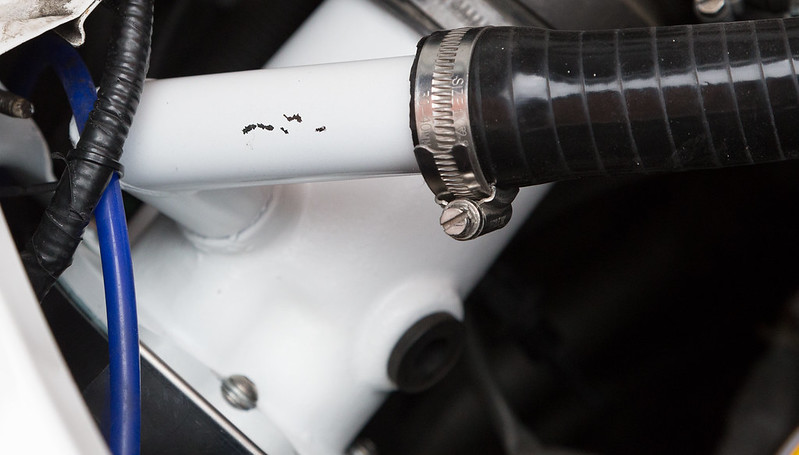
I think my O2 sensor is goosed. Well, that's what the car is telling me at least. I inadvertently found out after taking the car out and noticed it was driving like trash. It was pretty easy to realise what had happened though. The car has a 3 way switch in the boot. Setting 1 turns the ToyoBD1 on, setting 2 turns it off and setting 3 puts the car into diagnostic mode. Useful to have, as it means you don't need to bridge the terminals to read codes etc. I must have caught it when fettling around in the boot the other day  It did, however, mean I spotted a warning code. In this case it was code 21: O2 sensor. I've reset the ECU, just in case, but it's still there. It would be good to fit a known working one as a test though, if anyone has one spare that I could borrow?
One pretty significant event is the change in Photobucket's Ts
I think my O2 sensor is goosed.
Re: The journey of one man and his Mule(s)
Magic Beans wrote:
One pretty significant event is the change in Photobucket's Ts
It the world of corporate dickhead moves it is frustrating as you say.
-
synXero
- Posts: 3781
- Joined: Fri May 28, 2010 12:04 pm
- Location: London, Edinburgh, or the Highlands!
Re: The journey of one man and his Mule(s)
The place was overrun with adverts in recent years anyway. IDK WTF they think they will achieve with this move except to instantiate the birth of a new, better, free image host. F'idiots.
-
Magic Beans
- Posts: 4789
- Joined: Thu Nov 24, 2011 1:01 pm
- Contact:
Re: The journey of one man and his Mule(s)
I'm sure their business strategists have carefully choreographed this whole thing, with some grand plan in mind. Smells more like you're typical cash grab though 
I nearly bought another car yesterday, just for the engine. After seeing it I wasn't convinced it did what it said on the tin though, so promptly ducked out. You have to have a lot of faith in something to buy something when you can't actually see the thing you're buying it for. It had potential for sure, lots of potential. The risk was too high for my liking though, too many unproven elements.
I nearly bought another car yesterday, just for the engine.
-
Magic Beans
- Posts: 4789
- Joined: Thu Nov 24, 2011 1:01 pm
- Contact:
Re: The journey of one man and his Mule(s)
Barely been at home recently and when I have I've not had any car time
After what feels like an eternity I've identified and purchased what should have been the correct lambda sensor for the car. So much contrary information out there, on what is and isn't compatible with a Rev 3+ turbo engine. Add in that the old info out there references parts that are no longer made/relevant! Eventually though this was ordered and promptly delivered.
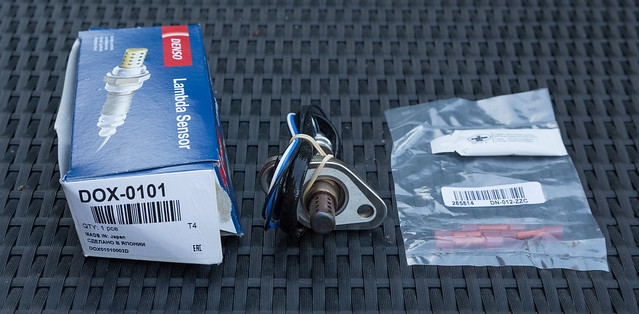
£38 off eBay, which is less than half the cost of the ones with the relevant Toyota plug on. Plus I wasn't always convinced that they were the correct unit either! Anyway, here's the link if anyone's looking for a replacement: http://www.ebay.co.uk/itm/1x-Denso-Lamb ... 2749.l2649
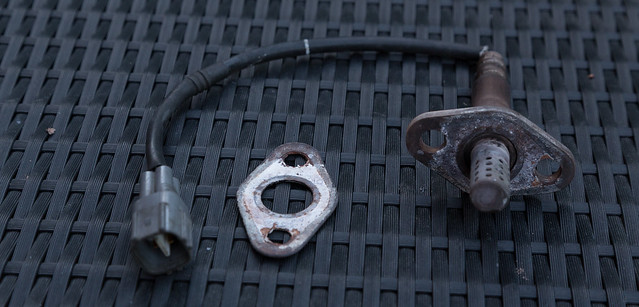
Old one out.

Seen better days!
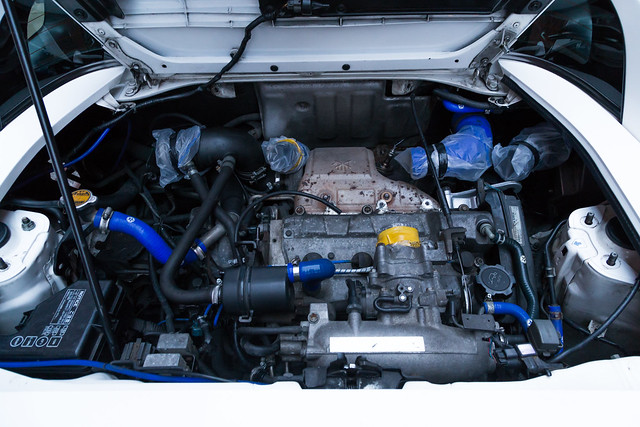
New sensor wired up(somewhat over-engineered I might say  ) and fitted.

Fired up the engine... throwing a code 21! Now at this point I'm wondering if it's:
a) the sensor isn't compatible
b) it's the wiring is bad
c) the ECU hadn't been properly reset(despite pulling the fuses etc)
d) the SARD ECU is wrong in some way?!
Logically the wiring should be correct, it was triple checked. There's no mention of the SARD ECU causing this type of issue and the sensor itself did fit and is supposed to be universal. So I decided to try a different way of resetting it, I pulled the battery for an hour.
I've had to wait until today to test it. Fired her up, didn't check for codes etc, went for a long drive so she was nice and hot, came home.... Flicked the magic diagnostic switch (god I love having that!) and was presented with a constantly flashing engine light. Now I'm a bit rusty on codes, so at the time I was a little worried. Google soon put me right though, with that meaning there were no recorded errors!  This is pleasing!
TL;DR If you have a Rev 3+ turbo and need a new O2 sensor, go spend 38 bucks on a DOX-0101.
Took delivery of a parcel from massbasshunter the other day. If it stops raining and I get a moment I'll fit them. Pretty much the only eternal tweak I'm planning on making, but one I think will finish the look off nicely 
After what feels like an eternity I've identified and purchased what should have been the correct lambda sensor for the car.
Old one out.
Seen better days!
New sensor wired up
Fired up the engine.
a) the sensor isn't compatible
b) it's the wiring is bad
c) the ECU hadn't been properly reset
d) the SARD ECU is wrong in some way?!
Logically the wiring should be correct, it was triple checked.
I've had to wait until today to test it.
TL;DR If you have a Rev 3+ turbo and need a new O2 sensor, go spend 38 bucks on a DOX-0101.
Took delivery of a parcel from massbasshunter the other day.
-
Magic Beans
- Posts: 4789
- Joined: Thu Nov 24, 2011 1:01 pm
- Contact:
-
Magic Beans
- Posts: 4789
- Joined: Thu Nov 24, 2011 1:01 pm
- Contact:
Re: The journey of one man and his Mule(s)
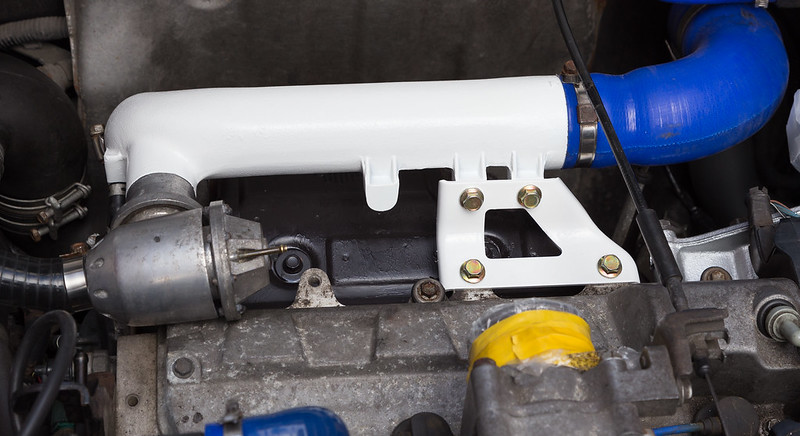
Picking up where I left off.. Everything that was due to be painted was stripped, sanded, Kurusted, filled etc, ready for paint.
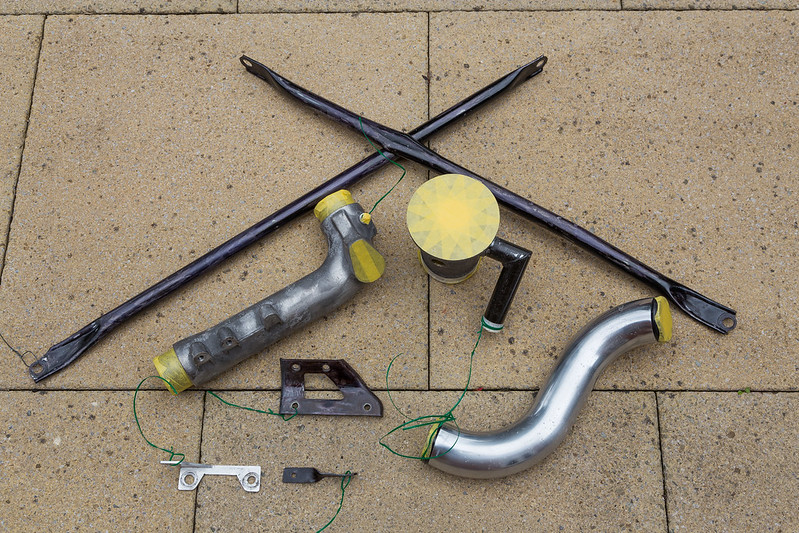
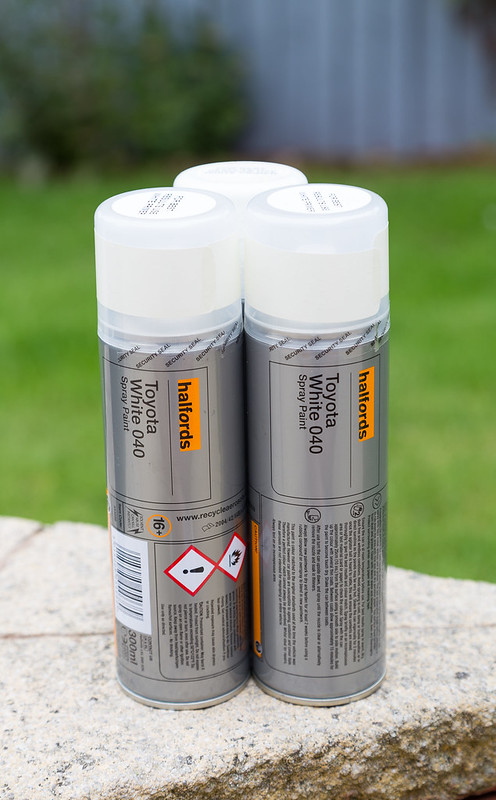
Sticking with Super White II(040) to match the body colour.
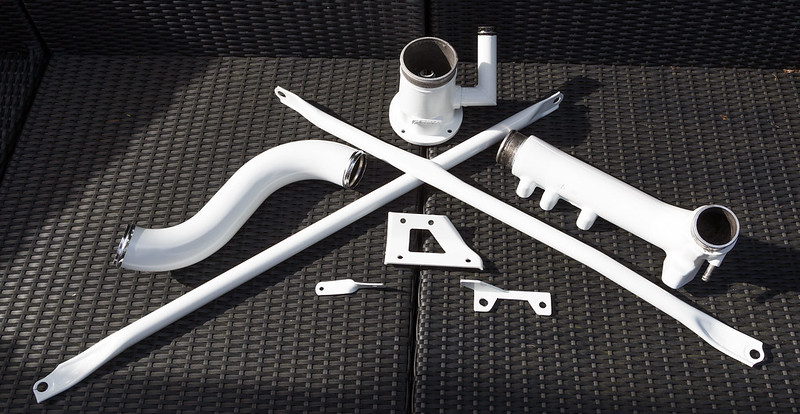
Cut to many hours later, 4 coats of paint, 3 coats of clear, fly attack, a failed spray nozzle on the last coat(grrr!!!  ) and the subsequent correction later, we have this.
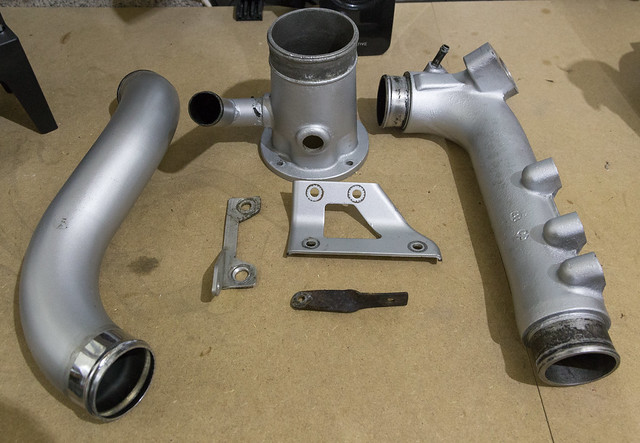
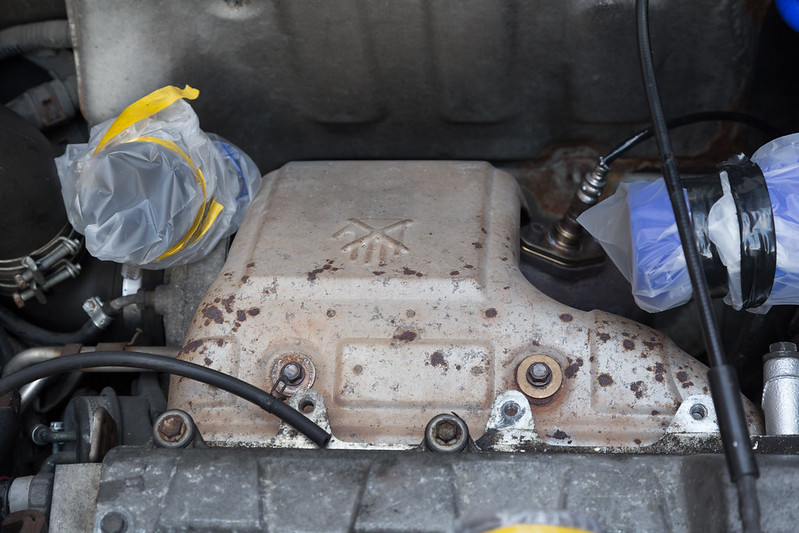
While the piping was out I took the opportunity to paint the turbo heat shield. I planned on removing it first, but the bolts quickly gave signs of snapping, so I opted to do it in situ. Scoured the nety for some brush on VHT paint and ultimately bought a can of this stuff.

Before
After a single coat. It's still wet at this point, needs to be heated to 220 degrees for 20 mins, which a good run out will take car of.
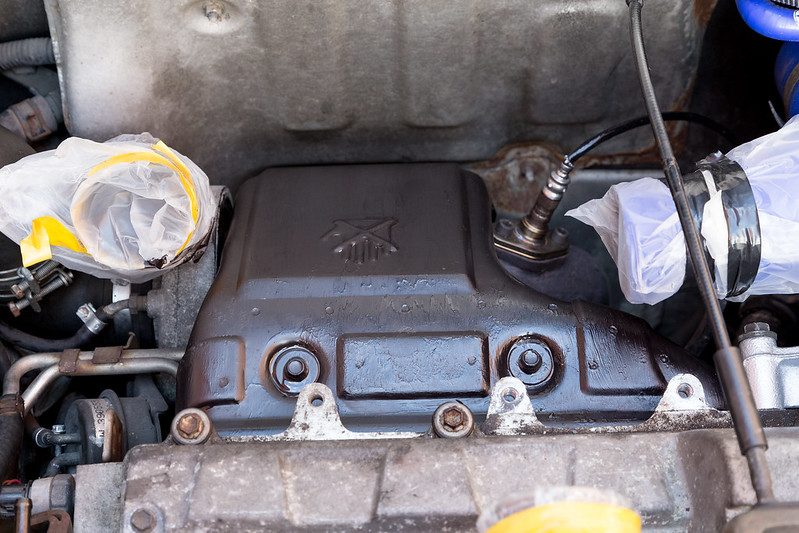
Now on to assembly. New fixings where possible, including some on the spare titanium bolts I had lying around.

Had to happen! Easy enough to touch up though.
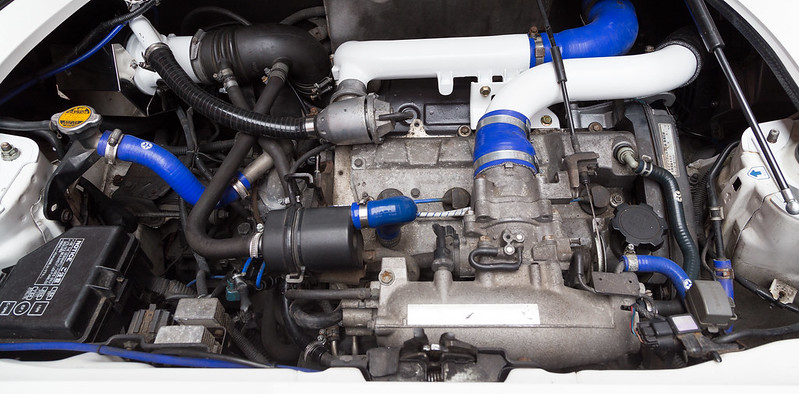
Phase 1 complete
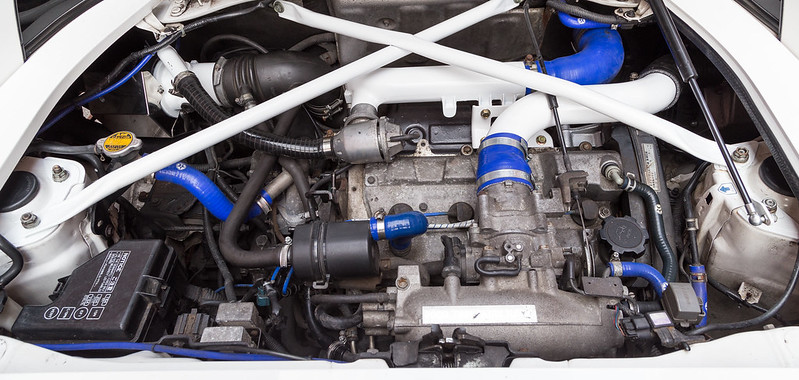
Phase 2 is the cam cover, throttle body, inlet mani, HKS SSQV and a few other bits. All of these will be a matt black, to match the heat shield and the wheels. No brushes on these bits though 
Sticking with Super White II
Cut to many hours later, 4 coats of paint, 3 coats of clear, fly attack, a failed spray nozzle on the last coat
While the piping was out I took the opportunity to paint the turbo heat shield.
Before
After a single coat.
Now on to assembly.
Had to happen!
Phase 1 complete
Phase 2 is the cam cover, throttle body, inlet mani, HKS SSQV and a few other bits.
Re: The journey of one man and his Mule(s)
That looks good Phil. Engine bay clean up working well. I will have to look at something similar for the turbo heat shield on mine.
Re: The journey of one man and his Mule(s)
Nice work buddy. Painting is good fun eh? 
-
pistol pete
- Posts: 7068
- Joined: Mon Feb 11, 2008 5:47 pm
Re: The journey of one man and his Mule(s)
Good work matey, that engine bay is coming up a treat
MR2 Sprint zombie outbreak response vehicle
https://www.facebook.com/pages/Zombie-S ... 0272127049
https://www.youtube.com/channel/UCNBrEd ... s-qbox0FwQ
https://www.facebook.com/pages/Zombie-S ... 0272127049
https://www.youtube.com/channel/UCNBrEd ... s-qbox0FwQ
-
Magic Beans
- Posts: 4789
- Joined: Thu Nov 24, 2011 1:01 pm
- Contact:
Re: The journey of one man and his Mule(s)
Thanks, chaps 
Phase 2 is when it should all come together. That cam cover really isn't pretty right now!
Spent some time tweaking the boost controller settings last night, while I was road baking the heat shield. It's now much happier, no spikes, holds boosts perfectly and spools up so quickly!! A very happy and healthy little engine.
Phase 2 is when it should all come together.
Spent some time tweaking the boost controller settings last night, while I was road baking the heat shield.
Re: The journey of one man and his Mule(s)
Oooh shiny! Looking good there. Bet that VHT smelled lovely while it was baking off
2001 BMW M5 (Bahnstormer) | 2004 RX8 231 (the Racecat) | 2001 Volvo V70 (Swedish eBay barge)
Previous:
1989 MR2 Mk1b T-bar| 1988 MR2 SC Super Edition
Previous:
1989 MR2 Mk1b T-bar
-
Magic Beans
- Posts: 4789
- Joined: Thu Nov 24, 2011 1:01 pm
- Contact:
Re: The journey of one man and his Mule(s)
It wasn't too bad really. I did have a moment of "has something failed in there?"" after I parked up though 
Just need to decide on the best approach for the black bits. I could do it myself but I'll happliy admit it's not my forte. Powdercoat looks great but has it's risks. 
Just need to decide on the best approach for the black bits.
-
Magic Beans
- Posts: 4789
- Joined: Thu Nov 24, 2011 1:01 pm
- Contact:
Re: The journey of one man and his Mule(s)
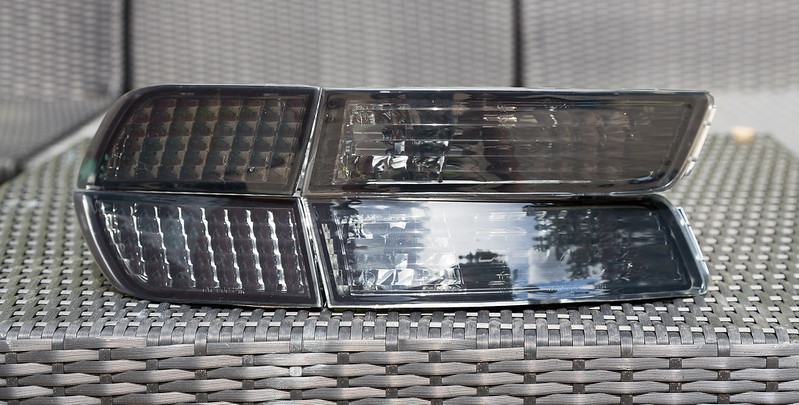
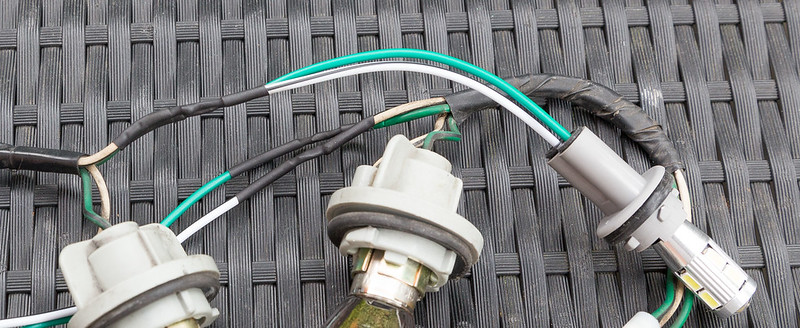
I had a some time and a welcomed break in the weather, so decided to fit a little something I'd recently acquired from Clive (madbasshunter). That being a brand new set of Autoart smoked crystal indicators.
This is one of the two small changes I have planned for the exterior of the car. My aim is to keep everything looking OEM but as near to monochrome as possible. It's all in-line with the colour (or absence of) palette across the rest of the car. Beyond that it's staying exactly as is, apart from some work to correct and protect everything.
This is how things looked at the start.

Stock pieces removed. I'll be keeping these, in case I ever want to go back to pure stock in the future.
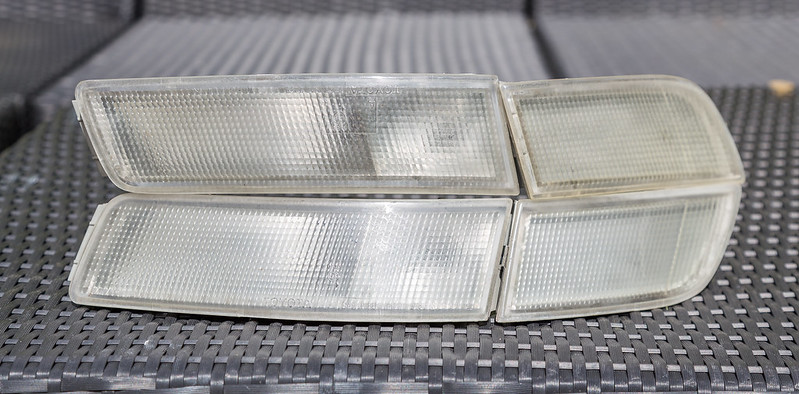
Eyes pulled out.

I knew I could rely on Stu to have thought of these touches already I had been looking into chrome indicator bulbs and some ultra bright W5W sidelight replacements. Now I don't need to
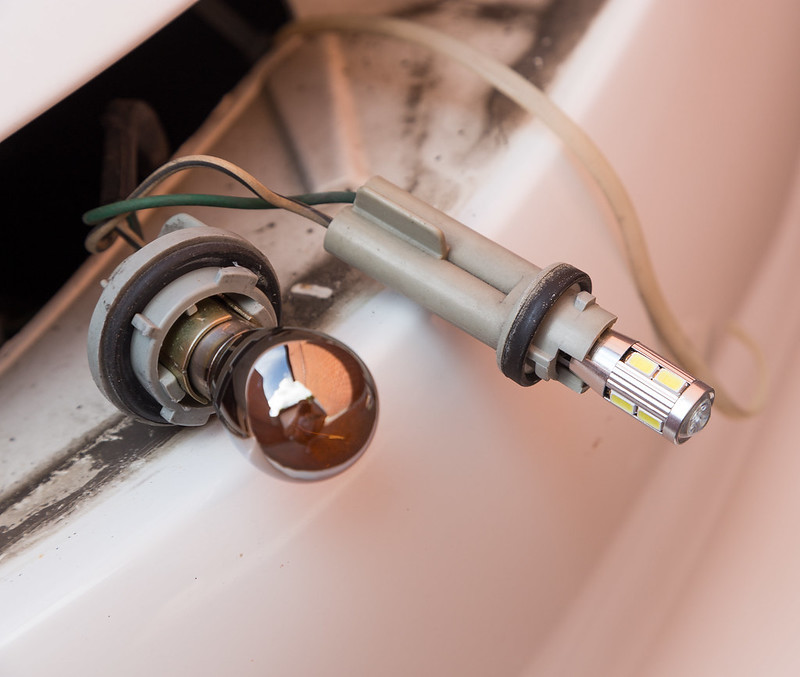
Mmm, shiny and new 
One small issue is the sidelight bulb holders have a slightly different lock pattern.
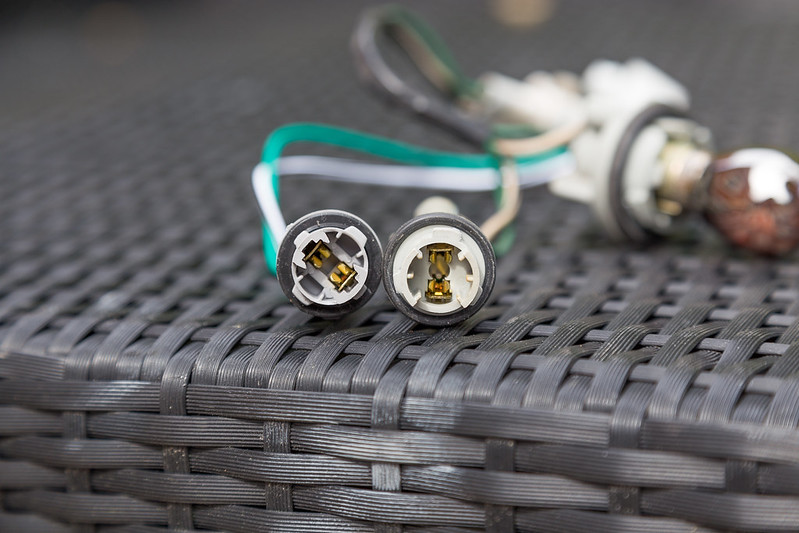
As the main loom connectors are also different the logical solution was to swap the sidelight bulb holders over. So out came the soldering station.
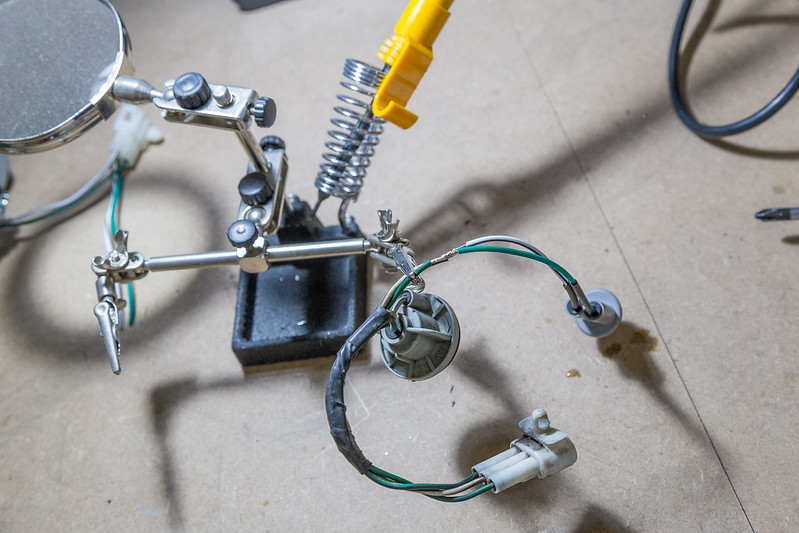
Soldered, heat shrink applied and ready for installation.
The bumper holes were fully cleaned and prep, then in the sidelights went. The bulbs are plenty bright enough, it's always hard to capture it in the day. The lenses are also a bit darker then shown, but I had to balance out the overall shot exposure.

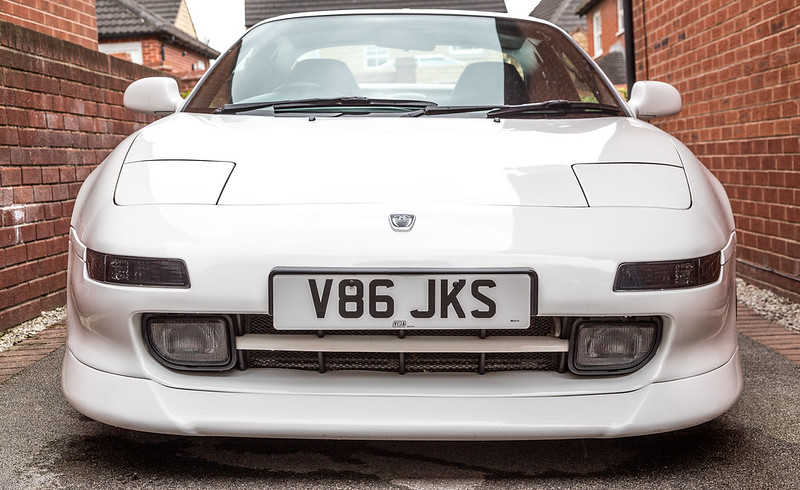
Personally I love the end result. It balances out the front end perfectly, along with the already darkened (they're covered/protected not tinted etc) fogs etc.
This is one of the two small changes I have planned for the exterior of the car.
This is how things looked at the start.
Stock pieces removed.
Eyes pulled out.
I knew I could rely on Stu to have thought of these touches already
Mmm, shiny and new
One small issue is the sidelight bulb holders have a slightly different lock pattern.
As the main loom connectors are also different the logical solution was to swap the sidelight bulb holders over.
Soldered, heat shrink applied and ready for installation.
The bumper holes were fully cleaned and prep, then in the sidelights went.
Personally I love the end result.
Re: The journey of one man and his Mule(s)
Looks good that mate. Much better than I thought they would.
I think the tinted fog lights help also. As you say, keeping it white and black across the front.
I think the tinted fog lights help also.
Re: The journey of one man and his Mule(s)
That looks really great. Well worth the effort
Re: The journey of one man and his Mule(s)
Tinted front side lights work well. Tinting the fog lights as mentioned maybe another touch. I am usually against this type of stuff but you car is fairly stock exterior so is just a nice subtle change.
-
Magic Beans
- Posts: 4789
- Joined: Thu Nov 24, 2011 1:01 pm
- Contact:
Re: The journey of one man and his Mule(s)
One thing I've come to realise over the years is that Toyota got the styling of these cars pretty much spot on all those years ago.
Need to do a proper photoshoot with it at some point.