Lauren's 4AGE build by Tom (Icunonsove)
Moderators: IMOC Moderators, IMOC Committee Members
Re: Lauren's 4AGE build by Tom (Icunonsove)
What Sam said. This is a fantastic thread!
platmatt8 wrote:Lauren has got bigger balls than most men on this site
charged wrote:Mine's probably screaming
Re: Lauren's 4AGE build by Tom (Icunonsove)
pk_090 wrote:What Sam said.
As previously said, the content of this thread ought to be in the knowledge base IMO
-
synXero
- Posts: 3781
- Joined: Fri May 28, 2010 12:04 pm
- Location: London, Edinburgh, or the Highlands!
Re: Lauren's 4AGE build by Tom (Icunonsove)
Makes me want to buy a set of pistons for room decoration.
What a job.
What a job.
-
Lauren

- IMOC Committee
- Posts: 38632
- Joined: Mon Dec 13, 2004 5:37 pm
- Location: Greater Manchester
- Contact:
Re: Lauren's 4AGE build by Tom (Icunonsove)
Okay, about time I put it back together!
I've already got an inlet manifold gasket on order from Toyota. Will pick that up tomorrow and also order some injector seals as the ones on it look worn.
Today, I decided to make a start and try and work out where everything goes. After eighteen months it's a bit of a challenge finding all the right bolts which are thankfully bagged but not all marked up. Also had some fun working out how the ancillary brackets and block strengtheners go on. I got there eventually.
There is obviously a lot to do, but given the engine is built, it's really a matter of putting everything else back together so the engine and gearbox can go back in.
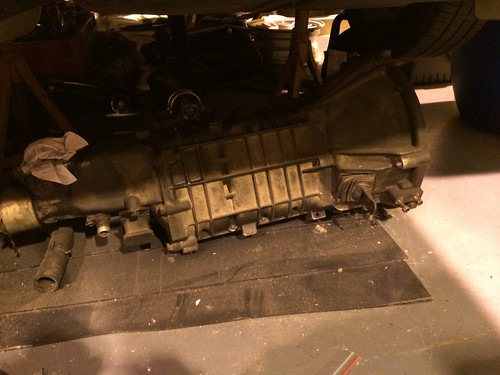
The engine as left by Mr Tom. He completed this last February.
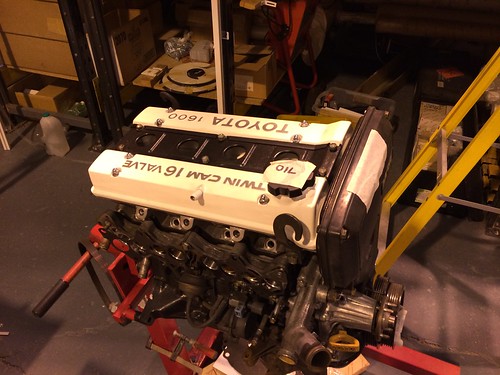
Untitled by Lauren Blighton, on Flickr
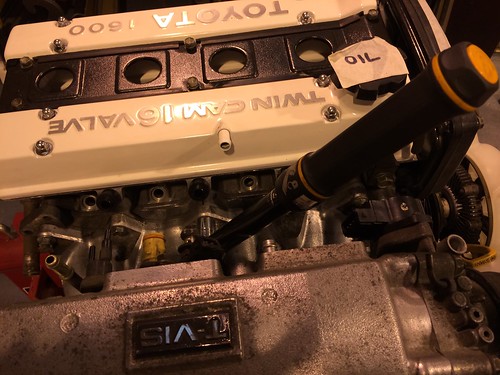
Tom has labelled some stuff, so I don't forget!
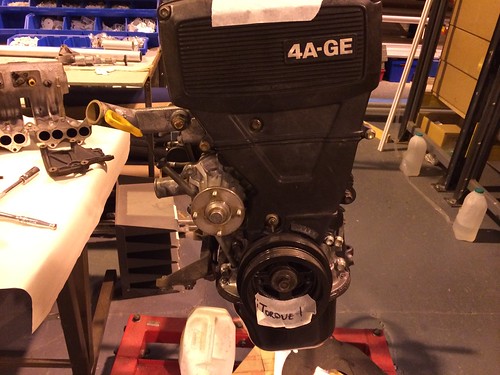
Untitled by Lauren Blighton, on Flickr
Some of the bits laid out on the table. Just got to figure out where everything goes.
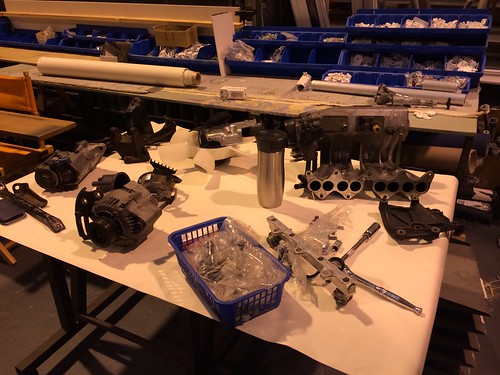
Untitled by Lauren Blighton, on Flickr
The car in situ where it has sat since August 2012!
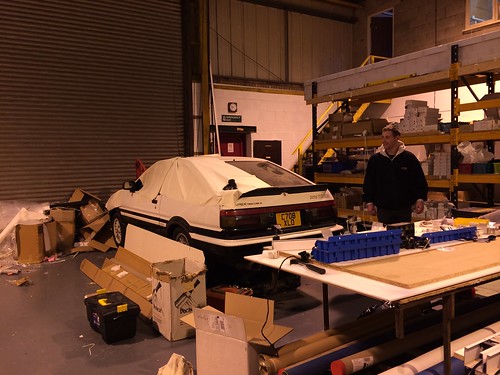
Untitled by Lauren Blighton, on Flickr
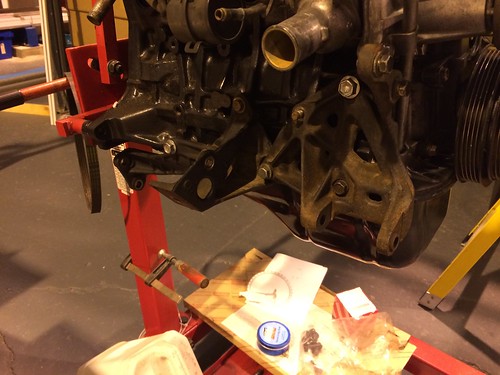
Here I've put on the block strengthening bracket, engine bracket and alternator bracket on the inlet side.
Untitled by Lauren Blighton, on Flickr
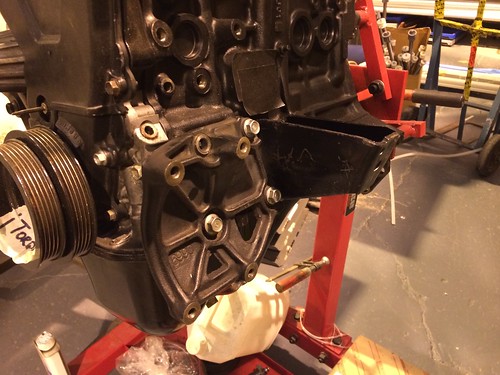
On the exhaust side, there is the strenthening brace, engine mount and AC and power steering bracket which is huge. There are other brackets that bolt to this!
Untitled by Lauren Blighton, on Flickr
A trip down memory lane seeing these stickers of events of years gone by:

Untitled by Lauren Blighton, on Flickr
Untitled by Lauren Blighton, on Flickr
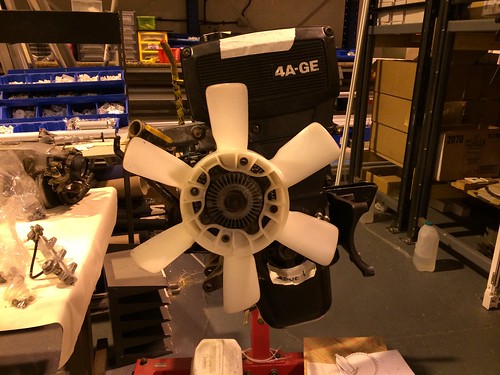
Engine fan on and pulley. It's a bit cleaner than when it came off!
Untitled by Lauren Blighton, on Flickr
I've already got an inlet manifold gasket on order from Toyota.
Today, I decided to make a start and try and work out where everything goes.
There is obviously a lot to do, but given the engine is built, it's really a matter of putting everything else back together so the engine and gearbox can go back in.
The engine as left by Mr Tom.
Tom has labelled some stuff, so I don't forget!
Some of the bits laid out on the table.
The car in situ where it has sat since August 2012!
Here I've put on the block strengthening bracket, engine bracket and alternator bracket on the inlet side.
On the exhaust side, there is the strenthening brace, engine mount and AC and power steering bracket which is huge.
A trip down memory lane seeing these stickers of events of years gone by:
Engine fan on and pulley.
2020 GR Yaris - Circuit Pack 
Re: Lauren's 4AGE build by Tom (Icunonsove)
Well done 
Keep at it
& do keep us up to date with progress 
Keep at it
Peter
1989 MR2 Mk1 NA T-bar
1998 Ssangyong Korando GLS
2011 Honda Civic Type R
1989 MR2 Mk1 NA T-bar
1998 Ssangyong Korando GLS
2011 Honda Civic Type R
-
Lauren
- IMOC Committee
- Posts: 38632
- Joined: Mon Dec 13, 2004 5:37 pm
- Location: Greater Manchester
- Contact:
Re: Lauren's 4AGE build by Tom (Icunonsove)
Had a quick hour and a half at it today.
Got the engine ready for mating to the gearbox next weekend.
Torqueing the Inlet manifold:
Untitled by Lauren Blighton, on Flickr
New injector seals on:
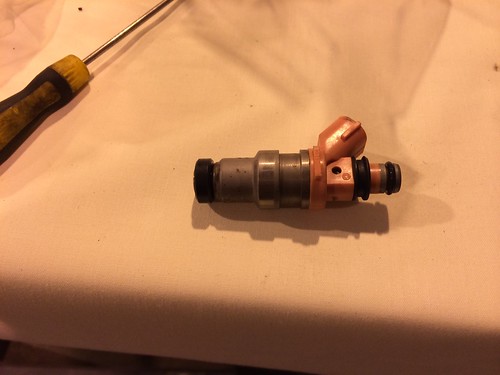
Untitled by Lauren Blighton, on Flickr
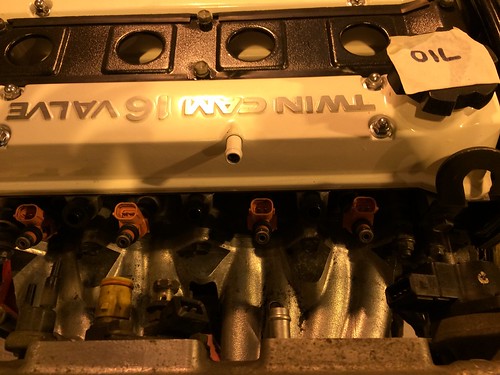
Injectors in until I realised it would likely be easier to push them onto the fuel rail first. What a fiddly job on your own.
Untitled by Lauren Blighton, on Flickr
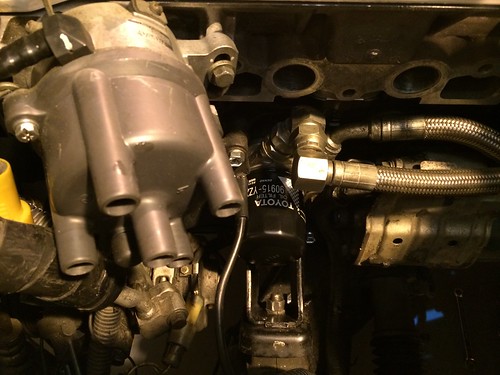
Dizzy in:
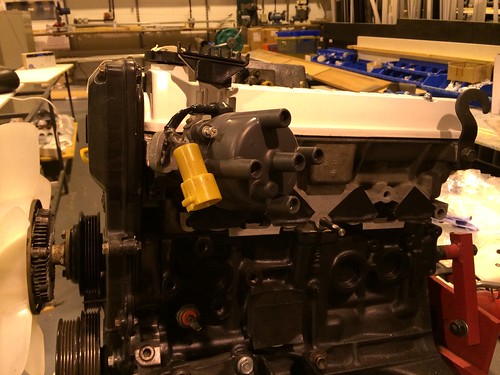
Untitled by Lauren Blighton, on Flickr
I might look at getting a new O ring. Couldn't find one amongst my new parts bag. Also can't find one of the bolts for the distributor so will order another from Toyota. Might be ordering a few lost bolts at this rate!
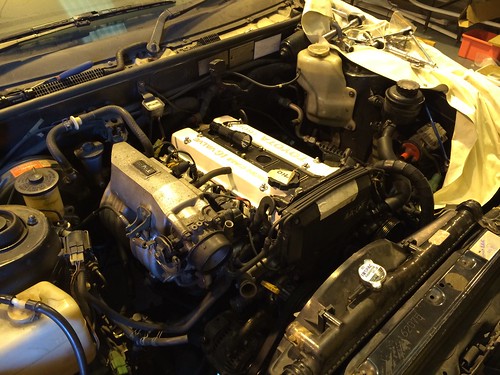
Alternator on. Was interesting that I found that when I bolted up the lower brace for the inlet manifold it didn't seem to fit right. If I did the bolt up to the block it would have been under tension. Turns out the AE86 has a different brace which is shorter and bolts off one of the lower block strengthening brackets.
Not that interesting, save for putting the fan/alternator/water pump belt on, it's pretty much ready for bolting the gearbox up.
Next weekend this can go on:
Untitled by Lauren Blighton, on Flickr
Then hopefully we'll get it all back in.
Got the engine ready for mating to the gearbox next weekend.
Torqueing the Inlet manifold:
New injector seals on:
Injectors in until I realised it would likely be easier to push them onto the fuel rail first.
Dizzy in:
I might look at getting a new O ring.
Alternator on.
Not that interesting, save for putting the fan/alternator/water pump belt on, it's pretty much ready for bolting the gearbox up.
Next weekend this can go on:
Then hopefully we'll get it all back in.
2020 GR Yaris - Circuit Pack
-
wilkie senior
- IMOC Moderator
- Posts: 2061
- Joined: Tue Feb 01, 2011 8:53 pm
- Location: Barnoldswick
Re: Lauren's 4AGE build by Tom (Icunonsove)
Looking forward to seeing it back on the road

Hail Cosmos Eagle Rev 5, 1998
RIP White Eagle Rev 1, 1991
-
boondougal
- Posts: 520
- Joined: Sun Jul 10, 2005 9:48 am
- Location: Shavington (near Crewe)
Re: Lauren's 4AGE build by Tom (Icunonsove)
really good build thread.
When i was looking at the colour options for the cam covers i really wanted white but i got shot down a little so i changed it to a blue to match my car... which i think was the right touch but i do like the white... especially for your car!
this will look great back in the engine bay.
When i was looking at the colour options for the cam covers i really wanted white but i got shot down a little so i changed it to a blue to match my car.
this will look great back in the engine bay.
-
Lauren
- IMOC Committee
- Posts: 38632
- Joined: Mon Dec 13, 2004 5:37 pm
- Location: Greater Manchester
- Contact:
Re: Lauren's 4AGE build by Tom (Icunonsove)
Well progress seems to be slow. I seem to feel ill everytime I work on the car, it's just a bit too cold in the workshop at the moment.
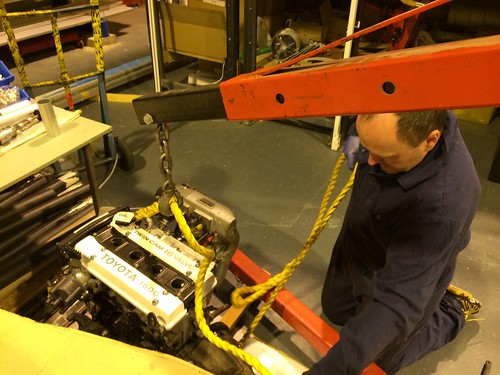
We got the engine off the stand with the help of the engine crane. I put the clutch and pressure plate on, but then remembered, arrghh, MR2 crank, spigot bearing!
I'm glad I remembered as I wouldn't want to go through that again.
Here it is with the spigot bearing which the gearbox input shaft locates into:

Untitled by Lauren Blighton, on Flickr
It does make it harder to get the gearbox on though.
Mark drills out the stripped thread on the bell housing:

Untitled by Lauren Blighton, on Flickr
Then he taps it:

Untitled by Lauren Blighton, on Flickr
Then helicoil in:

Untitled by Lauren Blighton, on Flickr
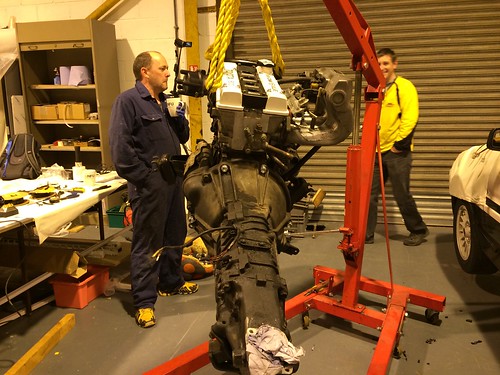
Engine and gearbox reunited complete with new clutch.

Untitled by Lauren Blighton, on Flickr
There are four bolts missing. Mark wasn't happy using whatever bolts were around so will have to order the right bolts from Toyota.
Next step is getting the engine and box in, not looking forward to that!
We got the engine off the stand with the help of the engine crane.
I'm glad I remembered as I wouldn't want to go through that again.
Here it is with the spigot bearing which the gearbox input shaft locates into:
It does make it harder to get the gearbox on though.
Mark drills out the stripped thread on the bell housing:
Then he taps it:
Then helicoil in:
Engine and gearbox reunited complete with new clutch.
There are four bolts missing.
Next step is getting the engine and box in, not looking forward to that!
2020 GR Yaris - Circuit Pack
Re: Lauren's 4AGE build by Tom (Icunonsove)
excellent build
On my AE86 I have always put the engine and the box separated and then torqued them up once in place...
You have to lift the car off the ground a good bit to be able to put them in when they are stuck together....
good one 

On my AE86 I have always put the engine and the box separated and then torqued them up once in place.
You have to lift the car off the ground a good bit to be able to put them in when they are stuck together
good one
-
Lauren
- IMOC Committee
- Posts: 38632
- Joined: Mon Dec 13, 2004 5:37 pm
- Location: Greater Manchester
- Contact:
Re: Lauren's 4AGE build by Tom (Icunonsove)
Well, the car is already in the air, so it's got to be easier. Last time I had the eninge apart I used an MR2 block and didn't realise about the spigot bearing. I then had to take the box off to put it in. Was a total nightmare, so didn't fancy all that fun and games by putting in the engine first!
2020 GR Yaris - Circuit Pack
-
Lauren
- IMOC Committee
- Posts: 38632
- Joined: Mon Dec 13, 2004 5:37 pm
- Location: Greater Manchester
- Contact:
Re: Lauren's 4AGE build by Tom (Icunonsove)
A bit more progress.
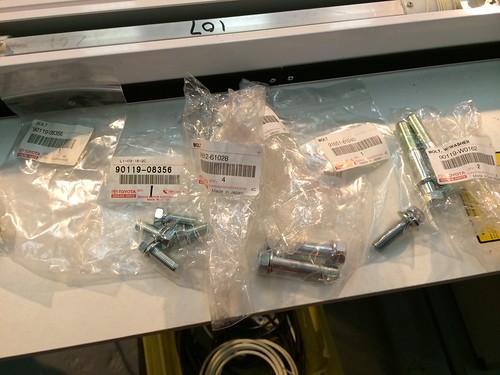
Mark insisted that I buy new bolts for the bellhousing to gearbox and block strengtheners. So off he went to Toyota:
Untitled by Lauren Blighton, on Flickr
£25 for 8 bolts!
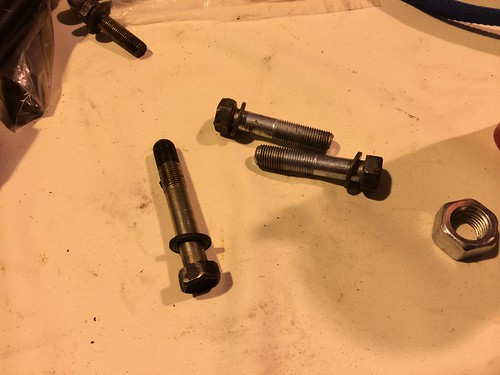
I'm glad we changed them though, the old ones were in terrible condition:
Untitled by Lauren Blighton, on Flickr
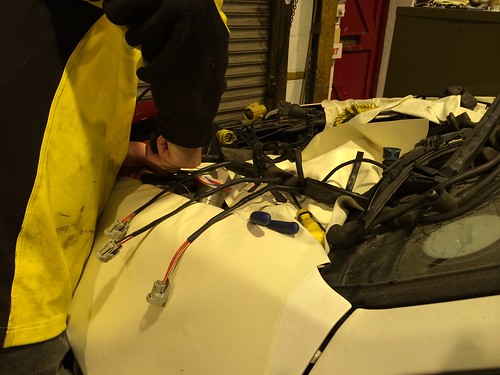
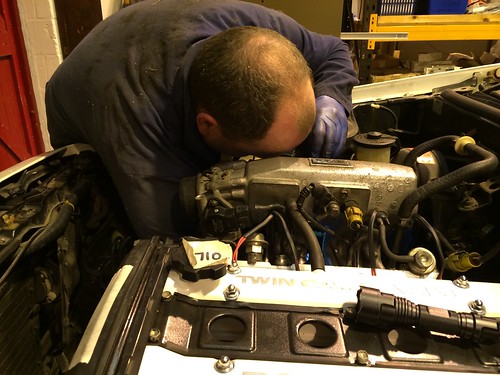
Mark makes the first cut to the wiring loom in preparation for the new injector clips(we've changed to later injectors from an AW11):
Untitled by Lauren Blighton, on Flickr
Meanwhile Si and I get the engine and box ready for lifting so we can get to those other bolts:
Untitled by Lauren Blighton, on Flickr
Starter on and some shiny bolts too:

Untitled by Lauren Blighton, on Flickr
Mark's soldering setup. I know crimping would be better but we don't have the gear. They will be well soldered, knowing Mark:

Untitled by Lauren Blighton, on Flickr
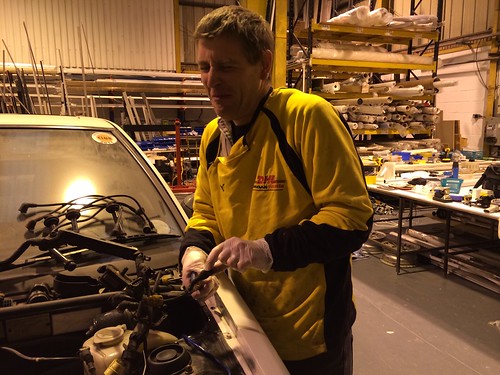
Mark, hard at work:

Untitled by Lauren Blighton, on Flickr
New injector plugs spliced into the old loom:
Untitled by Lauren Blighton, on Flickr
Next the engine and box goes back in!
Mark insisted that I buy new bolts for the bellhousing to gearbox and block strengtheners.
I'm glad we changed them though, the old ones were in terrible condition:
Mark makes the first cut to the wiring loom in preparation for the new injector clips
Meanwhile Si and I get the engine and box ready for lifting so we can get to those other bolts:
Starter on and some shiny bolts too:
Mark's soldering setup.
Mark, hard at work:
New injector plugs spliced into the old loom:
Next the engine and box goes back in!
2020 GR Yaris - Circuit Pack
-
PW@Woodsport
- Posts: 7642
- Joined: Tue Dec 14, 2004 6:40 pm
- Location: durham
- Contact:
Re: Lauren's 4AGE build by Tom (Icunonsove)
Lauren i'm not sure you can do that, swap Mk1b injectors into an early 4a-ge setup.
The early square 4a-ge injectors are high impedance without a resistor pack, the Mk1b injectors are low impedance WITH a resistor pack..... i'm not even sure you can retro fit the resistor pack without also changing the ECU to a late type.
You need to be careful with that or risk ECU damage, i might be wrong or possibly the AE86 is different but it just raised an eyebrow when i saw Mk1b injectors going into an early setup.
The early square 4a-ge injectors are high impedance without a resistor pack, the Mk1b injectors are low impedance WITH a resistor pack.
You need to be careful with that or risk ECU damage, i might be wrong or possibly the AE86 is different but it just raised an eyebrow when i saw Mk1b injectors going into an early setup.

-
Lauren
- IMOC Committee
- Posts: 38632
- Joined: Mon Dec 13, 2004 5:37 pm
- Location: Greater Manchester
- Contact:
Re: Lauren's 4AGE build by Tom (Icunonsove)
Okay, thanks for that Paul. Must admit, had no idea.
Edit, Mark said, all that's been checked it's not an issue.
Edit, Mark said, all that's been checked it's not an issue.
2020 GR Yaris - Circuit Pack
-
PW@Woodsport
- Posts: 7642
- Joined: Tue Dec 14, 2004 6:40 pm
- Location: durham
- Contact:
Re: Lauren's 4AGE build by Tom (Icunonsove)
Ah ok, well if Mark's checked it out it must be fine as he knows his stuff, just never heard of anyone doing that with the 4a-ge, normally you have to swap the entire ECU/loom and fit a resistor pack, and i have seen various other makes of car having problems burning ECUs out trying to run the "wrong" injectors...
http://www.hondata.com/techlowohminjectors.html
Just thought it was worth a mention.
http://www.hondata.com/techlowohminjectors.html
Just thought it was worth a mention.
-
Lauren
- IMOC Committee
- Posts: 38632
- Joined: Mon Dec 13, 2004 5:37 pm
- Location: Greater Manchester
- Contact:
Re: Lauren's 4AGE build by Tom (Icunonsove)
No worries, cheers for that.
I would have no idea myself. We'll see what happens I guess.
I would have no idea myself.
2020 GR Yaris - Circuit Pack
-
Lauren
- IMOC Committee
- Posts: 38632
- Joined: Mon Dec 13, 2004 5:37 pm
- Location: Greater Manchester
- Contact:
Re: Lauren's 4AGE build by Tom (Icunonsove)
Just spoken to Mark. The both are low impedance resistors. The AE86 ECU and setup it not the same as the early AW11.
It runs low impedance without a resistor pack.
It runs low impedance without a resistor pack.
2020 GR Yaris - Circuit Pack
-
PW@Woodsport
- Posts: 7642
- Joined: Tue Dec 14, 2004 6:40 pm
- Location: durham
- Contact:
Re: Lauren's 4AGE build by Tom (Icunonsove)
That would make sense, but terribly confusing! Your AE86 ECU must be able to drive low imp injectors without a resistor pack, so pink Mk1b ones should then be fine.
What i don't like is Toyota making an early engined AE86 with the same colour and shape injectors as a Mk1a from the same era but changing the impedance, that's a bit naughty to say the least, i wonder how many people have bought some AE86 injectors and tried to use them in a Mk1a or vice versa?
I remember talking to Tom about this and now remember the two injector types resistance being somewhat the same.
That injector difference(but same colour/shape) would catch a lot of people out.
What i don't like is Toyota making an early engined AE86 with the same colour and shape injectors as a Mk1a from the same era but changing the impedance, that's a bit naughty to say the least, i wonder how many people have bought some AE86 injectors and tried to use them in a Mk1a or vice versa?
I remember talking to Tom about this and now remember the two injector types resistance being somewhat the same.
That injector difference
-
Lauren
- IMOC Committee
- Posts: 38632
- Joined: Mon Dec 13, 2004 5:37 pm
- Location: Greater Manchester
- Contact:
Re: Lauren's 4AGE build by Tom (Icunonsove)
I agree it's a total nightmare. Mark and Tom spent some time testing them and working out whether it was okay or not.
2020 GR Yaris - Circuit Pack
-
Lauren
- IMOC Committee
- Posts: 38632
- Joined: Mon Dec 13, 2004 5:37 pm
- Location: Greater Manchester
- Contact:
Re: Lauren's 4AGE build by Tom (Icunonsove)
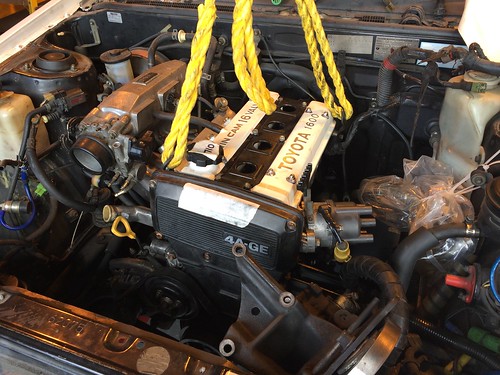
Okay, we have the engine and box back in the car! It's been 20 odd months since it last sat in there!
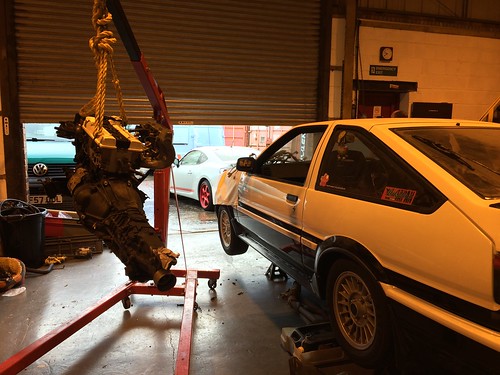
Waiting for the rain to stop so we can open the shutter doors and get the engine and box in position:
Untitled by Lauren Blighton, on Flickr
Shutter going up and time for the AE86 to meet the GT86.
Untitled by Lauren Blighton, on Flickr
With three of us and me being underneath guiding the gearbox down, we had it all on the mounts within 15 minutes.
Untitled by Lauren Blighton, on Flickr
Mocal sandwich plate for the oil cooler on and new Toyota filter added:
Untitled by Lauren Blighton, on Flickr
Si gets busy with all the awkward bits:
Untitled by Lauren Blighton, on Flickr
This pic doesn't show much, but it signifies the prop being back on the gearbox, so all is connected underneath:

Untitled by Lauren Blighton, on Flickr
Exhaust manifold needs some more wrapping yet:

Untitled by Lauren Blighton, on Flickr
Si still fiddling:

Untitled by Lauren Blighton, on Flickr
A bi of a problem here. The inlet seems to have got broken somewhow where it's been stored out of the car.  Not sure what to do, will see if Toyota still have new ones and price up, I think. Not sure I can do much with that.

Untitled by Lauren Blighton, on Flickr
Still, a decent amount of progress has been made today.
Untitled by Lauren Blighton, on Flickr
We need a few bits. Apart from the radiator, I need engine oil, gearbox oil and a few odds and sods. But, will hopefully have it running in a few weeks.
Waiting for the rain to stop so we can open the shutter doors and get the engine and box in position:
Shutter going up and time for the AE86 to meet the GT86.
With three of us and me being underneath guiding the gearbox down, we had it all on the mounts within 15 minutes.
Mocal sandwich plate for the oil cooler on and new Toyota filter added:
Si gets busy with all the awkward bits:
This pic doesn't show much, but it signifies the prop being back on the gearbox, so all is connected underneath:
Exhaust manifold needs some more wrapping yet:
Si still fiddling:
A bi of a problem here.
Still, a decent amount of progress has been made today.
We need a few bits.
2020 GR Yaris - Circuit Pack