http://www.youtube.com/watch?v=B3LQ0eKiiso
2zz-ge Mk1 build
Moderators: IMOC Moderators, IMOC Committee Members
-
PW@Woodsport
- Posts: 7642
- Joined: Tue Dec 14, 2004 6:40 pm
- Location: durham
- Contact:
Re: 2zz-ge Mk1 build
I took a video today of the engine running, this is on a Mk2 NA rear silencer and a merged downpipe that i forgot to take pics of! Anyway here it is, it is a very quiet engine indeed which mark really insisted on, the camera mic makes it sound a lot louder than it actually is, i promise you it's as quiet as OEM.
http://www.youtube.com/watch?v=B3LQ0eKiiso
http://www.youtube.com/watch?v=B3LQ0eKiiso

Re: 2zz-ge Mk1 build
Paul you're a star!! 
Superb work, I've just watched that video 5 times and its just how I wanted the transplant to be. I know the OEM intake and exhaust are probably not to everyone's tastes but the point is I expressed my wishes to Paul and he made it happen. His communication throughout the project has been faultless and the end result is a car that I can enjoy everyday with no downsides and about 70bhp more 
Also, I don't know much about Durham but I know now I can't wait to go there!
Superb work, I've just watched that video 5 times and its just how I wanted the transplant to be.
Also, I don't know much about Durham but I know now I can't wait to go there!
-
PW@Woodsport
- Posts: 7642
- Joined: Tue Dec 14, 2004 6:40 pm
- Location: durham
- Contact:
Re: 2zz-ge Mk1 build
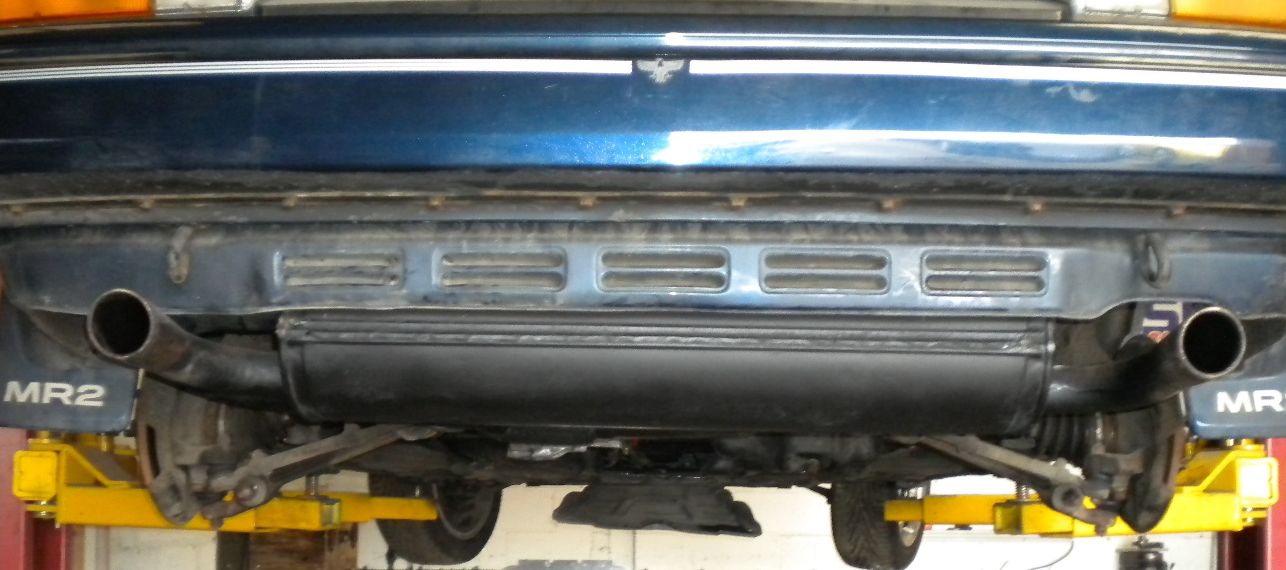
Pics of the Mk2 NA exhaust....
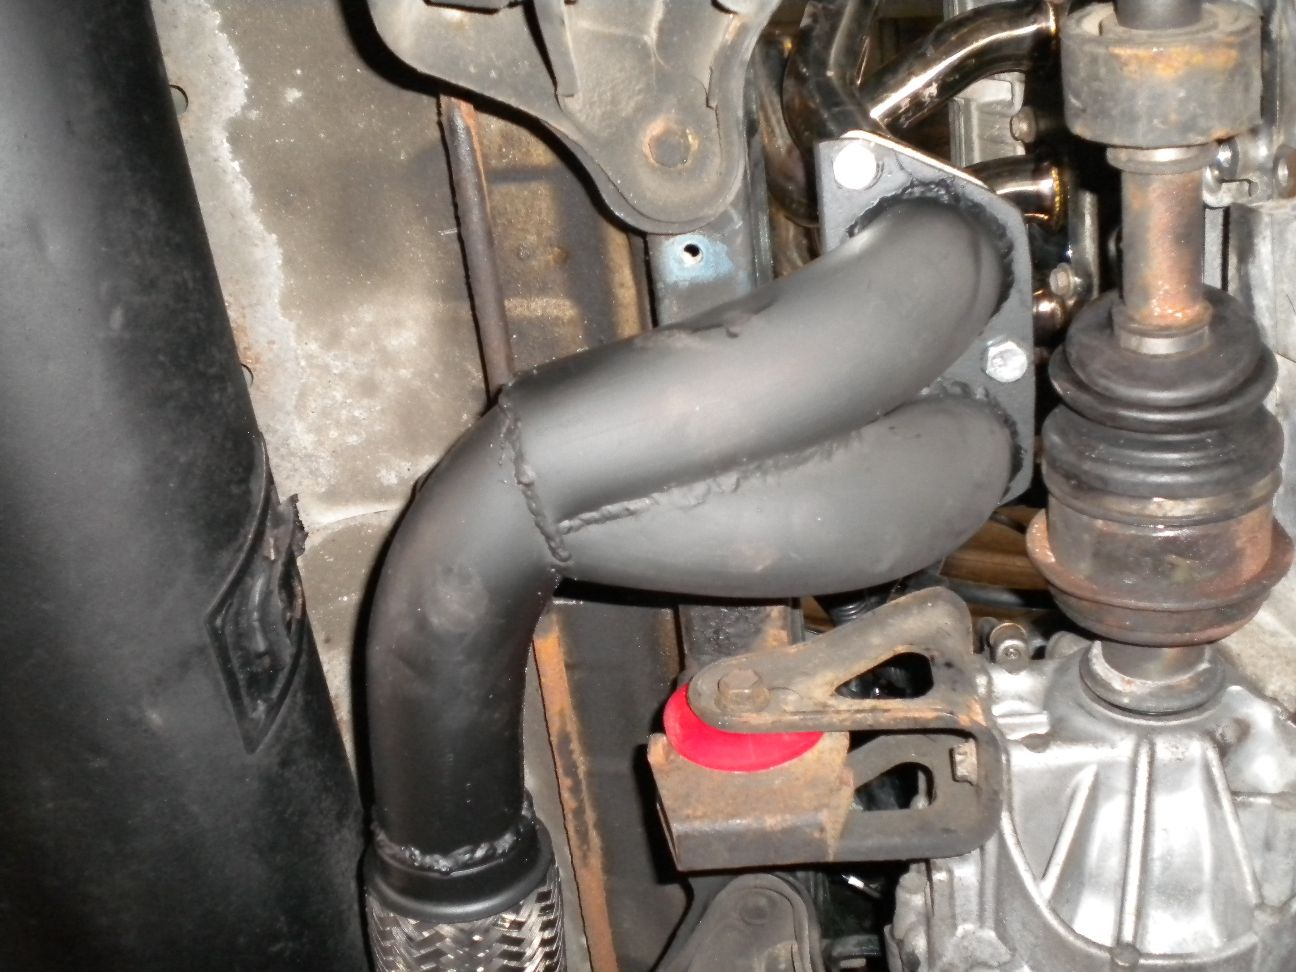
The Y pipe merge i made...
I noticed the rear firewall getting quite hot around the exhaust, and the ECU is on the other side of that wall, so i added a chequer plate shield around the exhaust, looks a bit industrial but this build is function over form.
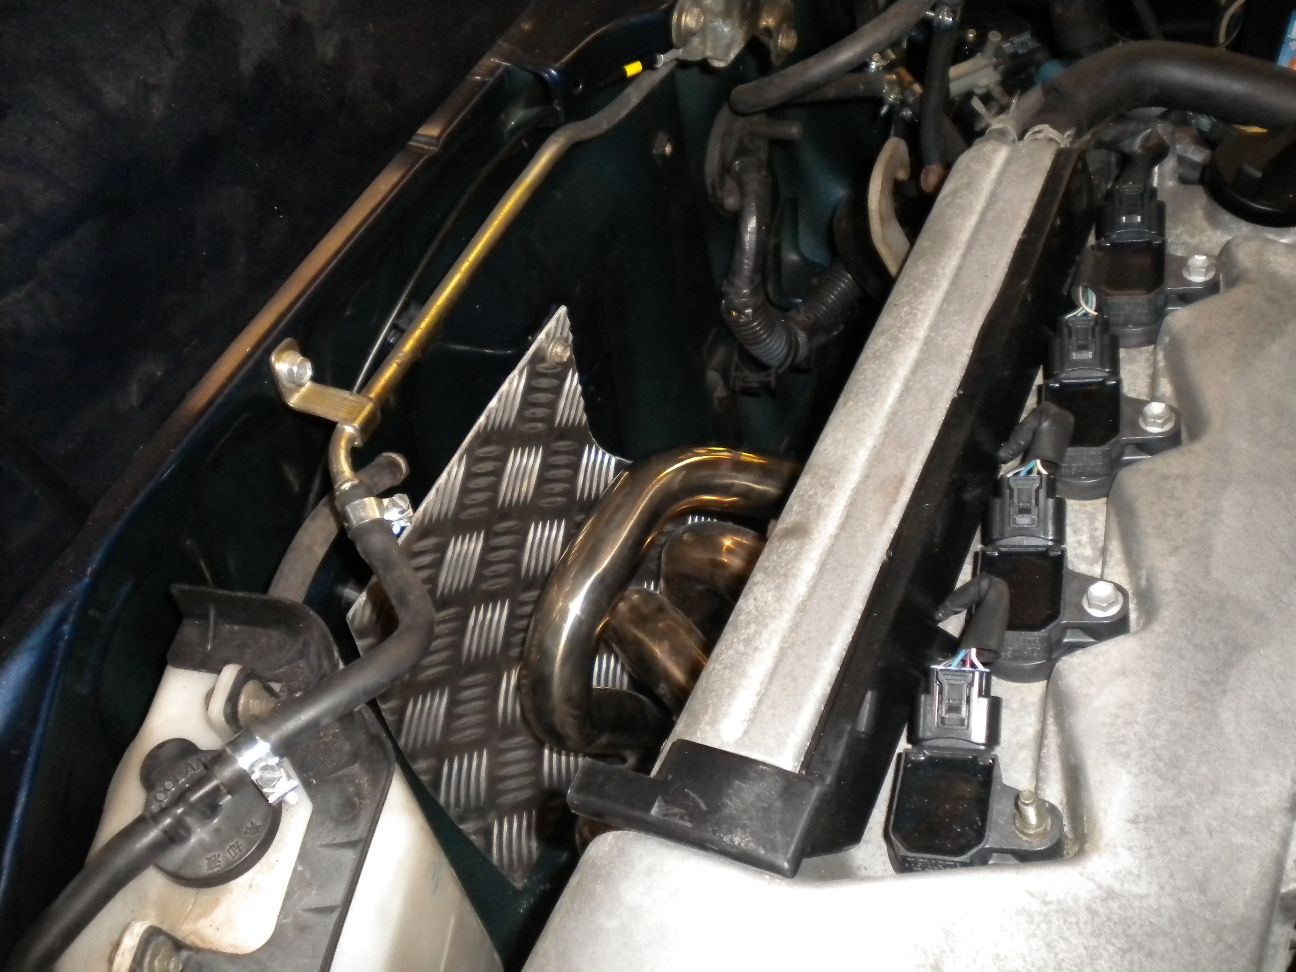
I also stuck a bit on the back of the ECU for good measure...

I suppose i could move the ECU, but it is bolted in the stock Mk1 position and moving it is a pain in the ass.
During running up we have noticed some heatsoak issues at idle only, either the 2zz water pump is not up to the job on a Mk1 or we have a dodgy thermostat, so i've ordered a new stat and hopefully that will cure it.
The Y pipe merge i made.
I noticed the rear firewall getting quite hot around the exhaust, and the ECU is on the other side of that wall, so i added a chequer plate shield around the exhaust, looks a bit industrial but this build is function over form.
I also stuck a bit on the back of the ECU for good measure.
I suppose i could move the ECU, but it is bolted in the stock Mk1 position and moving it is a pain in the ass.
During running up we have noticed some heatsoak issues at idle only, either the 2zz water pump is not up to the job on a Mk1 or we have a dodgy thermostat, so i've ordered a new stat and hopefully that will cure it.
Re: 2zz-ge Mk1 build
Maybe it's the angle but the exhaust looks like it's going to toast the drive shaft boot long before the ecu.
Have to say that chequer plate looks naff, a bit of Nimbus Lite would be so much better- not in the same price bracket as the plate though!
Have to say that chequer plate looks naff, a bit of Nimbus Lite would be so much better
-
PW@Woodsport
- Posts: 7642
- Joined: Tue Dec 14, 2004 6:40 pm
- Location: durham
- Contact:
Re: 2zz-ge Mk1 build
As i said this particular build is function over form, i am under instruction on that, i used the chequer plate because it will work, you will notice i haven't detailed anything on this engine like we do other projects. I suppose i could turn the plate around so you just see the flat side but why? We only need it to work.
There will be a heatshield going between the exhaust and driveshaft 
There will be a heatshield going between the exhaust and driveshaft
Re: 2zz-ge Mk1 build
Absolutely Paul. Given the choice between looks or function, I'd take function every time. This is after all going to be my everyday road car so above all else I want it to be reliable.
Great job on the exhaust Paul, I like the subtle look of the std. mk2 backbox and my ears will be happy now on the motorway, even if I do lose a couple of BHP over a performance back box.
Great job on the exhaust Paul, I like the subtle look of the std.
Re: 2zz-ge Mk1 build
Ok functionally how is chequer plate better than plain 2mm ally sheet?
2mm sheet is lighter, easier to form, cheaper and doesnt have a built in cheese grater to skin your knuckles against 
2mm sheet is lighter, easier to form, cheaper and doesnt have a built in cheese grater to skin your knuckles against
-
PW@Woodsport
- Posts: 7642
- Joined: Tue Dec 14, 2004 6:40 pm
- Location: durham
- Contact:
Re: 2zz-ge Mk1 build
Functionally it is 3mm thick, not 2..... so it's better. If i turned it around to leave the plain side in view it would still be doing the same job.
I could have used a 1mm piece of plain alloy sheet i had but i felt it wasn't thick enough.
I could have used a 1mm piece of plain alloy sheet i had but i felt it wasn't thick enough.
Re: 2zz-ge Mk1 build
This is probably a pointless argument but functionally an aluminium heat shield does not require thickness - if it did the Nimbus stuff would not be 0.6mm thick.
This sort of heat shield works on three levels- it's shiny so it reflects the radiant heat, it's highly conductive so it spreads the heat across it's surface to minimse hot spots and it traps a layer of air behind that works as an insulator. None of these means it has to be thick to function as a heat shield, at work we use gold foil as a heat shield - it's only microns thick.
This sort of heat shield works on three levels
-
PW@Woodsport
- Posts: 7642
- Joined: Tue Dec 14, 2004 6:40 pm
- Location: durham
- Contact:
Re: 2zz-ge Mk1 build
Yes i have used spacers to leave an air gap behind this shield, so i know how it works, honestly your only issue is with how it looks, but really who cares? I wasn't asked to build our usual show standard engine bay with this project, just make it happen, as i said if i turned the chequer plate around you would never have commented, so it's only a cosmetic issue for you. My customer is perfectly happy.
Re: 2zz-ge Mk1 build
MartG wrote:http://www.blitz-uk.co.uk/ProductItem-514.aspx
I agree
But not with the price
I am sure Mr Woods could make an ST205 chargecooler and an eaton SC from an early Cooper S work just as well, for a fraction of the cost
Re: 2zz-ge Mk1 build
True - or buy a wrecked Corolla Compressor ( if you can find one ) and use the engine out of that 
Re: 2zz-ge Mk1 build
Just thought Id write a long overdue update to his project.
We had a few initial problems which is to be expected with a project like this(1st in the country) but Im very pleased to say that the bugs were ironed out about a month ago and now the car is exactly how I want it.
First problem was that the custom tubular exhaust manifold(designed for MK3 with 2zz transplant) I bought from Ebay in the states was way too thin and kept cracking. It was welded up in one place then it would just crack again in another place. In the end Paul sorted this for me at his own cost by cutting and shutting a MK3 manifold to suit and using the standard MK3 manifold to engine bracing. Im very pleased to report there have be no further problems with this since.
Second problem was that there was a slight gear oil leak from the extended gear selector shaft. Again Paul managed to buy the correct seal from Toyota and this has been bonded on externally now making a oil tight seal. Throughout these problems and other very minor issues Paul has been outstanding with his customer service, always listening and rectifying the issues.
Anyway, how does it drive? I decided early on that I wanted the closest ratios available in the gearbox(apart from 6th) with the torsen LSD and Im very pleased I went for this setup. The traction on take off is great with both wheels digging into the tarmac. When the engine hits 6200rpm the second cam kicks in and the car just lets rip singing around to the 8500rpm cut out. Due to the close ratio box there is a momentary pause after the change to second gear then it hits 6200rpm cam change-over point and it takes off again. 3rd to 4th, 4th to 5th and 5th to 6th are all really close so from 2nd gear on the car never drops out of the high lift cam if all the revs are used. It is very addictive and amazingly fun. There is nothing better than taking it for a blast along known country roads on a quiet Sunday morning, with the engine on the high lift cam the noise is like a group A normally aspirated rally car 
The engine makes more power and torque at all points in the rev range than the standard 4AGE but it still retains and even enhances the high revving nature that makes the Mk1 MR2 so much fun in the first place. As Paul put it its like a Mk1 plus. Since this is my everyday car I also wanted it to cruise well on the motorway, be quiet and return decent mpg. Im pleased to say due to the standard MK2 backbox, standard Mk1 intake and 6th gear it does indeed cruise more quietly than the standard Mk1 and returns about 40mpg at a steady 70 - 80mph. Handling wise due to the LSD this has improved immensely and in the wet Im now able to hang the rear out around roundabouts and hold it there on the power in a lovely drift. The 2ZZ engine is very light being all alloy and is lighter than the original iron block 4AGE, this has cancelled out the weight of the extra (6th) gear and has maintained the great balance of the standard Mk1 MR2. Paul fitted a full set of poly bushes for me so next week Ill have the car fully aligned to the TRD settings which should hopefully sharpen the initial turn in a little. Other than that I may experiment with drilling out the poly engine mounts slightly since at the moment there is a little too much vibration at tick-over due to the ridged nature of the mounts.
Overall though as youve probably guessed Im delighted with this conversion hats off to Paul at Woodsport for not only creating it but also the backup hes given me since.
We had a few initial problems which is to be expected with a project like this
First problem was that the custom tubular exhaust manifold
Second problem was that there was a slight gear oil leak from the extended gear selector shaft.
Anyway, how does it drive? I decided early on that I wanted the closest ratios available in the gearbox
The engine makes more power and torque at all points in the rev range than the standard 4AGE but it still retains and even enhances the high revving nature that makes the Mk1 MR2 so much fun in the first place.
Overall though as youve probably guessed Im delighted with this conversion hats off to Paul at Woodsport for not only creating it but also the backup hes given me since.
-
Lauren

- IMOC Committee
- Posts: 38632
- Joined: Mon Dec 13, 2004 5:37 pm
- Location: Greater Manchester
- Contact:
Re: 2zz-ge Mk1 build
Just a word of warning about the TRD settings. They don't really sharpen the handling or improve turn in. Unfortunately the MK1 will always struggle with turn in to an extent.
If you want to do that, back off the front toe in to around parallel and think about a tad less rear toe in(which I think is in line with the TRD settings (3.2 mm toe-in IIRC).
If you want to do that, back off the front toe in to around parallel and think about a tad less rear toe in
2020 GR Yaris - Circuit Pack 
Re: 2zz-ge Mk1 build
We run 0 toe in on the front of the rally car, turn in is good.
We try not too run too much toe in on the rear either. Makes things interesting.
Front is very pointy but the back doesn't always follow, very controllable though.
We try not too run too much toe in on the rear either.
Front is very pointy but the back doesn't always follow, very controllable though.
Re: 2zz-ge Mk1 build
The TRD settings are as follows:
Toe-In:
ft=1.6mm(stock=1mm)
rr=3.2mm(stock=4-5mm)
Castor= 6 deg (don't worry about this too much though )
Camber:
ft= 1mm neg(stock zero)
rr= 1.5 neg(stock 1 deg)
It seems strange to me that the TRD settings run more toe in than standard as this just gives improved straight line stability. Thanks for your comments I think Ill run the fronts at 0 deg and see how I get on.
Toe-In:
ft=1.6mm
rr=3.2mm
Castor
Camber:
ft= 1mm neg
rr= 1.5 neg
It seems strange to me that the TRD settings run more toe in than standard as this just gives improved straight line stability.
Re: 2zz-ge Mk1 build
front toe-in hurts straight line stability!! it will make the car more willing to change direction at higher speed. think about it, when you induce a change in direction you transfer weight to the outside wheel, which is turned in more relative to the steering angle, so it wants to change direction faster. the upside generally being that it will turn in more responsively as well. but things are never this simple.
the geometry settings arent a magical handling fix though. you cant cure understeer with toe settings if the understeer isnt being caused by the toe settings, for example. springs, dampers, anti-roll bars, tyres, etc all play a (more significant) part. you have to find the combination that works with your setup. the TRD settings are based on internet rumour that they were developed by TRD. who knows if thats even true, and if it is, what setup were TRD running? who was driving the car? where was the car being driven?
start out with stock settings(its pretty much guaranteed that they wont be set at stock at present, they tend to drift away over time). then make changes based on handling characteristics. there is no magical setup, especially since your car is fairly unique.
the geometry settings arent a magical handling fix though.
start out with stock settings
Re: 2zz-ge Mk1 build
That'll teach me to trust wickedpedia
"In a rear wheel drive car, increased front toe in provides greater straight-line stability at the cost of some sluggishness of turning response, as well as a little more tire wear as they are now driving a bit sideways. On front wheel drive cars, the situation is more complex."
http://en.wikipedia.org/wiki/Toe_%28automotive%29
http://en.wikipedia.org/wiki/Toe_%28automotive%29