Mk2 2gr supercharged
Moderators: IMOC Moderators, IMOC Committee Members
-
PW@Woodsport
- Posts: 7642
- Joined: Tue Dec 14, 2004 6:40 pm
- Location: durham
- Contact:
Re: Mk2 2gr supercharged
Just noticed a wire frame error on the rear arch, it won't have a flat arch top like that, I was lazy with my sketch.

Re: Mk2 2gr supercharged
Re: Mk2 2gr supercharged
I was over Paula's today and we had a long conversation about the car. Mate you have upped the ante. I like the F40 engine lid, the plans for the wide-wide body and your ideas for the rest of the car. All you have to do now is finish the bloody thing!
-
PW@Woodsport
- Posts: 7642
- Joined: Tue Dec 14, 2004 6:40 pm
- Location: durham
- Contact:
Re: Mk2 2gr supercharged
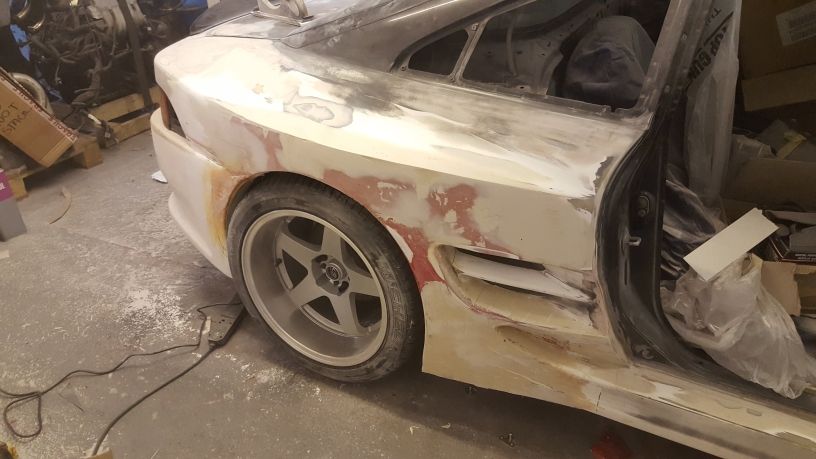
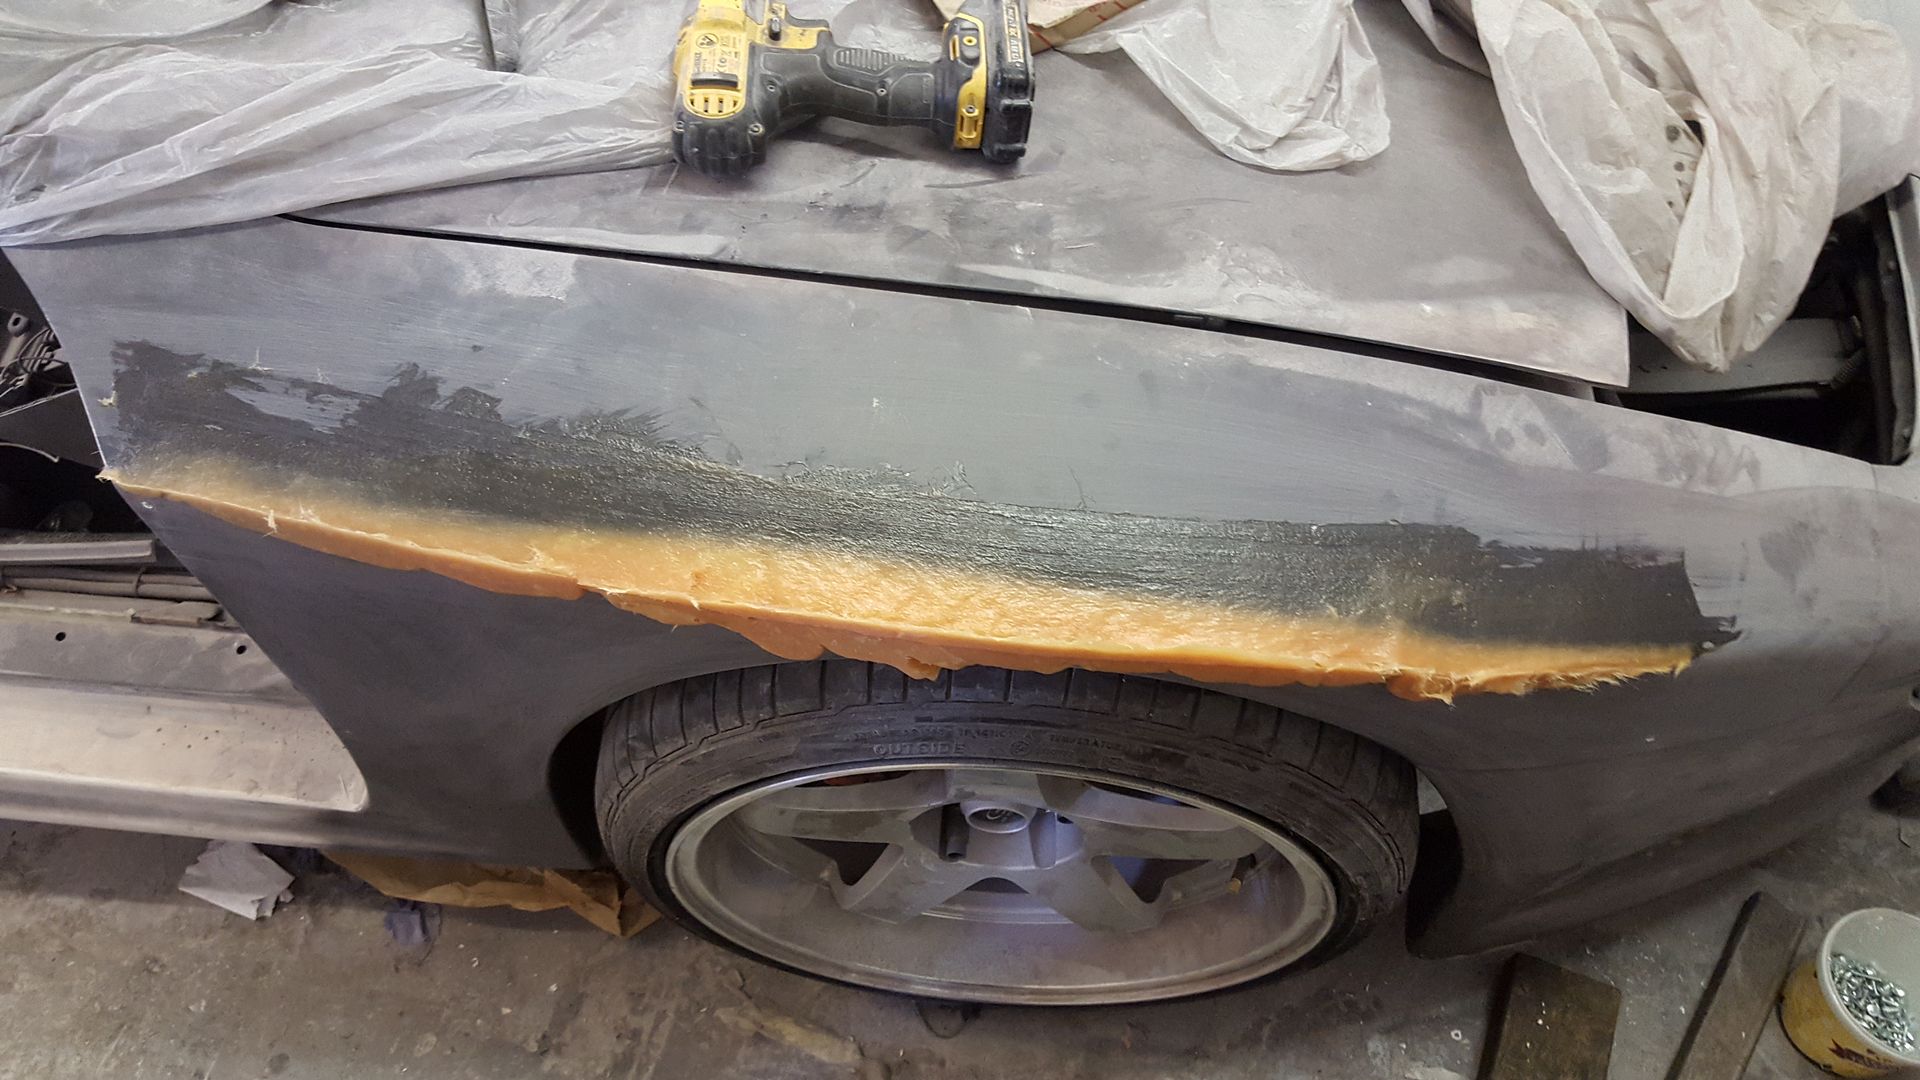
Ok so I grabbed a cheeky day on the car to make a start on extending the widebody to cover the 12j rims.
The initial plan was to cut and extend the entire quarter and blend it back in, however it had more chance of compromising the overall rigidity doing it that way, so I decided to leave the original structure in place.
I started by grafting the vent area from a Bomex sideskirt(fibreglass rather than some plastic composite Toyota use) into the original TRD vent area, this gave me my starting lines and coverage on the front edge of the tyre.
From that I temporarily used some 3mm ply that curved really nicely from the vent over to the rear bumper, this was aligned 10mm from the planned finished surface. 10mm of P40 was then laid up over that area to give it structure and a basic shape.
After several hours of basic body profiling the new extended quarter shape has started to emerge and final shaping using Upol"Fantastic" has started, which is 2-3mm thick at its deepest point.
It is going to take several weeks per corner to get the final shape right, but very happy with it so far. As you can see the wing top edge is very sharp right now, that is just a result of the body file meeting at two faces and allows me to get the downslope and front face contours perfect. The final wing edge will be rounded off like the original TRD is, although I do like the pin sharp edge I can't bring myself to leave it like that.
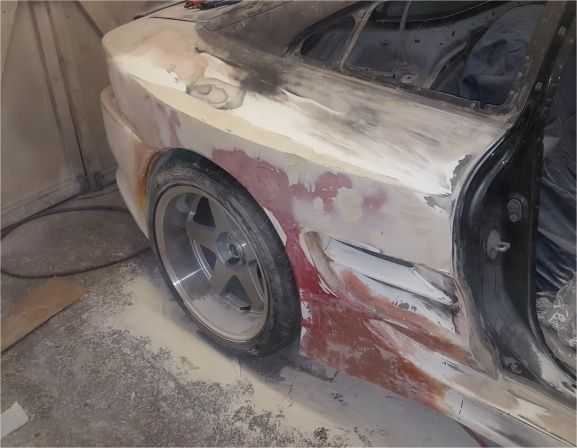
You can see in the pic below how the sideskirt now has a nice flick out which starts near the door post, and I've also decided not to extend the original vent centre bar, it looks better inboard and makes the vent look deeper(which of course it is).
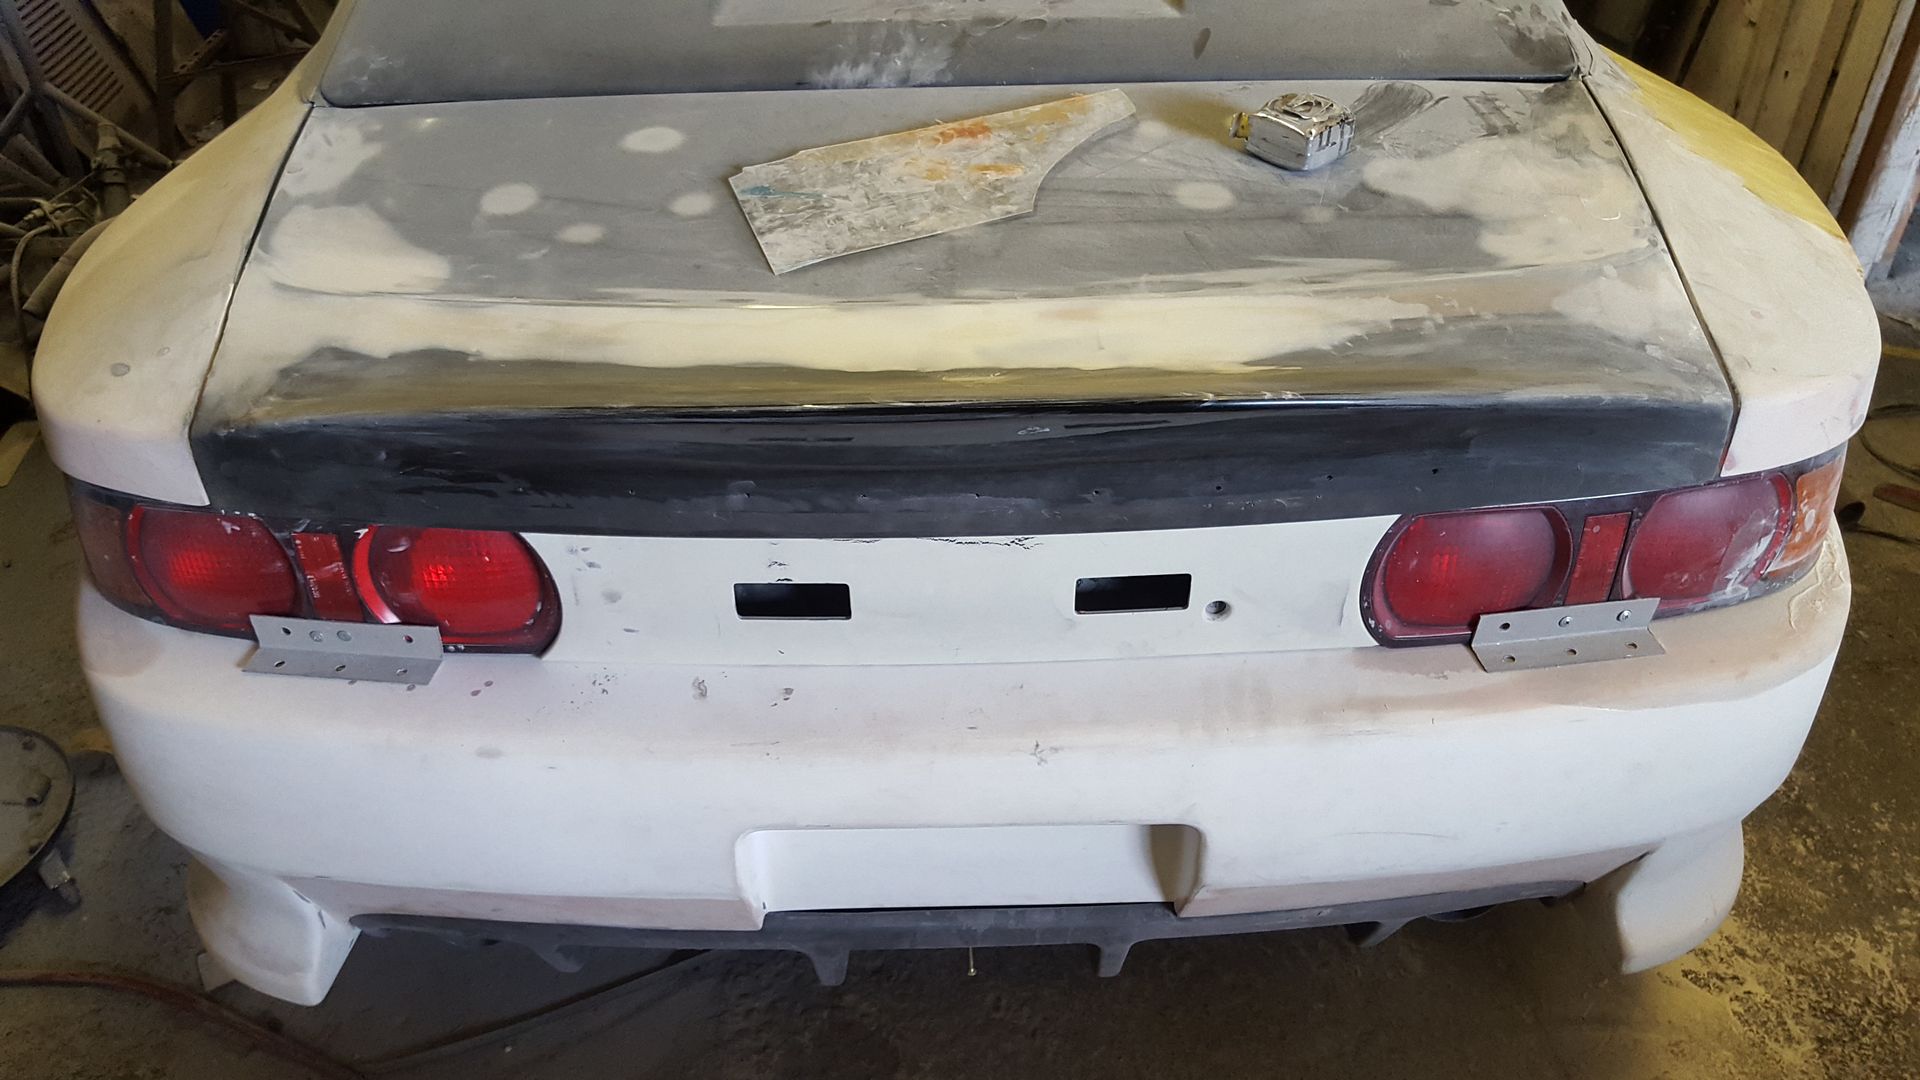
From the rear you can now see the added width on the right, you might remember from last year the lights have already been moved outboard and new wider centre panel made, the light recesses will not need to be redone as part of the widebody extending.
You can also see I have started to make the new ducktail design, my previous Autopista design was too over fussy in the end, I want a more exotic, cleaner look. The ducktail has been bonded and temporarily screwed for now, but will be totally flush blended into the extended TRD boot, this also means I can change designs/spoiler in future without it affecting the rest of the car.
For me this new design works much better with the F40 lid and ties in nicely with the rear diffuser.
The F40 lid is going to get the lowest centre vent altered, that will incorporate a brake light unit but not as wide as it is now, the lid also needs a complete frame, rain channel and rain trays making for it along with being hinged and gas struts added.
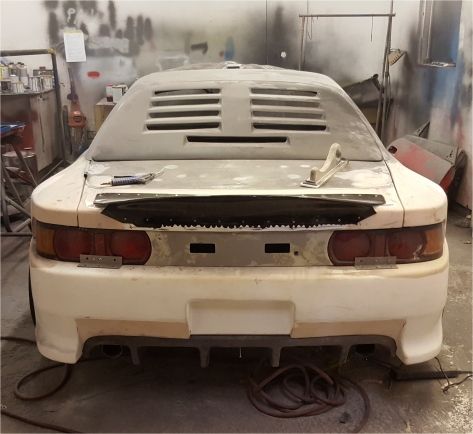
The TRD rear bumper lower"swages" have also bothered me, in fact I really don't like the design there (the scalloped out bits either side of the diffuser) , I think those areas would look much better blended out with maybe just a small swage left at the bottom, undecided on that one for now.
So yeah, an insane amount of work all happening at the same time, but I have a set vision for it now which will be seen through to completion.
The initial plan was to cut and extend the entire quarter and blend it back in, however it had more chance of compromising the overall rigidity doing it that way, so I decided to leave the original structure in place.
I started by grafting the vent area from a Bomex sideskirt
From that I temporarily used some 3mm ply that curved really nicely from the vent over to the rear bumper, this was aligned 10mm from the planned finished surface.
After several hours of basic body profiling the new extended quarter shape has started to emerge and final shaping using Upol
It is going to take several weeks per corner to get the final shape right, but very happy with it so far.
You can see in the pic below how the sideskirt now has a nice flick out which starts near the door post, and I've also decided not to extend the original vent centre bar, it looks better inboard and makes the vent look deeper
From the rear you can now see the added width on the right, you might remember from last year the lights have already been moved outboard and new wider centre panel made, the light recesses will not need to be redone as part of the widebody extending.
You can also see I have started to make the new ducktail design, my previous Autopista design was too over fussy in the end, I want a more exotic, cleaner look.
For me this new design works much better with the F40 lid and ties in nicely with the rear diffuser.
The F40 lid is going to get the lowest centre vent altered, that will incorporate a brake light unit but not as wide as it is now, the lid also needs a complete frame, rain channel and rain trays making for it along with being hinged and gas struts added.
The TRD rear bumper lower
So yeah, an insane amount of work all happening at the same time, but I have a set vision for it now which will be seen through to completion.
-
PW@Woodsport
- Posts: 7642
- Joined: Tue Dec 14, 2004 6:40 pm
- Location: durham
- Contact:
Re: Mk2 2gr supercharged
Some more time spent on the new duck tail design, this works perfectly for me from a styling point of view.
Still an awful lot to do of course.
Still an awful lot to do of course.
Re: Mk2 2gr supercharged
Had a look at her today, what a presence the car has about it. As said before photos don't do it justice and it's hard to get an idea of the shape when the car's not in one colour. I like the duck tail mate, really sets the back end off.


-
PW@Woodsport
- Posts: 7642
- Joined: Tue Dec 14, 2004 6:40 pm
- Location: durham
- Contact:
Re: Mk2 2gr supercharged
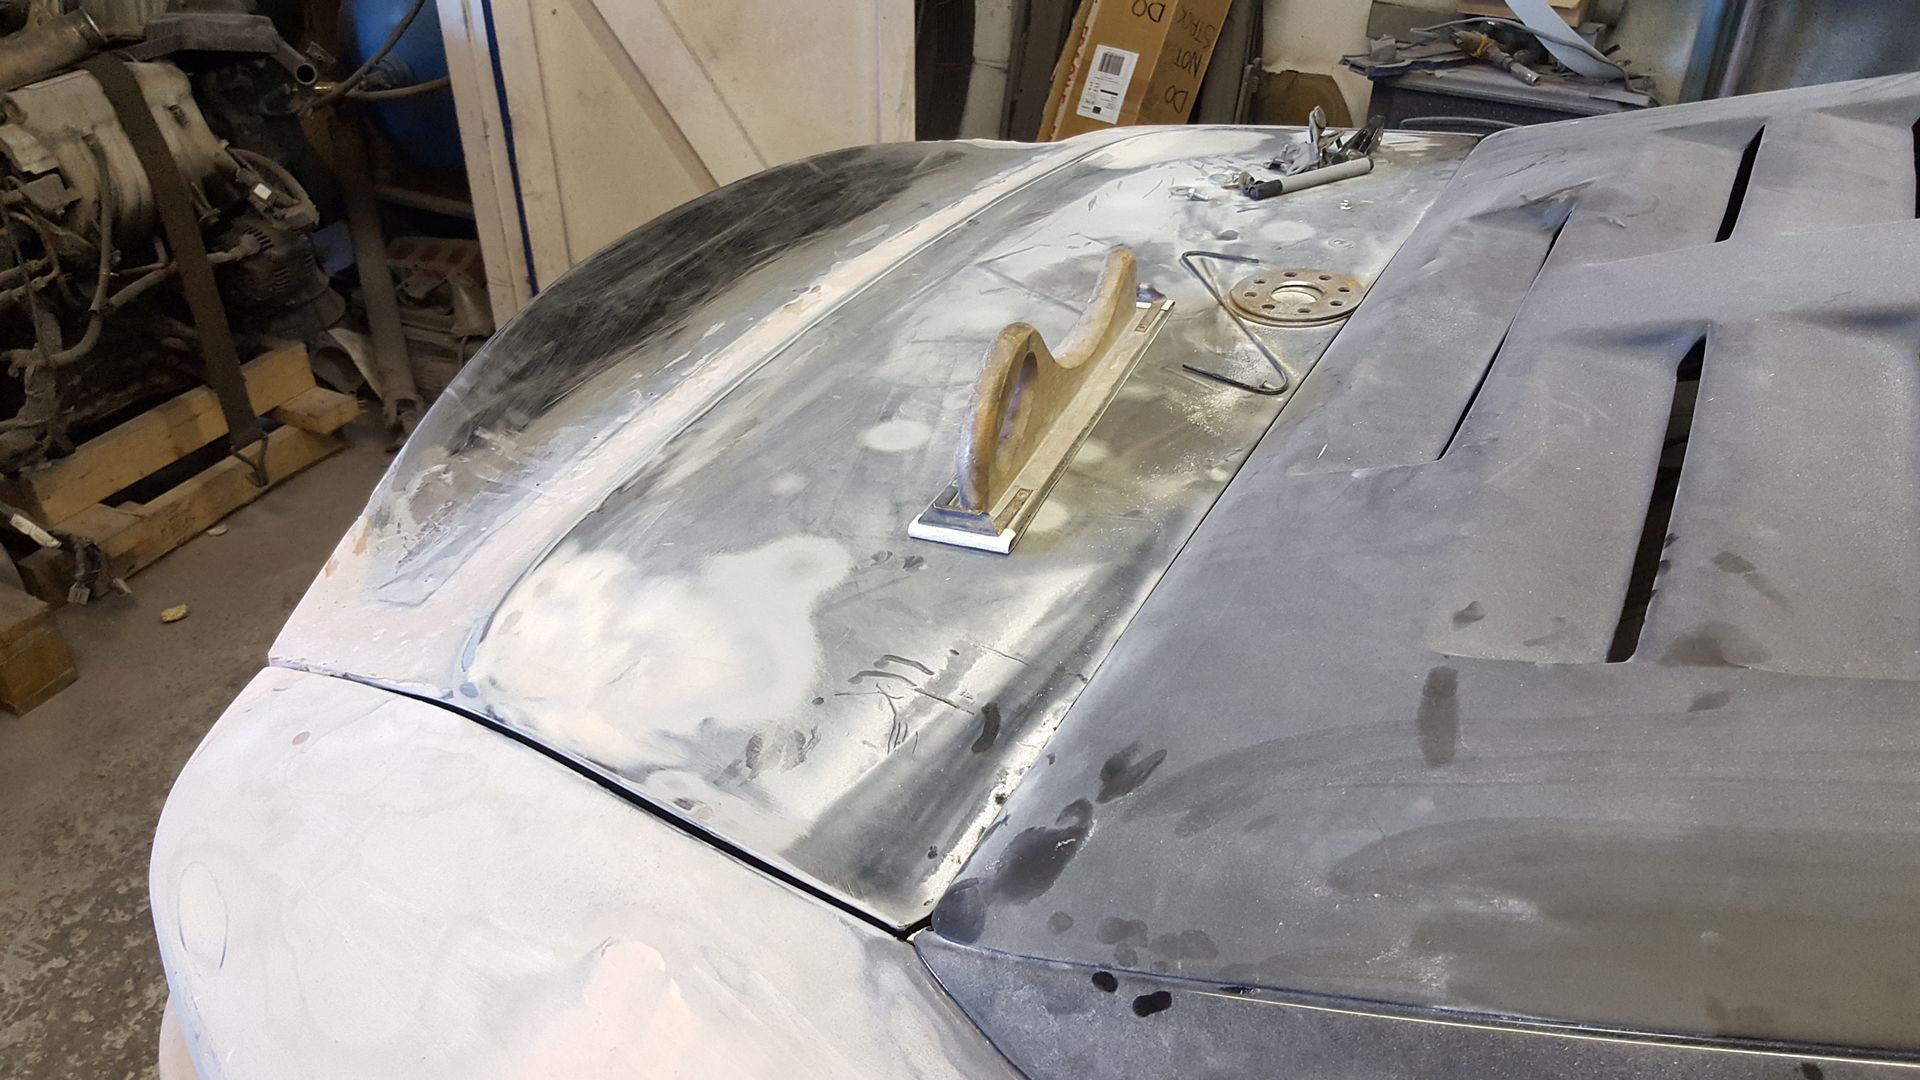
So a little side project on the car is to make the F40 lid an integral part of the body. I can't ever remember seeing anyone being able to successfully hinge the lid so it works properly and not just a lift on/lift off panel (which is kind of crap really).
I've put a lot of research into this and how the hinge assembly needs to work to lift the lid up and then away from the roof line. The hinge from a simple tailgate is always mounted behind the roof edge which allows it's arc to lift the panel up and away, but I have the complication of a rear window preventing a hinge behind the roof line. Now as soon as a hinge is mounted in front of the roof line it will not work, IE always taking the panel into the roof as soon as it starts to open.
I found a mk3 mr2 engine lid hinge was a good starting point, it has a double pivot type mechanism that pushes the lid up and away while being mounted on the engine bay side.
For now these hinges are dummy mounted on makeshift brackets, ugly at the minute but I have plans to box these in and make them as OEM as possible, excuse the dust....

Now just bolting these hinges to the lid skin is far too flimsy, the lid itself needs proper structure to it, again more like a tail gate would be, so that it cannot flex and potentially damage surrounding paintwork. It needs to solidly shut onto its catch and feel like a factory item.
So I have started making the steel frame for the lid, this is being done with flat bar for the hinge plates and light box section for the surrounding frame. The frame is being bonded and fibreglassed into the original F40 lid skin.
About 3 hours fabrication went into the left side frame which will tie into a lower member.
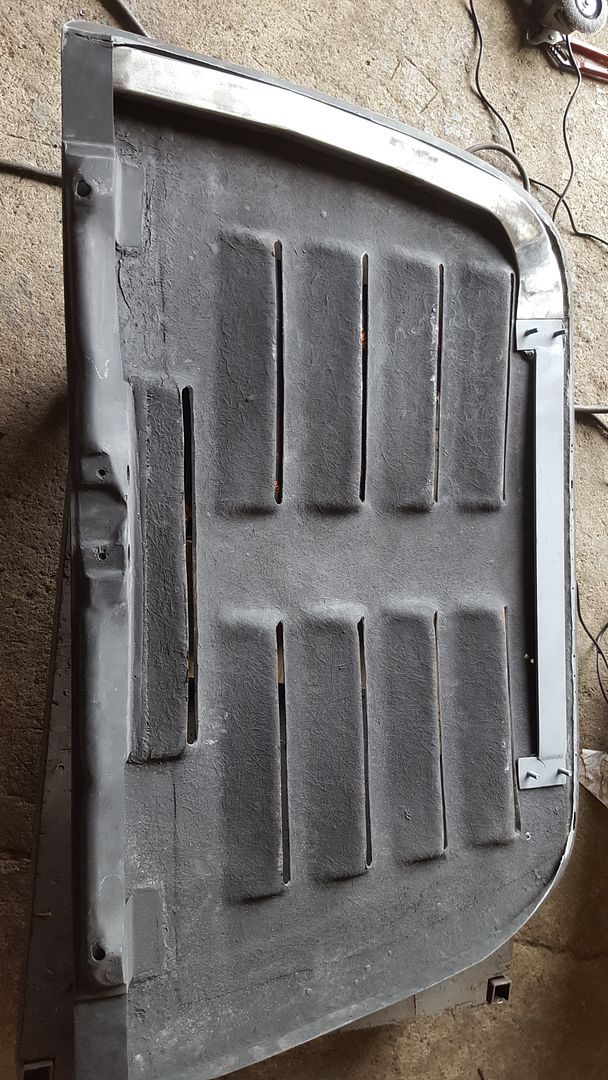
The starting point for the right side of the lid frame...
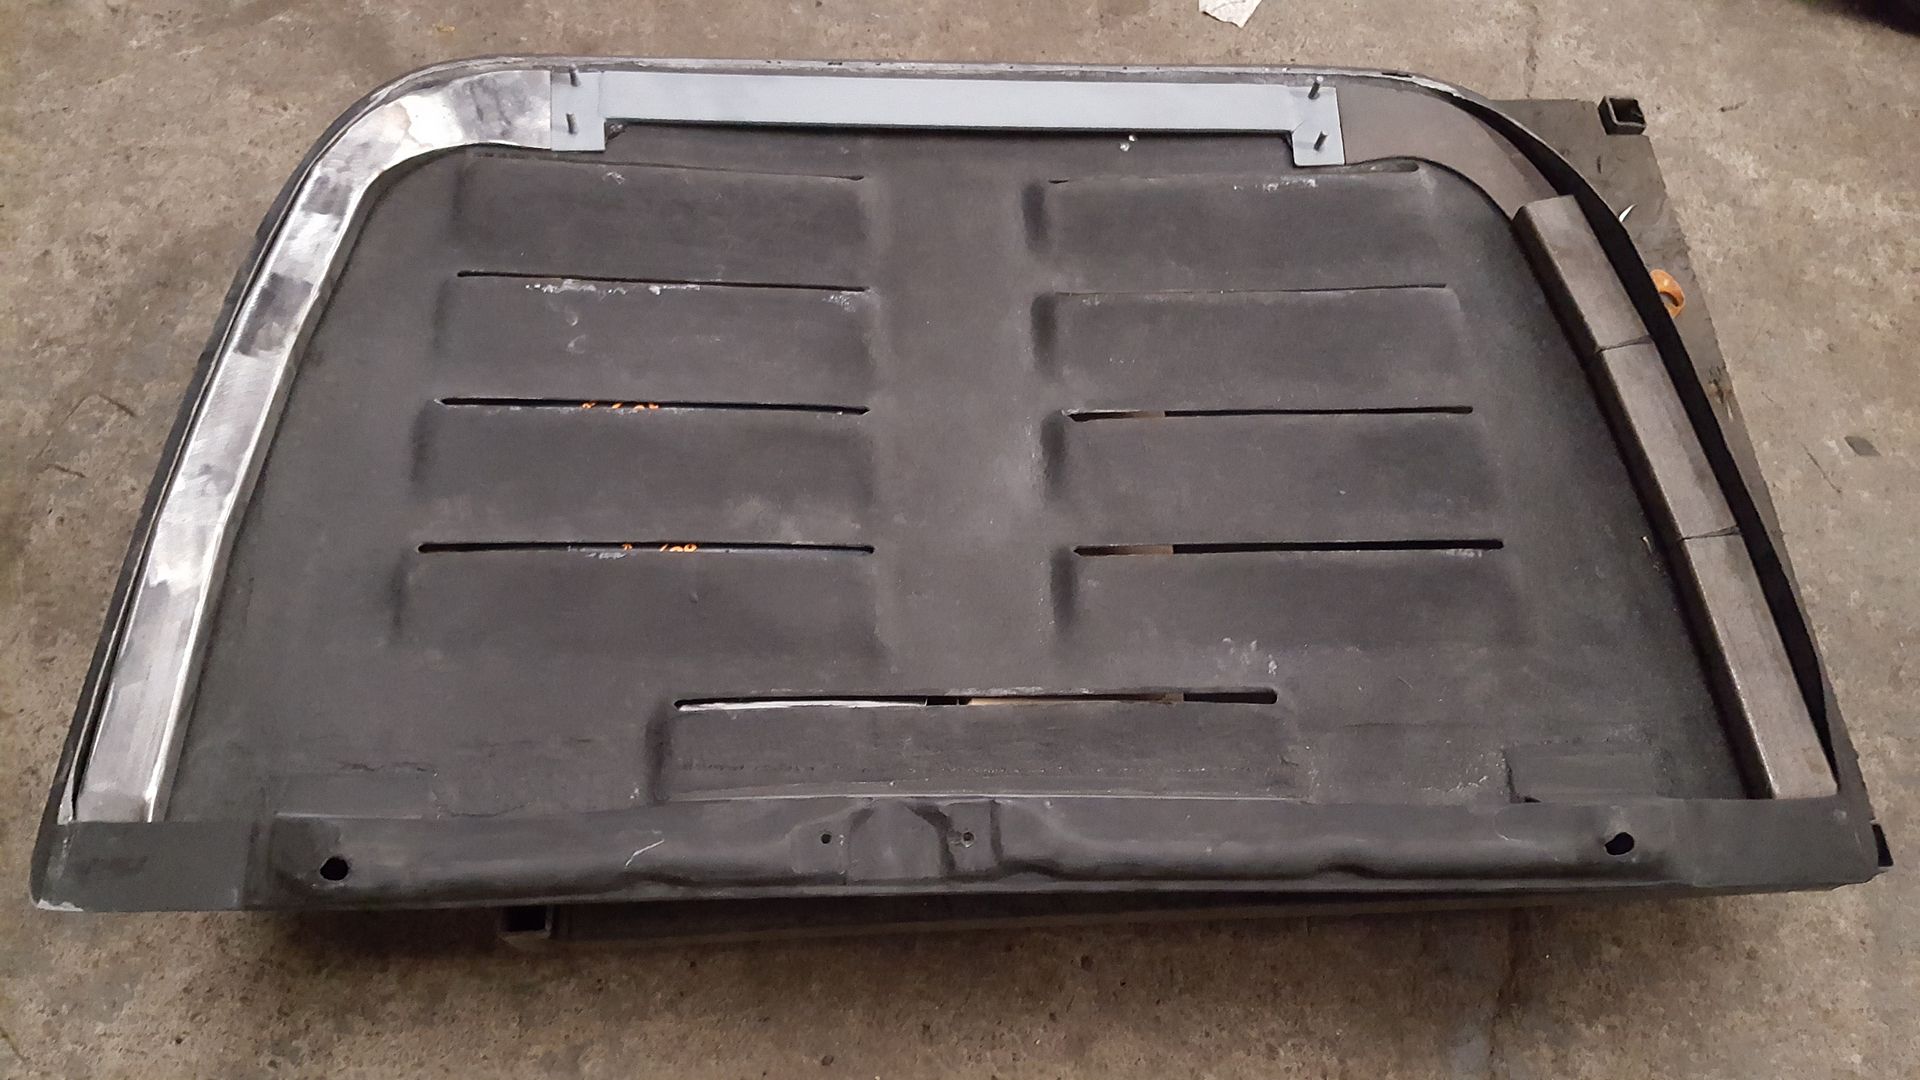
After this two gas rams will mount to the stiffened frame and it will lift effortlessly. I estimate about 20 hours work in the lid frame total.
I've put a lot of research into this and how the hinge assembly needs to work to lift the lid up and then away from the roof line.
I found a mk3 mr2 engine lid hinge was a good starting point, it has a double pivot type mechanism that pushes the lid up and away while being mounted on the engine bay side.
For now these hinges are dummy mounted on makeshift brackets, ugly at the minute but I have plans to box these in and make them as OEM as possible, excuse the dust.
Now just bolting these hinges to the lid skin is far too flimsy, the lid itself needs proper structure to it, again more like a tail gate would be, so that it cannot flex and potentially damage surrounding paintwork.
So I have started making the steel frame for the lid, this is being done with flat bar for the hinge plates and light box section for the surrounding frame.
About 3 hours fabrication went into the left side frame which will tie into a lower member.
The starting point for the right side of the lid frame.
After this two gas rams will mount to the stiffened frame and it will lift effortlessly.
Re: Mk2 2gr supercharged
A lot of work and thought has gone into this, I can see that.
Would it not be better to make the frame from aluminum to keep the weight down and thus creating less flex on the supporting structure that you are making ?
Would it not be better to make the frame from aluminum to keep the weight down
-
PW@Woodsport
- Posts: 7642
- Joined: Tue Dec 14, 2004 6:40 pm
- Location: durham
- Contact:
Re: Mk2 2gr supercharged
Yes it would have been better to make the frame itself from aluminium from a weight perspective but the hinge mounting plate needs to be steel as aluminium has a tendancy to fracture under stress/flex.
I would have had a problem joining alloy to steel too, this way I can get a good weld onto the hinge plate.
I suppose there's a reason manufacturers always seem to make tail gates from steel rather than alloy, maybe cost effective?
Who knows really.
I would have had a problem joining alloy to steel too, this way I can get a good weld onto the hinge plate.
I suppose there's a reason manufacturers always seem to make tail gates from steel rather than alloy, maybe cost effective?
Who knows really.
-
PW@Woodsport
- Posts: 7642
- Joined: Tue Dec 14, 2004 6:40 pm
- Location: durham
- Contact:
Re: Mk2 2gr supercharged
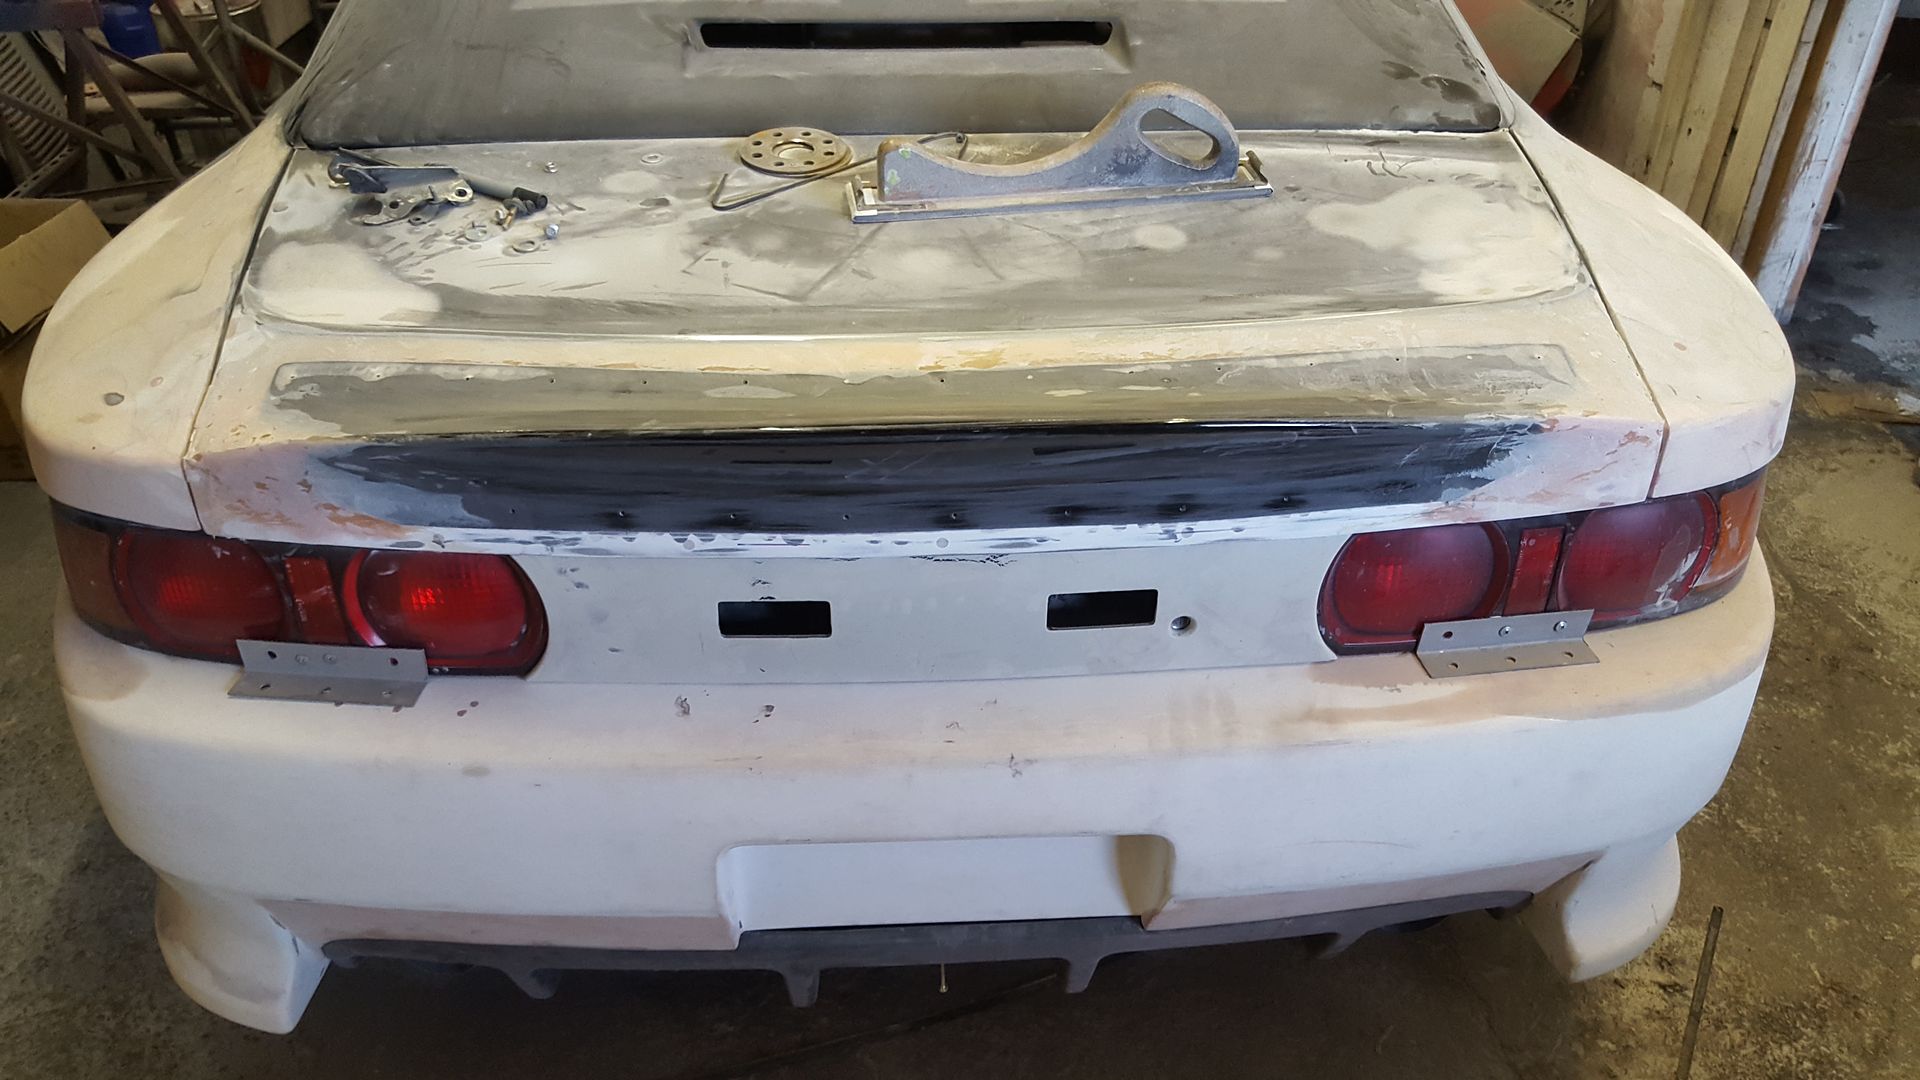
So we got the final version of the extended quarter panel shape done and mocked up the top edge shape, it looks pretty good.
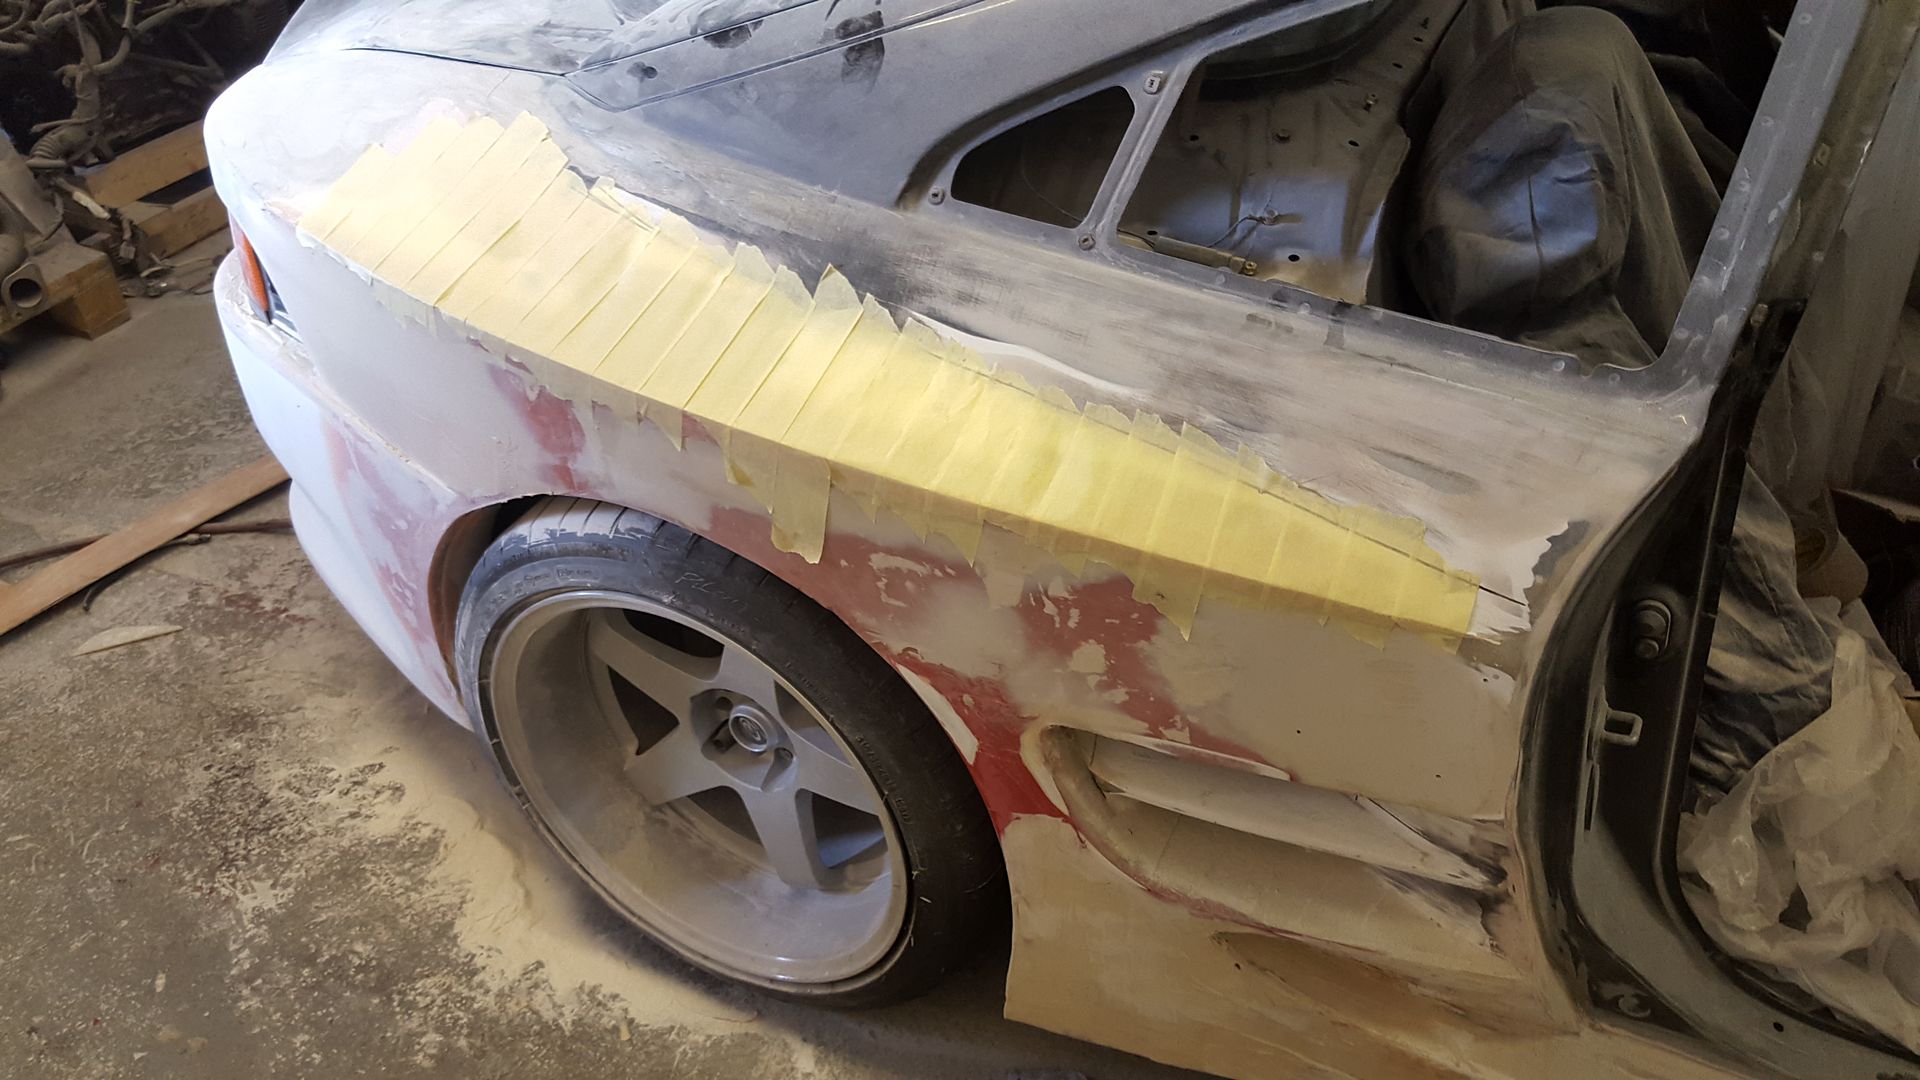
Exactly 25mm wider than a regular TRD.
The TRD duck tail is now finished...
Work has started on extending the front wings which will have a curved profile rather than the TRD slab sided styling, so yeah it's totally bespoke now.
Lots still to do, I've also down sized the tyres from 335 to 315 on the rear, which has sorted the profile out.
Exactly 25mm wider than a regular TRD.
The TRD duck tail is now finished.
Work has started on extending the front wings which will have a curved profile rather than the TRD slab sided styling, so yeah it's totally bespoke now.
Lots still to do, I've also down sized the tyres from 335 to 315 on the rear, which has sorted the profile out.
Re: Mk2 2gr supercharged
This is in no way a criticism, but maybe you are subconsciously using styling cues from the Venturi 400 Trophy. Anyway, I am enjoying the project. Keep it up.
https://www.google.ie/search?q=venturi+ ... oQzimQFTwM:
https://www.google.ie/search?q=venturi+ ... oQzimQFTwM:
-
PW@Woodsport
- Posts: 7642
- Joined: Tue Dec 14, 2004 6:40 pm
- Location: durham
- Contact:
Re: Mk2 2gr supercharged
Oh nice, that actually has some very nice styling going on, especially like the door/rear quarters vent.
Set me off thinking about it now....
Set me off thinking about it now.
Re: Mk2 2gr supercharged
I told you son not to think on a empty head.
Must admit that Venturi 400 does look sexy as.
Must admit that Venturi 400 does look sexy as.
-
PW@Woodsport
- Posts: 7642
- Joined: Tue Dec 14, 2004 6:40 pm
- Location: durham
- Contact:
Re: Mk2 2gr supercharged
So browsing the web I found someone who has already done what I am doing by extending the TRD to make a super widebody.
I have to say I love the look, I won't be extending the sideskirts outboard like they have done, but it's the same look on the wings and quarter panels...
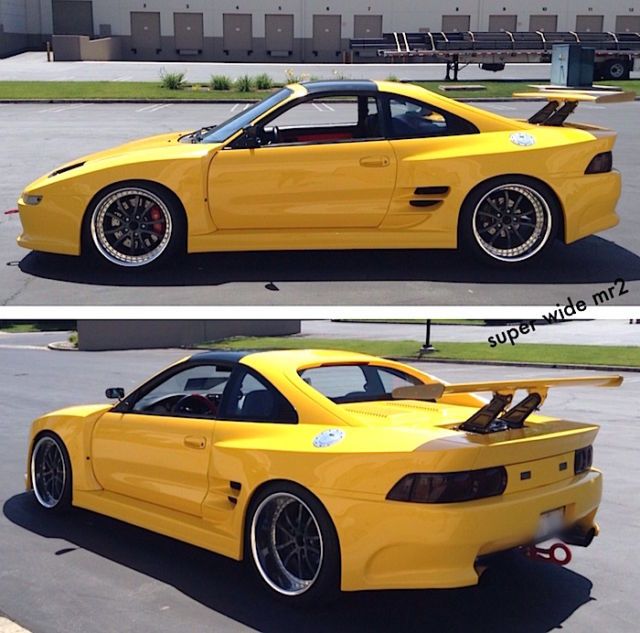
I have to say I love the look, I won't be extending the sideskirts outboard like they have done, but it's the same look on the wings and quarter panels.
Re: Mk2 2gr supercharged
It looks good. I actually like the side skirts extended, it "joins" the extended front and rear.
I would be tempted to give the rear of front wings air ducts F40 style. It would help wheel arch air flow.
I'm not usually a fan of yellow cars, but I like this colour.
I would be tempted to give the rear of front wings air ducts F40 style.
I'm not usually a fan of yellow cars, but I like this colour.
-
PW@Woodsport
- Posts: 7642
- Joined: Tue Dec 14, 2004 6:40 pm
- Location: durham
- Contact:
Re: Mk2 2gr supercharged
Air ducts on the front wings was always a consideration, but I'd put off doing it, I think you're right though it might be better with them cut out.
Re: Mk2 2gr supercharged
God these uber-widebody TRD MR2's are sooooooo common
-
PW@Woodsport
- Posts: 7642
- Joined: Tue Dec 14, 2004 6:40 pm
- Location: durham
- Contact:
-
PW@Woodsport
- Posts: 7642
- Joined: Tue Dec 14, 2004 6:40 pm
- Location: durham
- Contact:
Re: Mk2 2gr supercharged
So busy with customers cars I just haven't had a chance to go near the car in the last month, hopefully get a chance to work on it soon.